Friday, July 30, 2021

CAS-ual Fridays - Sponsored by Coffee!


I'm up on the blog over at CAS-ual Fridays Stamps using this one using the new Partly Cloudy stencil along with bunches of other stuff available in the shop!


Hope you'll hop on over there and join me for details and links!

Thanks so much for stopping by and hope you'll come again soon!


You Inspire Me - Miss Ink Stamps


Have you seen all of the new sets over at Miss Ink??  This is one of my faves (besides Slim of course)... Blooming Brushes is the name and inspiration is the game.  It's got beautiful florals... paint brushes... paint drips, fabulous sentiments and lots of options.


I used the Heirloom Blooms stencil for the background.  This set has lots of beautiful images and sentiments.  Thanks so much for stopping!  Hope you'll be back again soon!


Tuesday, July 27, 2021

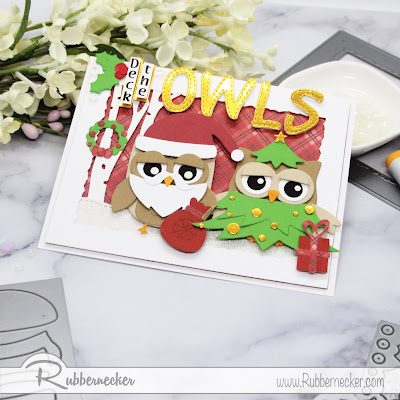
Deck The Owls - Rubbernecker Stamps


I've got some fun for you today!  I've used these adorable owls from Rubbernecker Stamps along with the Christmas Add-On set!  They are so much fun to dress up!


You'll find lots more photos along with details of how I put this one together up on the Rubbernecker Blog here!

Also, I'm playing along at the BYSH Cardmakers Christmas In July Linky Party (you have a couple more days), Double Trouble Challenge Blog's Christmas In July Challenge and Heart2Heart challenges Christmas in July!  You should start your Christmas cards and play along too!  It's a win win!


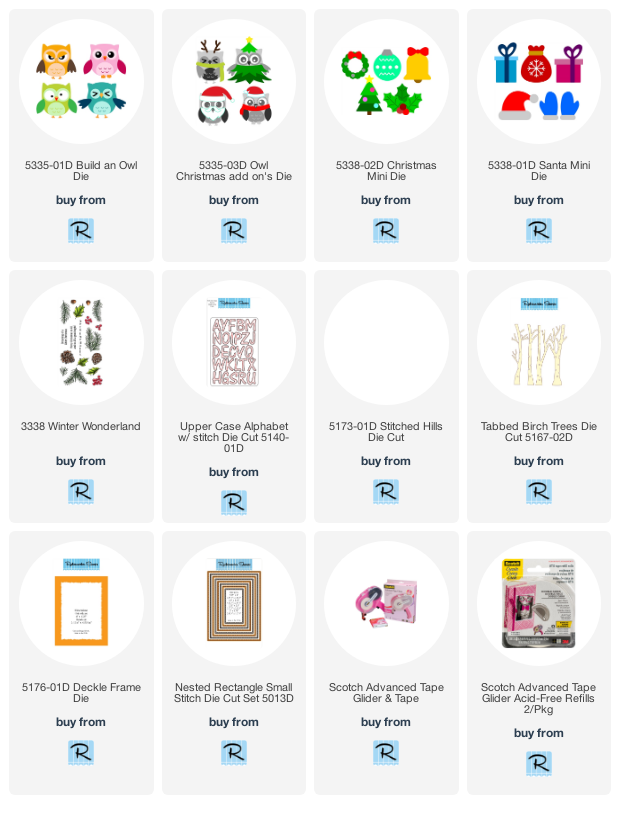
Below are links to the products I've used for today's card!  Should you purchase using these links I will receive a small compensation at no additional cost to you... and thank you!! 

Monday, July 26, 2021

CAS-ual Fridays Stencil Release - Falling Leaves Stencil


Welcome back for the final day of New Release Inspiration at CAS-ual Fridays Stamps!  Today we're sharing projects using the Falling Leaves Stencil!


I decided to create a Fall-ish card using a panel cut from a gel print background.  I used the stencil to apply some gold texture paste.  I cleaned the stencil and dried it and then placed it back over the gel and pressed on some Flower Soft in autumn colors, pressing it into the gel and then I added some glitter in an autumn orange.  I pressed them both in slightly and then let it dry.  Once dry, I used a stiff paintbrush to remove the excess.


Finally the Big Thanks Duo was the perfect sentiment... in gold and brown.

Thanks so much for stopping!  Hope you'll come again soon!

Now be sure hop on over to the CAS-ual Fridays Stamps Blog to see what everyone has created for you using this fabulous stencil!


A Jillian Vance Design - Enjoy the Beauty


I'm up on the blog over at A Jillian Vance Design with this one!  I hope you'll join me over there for links and details!


I'm also playing along with a couple Christmas In July challenges going on right now!

There is a fun hop and Linky Party going on over at the Build Your Stash Holiday Cardmakers!  Lots of sponsors and prizes and you have until the 30th to link up!  Just create a Christmas Card and link it up for your chance to win.  And while you're at it, don't forget about their Facebook group and the sketch challenge they have going on over there.  I didn't use the sketch for this one, but you can!


Over at Double Trouble Challenge Blog it's also Christmas In July!  Meet the twist by using a bow on your project!  AND they're partnering with Heart2Heart Challenges this time and theme there is also Christmas In July!  For this challenge, Heart2Heart is waiving the requirement to use at least one Close To My Heart product on your project, but they'd love to see it if you do!  I have a bow AND I have used a CTMH product.. that fun gold gem is an oldie but a goodie and still one of my favorite embellishments.


Thanks so much for stopping and I hope you'll come again soon!


Sunday, July 25, 2021

CAS-ual Fridays Stencil Release - Partly Cloudy Stencil


Welcome back for more CAS-ual Fridays New Release!  Today we're sharing with you projects made with the new Partly Cloudy Stencil!


I created the rainbows by doing all of the yellow first, moving the stencil around the panel.  I washed it off and then did the pink, overlapping some of the yellow.  I washed it off one more time and went back around with the yellow.  It was super easy to line them up.  I did cover some of the other openings in the stencil just to be sure... I tend to get messy.


I blended a sun and fussy cut it out and then stamped the flowers from the Sassy Smiles Duo stamp set in the pink, yellow and an orange melon color.  Then I popped the sun and die cut the Smile word and background and popped that up too.  Finally I stamped and heat embossed one of the sentiments from the set and popped it up underneath the word die.

That's me for today!  I hope you enjoyed it!  Now be sure to head on over to the CAS-ual Fridays Stamps Blog and see what everyone has created for you today!

Be sure to come again tomorrow for more New Release Inspiration!


Saturday, July 24, 2021

Crafty Elves Countdown To Christmas-July 2021 Edition With Angie Blom!


Yay!  It's the 25th of the month and time for the Crafty Elves to share the Christmas cards we've been working on this month!

So excited because this month we have a special guest!  The wonderfully talented Angie Blom is joining our little hop this month!  We're using some of the fabulous images from the Angie Blom Digital Designs Shop!  (Psst!  Big sale going on over there on all Christmas sets!  Check them out here!  And when you visit the post over there for today be sure to wish Angie the most wonderful of birthdays!

Without further ado, here is how I was inspired:


I started with the fabulous Unique Flakes set!  I printed the Snowflake Printout on my laser printer and ran it through my Minc with some beautiful Amethyst Watercolor Deco Foil.


Didn't that turn out gorgeous!  And the cool thing is after you apply foil to a project you're left with a negative sheet where the open spaces are the shapes you just foiled and there's lots of foil left on the in between spaces.


I discovered accidentally, that foil will stick to an acrylic paint background when run through the Minc.   I grabbed a die cut panel that I had previously created with my Gel press and sprayed on some Ranger Distress Resist Spray pretty heavily and let it dry.  Although my experience is that the foil will stick to the gel press background, it isn't necessarily full coverage so I'm not sure if it depends on how many layers are in an area or not and I wanted to be sure I'd have enough coverage.  After it was dry, I was able to lay the negative sheet from my first snowflake background over the top and run it through my Minc... It turned out extra shiny because of the Distress Spray and I'm very happy with it.

For these two with those gorgeous background I just added a nice big sentiment.  I decided on the darker one to add some snowflakes sticking out from underneath to brighten it up a bit.

I love how these both came out!


Next I printed another panel and foiled it in some Glass Slipper Deco Foil.  This has turned out to be one of my very favorite Deco Foils... the colors in it are just SO beautiful!  I used the Merry & Bright Mug for this one.  I printed the sentiment right on the mug and added a snowflake and frame from Paper Smooches for a quick and simple card!


And here are the colors I used for my mug!


I decided to take the opportunity to make a pretty flat card.  Because this image was SO cute and was so much fun to color I felt that it was just right as it is!  This Elves set is adorable and that cute punny sentiment!!  I just printed both together as is and die cut them with a Mini Slimline die from A Jillian Vance Design! I just added a few sequins and that's really all it needed.

With these adorable little elves, I'm playing along with the current challenge over at Double Trouble Challenge Blog, Christmas In July!  And I have a bow on this one so I've met the twist.  Also, they are partnering with Heart2Heart challenges Christmas In July Challenge who is waiving their usual requirement to use CTMH products for this one, so easy to play along with both!


I used ALL of these colors for this one because I had three different skin tones and three different hair colors... so lots of E's.  


And finally this one!  I absolutely love this tall, thin Santa perfect for a slimline from the Let's Be Merry digital set.  I was going to make him flat as well, but I decided to fussy cut him and the sentiment after I printed them and used a gel press background.  I added a few dots using the new Snowflake Stencil from CAS-ual Fridays and some Thermoweb Deco Foil Blanco Transfer Gel.  The slimline base was cut using a Slimline Die from Rubbernecker Stamps.

I popped up Santa and for the sentiment, I cut a Snowflake from AJVD from white glitter paper and twice more from white cardstock and stacked them together... adhered it to the top of the Slimline and then popped the fussy cut sentiment over it.


And the few colors I used on this one!

That's me for today!  Now be sure that you hop this very short hop and check out what my fellow Crafty Elves have been up to this month:


Also, there's a fun Christmas In July Hop/Linky Party going on over at BYSH Cardmakers Blog!  With some fabulous sponsors (including the illustrious Angie Blom) and lots of inspiration you should play along too!  And be sure to join the Build Your Stash Holiday Cardmakers group over on Facebook for year round Christmas Card inspiration!  I'm linking up Santa for a chance to win!  Hop you play along and good luck!


But don't leave yet!!  I have a winner from last month!


Lori!  Send me your snail mail address so I can get some Happy Mail out to you!

Thanks so much to everyone who stopped by in June to leave me some love and we'll play again this month!  This month I'm also going to offer a $10 gift code to the Angie Blom Digital Designs shop to the winner!

Thanks so much to everyone who stopped by!


CAS-ual Fridays Stencil Release - Jewish Stars Stencil!


Welcome back!  It's Day 2 of Stencil Release over at CAS-ual Fridays Stamps!  Today we're sharing projects using the new Jewish Stars Stencil!


I used the stencil to create a strip of stars by applying some Deco Foil Transfer Gel through the stencil and when it was dry running it through the Minc with some pink Deco Foil.


Then I cut the Star of David from pink cardstock with the smaller star placed inside the large star and then adhered all of the pieces in place for an inlaid look and popped it up onto the card.

I embossed the sentiments from the Mazel Tov Stamps and fussy cut the Mazel Tov! sentiment and popped it up over the star and cut the "Be Blessed" sentiment into a strip and popped it up on the bottom.


Miss Ink Stamps Release Day - Thank You Very Much!


Welcome back!  It's Release Day over at Miss Ink Stamps!  I've used the fun new Thank You Very Much stamp set!


This little Elvis Gnome is adorable!  With his curled lip and all!  And he just wants to say Thank you!  Thank You Very Much!

I created the fun Spotlight background using the Sunburst and Sparkles Stencils.  I used a couple different Distress Oxide Inks and turned the stencil a bit each time.  Then I added some Glitter Gel through the Sparkles stencil.


Adorable, right??  Be sure to head on over to Instagram to the Miss Ink Stamps Account for a chance to win and for links to everyone's projects for today!


Friday, July 23, 2021

CAS-ual Fridays Stencil Release - Snowflake Stencil


Today is the start of a new stencil release over at CAS-ual Fridays Stamps!  We're sharing projects using the new Snowflake Stencil!

I started this one by blending some Broken China and Tumbled Glass inks onto a panel cut with the Pinked Slimline die.  Then I applied Blanco Transfer Gel through the snowflakes and set it aside to dry.


I cut the Merry Christmas from white glitter paper and twice more from white cardstock and stacked them together with glue.  I mounted it onto an oval panel.  When the gel was dry, I laid some flock over it and ran it through my Minc.  Finally I popped the sentiment panel over the top in the center of the slimline and added a few sequins.

That's me for today!  I hope you enjoyed it!

Now be sure to head on over to the CAS-ual Fridays Stamps Blog to see what everyone has created for you!  And be sure to come back tomorrow for more New Release!


Thursday, July 22, 2021

Miss Ink Stamps Release Sneak - Slim's Whims!


I am so excited!  Today I'm sharing sneaks of a new stamp set that will be available in the Miss Ink Stamps shop on Saturday and it's a really special set because My very own good boy, Slim was the inspiration!


I believe this was the photo that did the inspiring... I mean... of course it did!  Do you see that face??


I LOVE this set!  I love that all of the stamps are separate and you have so many choices of combinations or you can just use Slim all on his own!


He's a goof ball....


Or he can be very fancy and thoughtful.

And... you may say...but dogs don't wear glasses....


Says you!

That's me for today!  Be sure to head on over to Instagram to the Miss Ink Stamps account for a chance to win and you'll find links to my teamies' projects for today!