Saturday, November 30, 2019

Crazy 4 Challenges C4C513 - Inspiration Photo

I've had this much fun this month hanging out with the ladies over at the Crazy 4 Challenges Blog!  Thanks to them for having me!

This week we have an Inspiration Photo for you:
When I first saw this photo I thought of rain...and then I realized that the glow from that big beautiful yellow umbrella was really what drew my eye.  Here's how I was inspired:


I do love that steely gray background in the photo and it made me think of this Foil from Brutus Monroe.  I used the Jitters stencil from Miss Ink to apply some Deco Foil Transfer Gel to my cardstock panel and then ran it through my Minc with the Foil.  With the flecks of black, silver, and gold and the vertical lines of the stencil I got the feel of that background.. with a little bit of shine!


Then I pulled out the beautiful Gardenia stamp set from Miss Ink and decided although probably you don't see yellow Gardenias usually, in this craft world of mine, why not??  I needed to recreate that beautiful hopeful glow of the yellow umbrella so I did.  I chose to further highlight it using this circle frame from MFT to create a shaker and I had the perfect mix (I believe it's an old CDD mix).  It had the silver, black and yellow (including yellow flowers!) in it as if it was made for this card.

And I decided this would be a happy card.. it's a congrats for anything!  Maybe an anniversary?  Or really any occasion worth celebrating.  That Woot! from the Everyday Sentiments set... just HAD to use it!


And then a Congratulations and another flower at the top along with a few more sequins.


So there you have it!   How are you inspired by that photo?  I can't wait to see what you create!

Thanks for stopping and hope you'll come back soon!


Friday, November 29, 2019

Snowman Fun With Trinity Stamps!


Excited to be guesting up on the Trinity Blog one more time this month!  Today I've used the new Tall Shaker Dome Die Set along with the adorable Snowman Border Builder die set to create this little snow globe scene!

I love how this Dome die is tall and leaves a bit more room to do some really cool stuff.. it includes some sweet snow landscapes so it was easy to create a few layers of snowy hills.


I love to use white glitter paper for my snowy bits on a card... I don't have snow where I am here in Sunny AZ, however I do hail from the Western NY area (think Buffalo) so I know how pretty snow can be when it sparkles in the sun!  (If only it wasn't also SO cold!).  I cut the dome and base pieces from gold metallic mirror cardstock and the inside back layer from some cloud design paper.

I added the buildings, tree, and fence that come in the Dome set way up on the hill and in front... a couple of those adorable snow dudes!  I love these guys!!  I always cut extra parts/pieces when I cut them and have them all saved in a little clear bag for future use.  My fine tweezers come in so handy for all of these small die cut pieces.

I couldn't help but add a little string of lights from the Gingerbread House set.  I LOVE these lights...lol!  I should just stamp and die cut hundreds of them to add to every card I make!  I added little dots of Glossy Accents to each bulb.


Another must have in my craft room is the Merry Christmas Senti-Mini Die Set... used alone or with the included background piece and with or without the coordinating stamp set... it's a fantastic set!


I finished it off with some gold/white twine, a snowflake from the I'm Dreaming of a White Christmas Embellishment Mix and my new very favorite sequins, Soapy Bubbles (very few cards make it out of my craft room these days without a few of these on it).

I'm playing along with Anything Goes over at Simon Says Stamps Wednesday Challenge!  Also playing along at Double Trouble with Bring On The Glitz and Snowmen and Cupcake Inspirations Snowman Challenge!  Also playing along again at the Simon Says Stamps IG Challenge #SSSIGCHALLENGE!


So thank you so much for visiting me here today!!  And huge thanks to the ladies at Trinity for having me this month!  I've had so much fun and they've been so great to create with!  Thank you thank you!!

Come back soon!

Thursday, November 28, 2019

A Special Freebie for a Happy Thanksgiving with CAS-ual Fridays Stamps!

Welcome back and Happy Happy Thanksgiving!  I hope you are having a chance to spend time with friends and family and to reflect on all the good that is in your lives right now.  I am very grateful today for so many things including that I get to be here sharing with you today!  We've got some really great things going on here starting now!

First... a sale!!!


Awesome sale, right??  And bonus!  If you spend $55 and will get the beautiful and adorable new stamp set Snow Angel for free!


Beautiful isn't she?  I've used this set today on a tag to play along with the 25 Days of Christmas Tags challenge!


I was inspired by Mindy Eggen's tag on Day 18!  That beautiful gold embossed sentiment background got me started!  I used my favorite Scallop Tag Fri-Dies as my base.


I'll be honest... It took me three times to get the tag right...lol!  I love imperfection as much as the next guy, but I learned some things along the way.  Patience for one...lol!  For me the easiest way to do this was to stamp each line separately with Versamark, powder, and emboss and then go on to the next.  Otherwise, these eyes could not keep track of where I was stamping.  And then I would just line the next set up so that the peace was lined up approximately the same distance on each line ... so for instance... I'd place the "P" of the 2nd line somewhere around the "C" and "E" on the one above it.  Don't check... I said approximately...lol!  AND!  Don't forget to swipe over the tag before you start with an antistatic pad... I only did it once the first time and that seemed to do the trick... although I never mind a little stray powder here and there.


I'm also playing along with the Wow Embossing Powder December Challenge on Facebook to use Gold!  I think I've done that here!  I used the Gold Metallic Embossing Powder.

I just love this sweet angel stamp and the oh so sweet sentiments included in it.  You can get her free with an order of $55 or you can buy her separately... or both during the sale!

AND even better there is a brand new Coffee sentiment set available!  Meet Stay Strong:


I used one of the sentiments on this card over this cool background I made using the Tin Roof Stencil, some embossing paste and some embossing powder!  Have you ever used embossing powder over embossing paste?  I love the extra dimension it gives to the embossed parts!  Here's how I do it:


When I use this technique, I like to start with Mixed Media paper because it's a little heavier and the combo of the paste with the heat embossing can really curl regular cardstock... plus sometimes I like to add other medium as well, so (if I remember) I usually start with this kind of paper.


I die cut my panel with a rectangle die from my stash.  Then I place it on a scrap paper because I tend to make quite the mess!  It's also easiest for me if I place some masking tape around the stencil to help keep it in place.  If I'm covering the entire panel, I keep the tape off the edge of where the paper is, but the tape still helps to hold it in place.  Then  I used my spatula to apply the embossing paste to the panel through the stencil.  And finally my new best friend when using any kind of paste with stencils is the Stencil Pal with it's long straight edge for smoothing out the past and it floats over the entire panel.


When you remove the stencil you're left with this...so pretty all by itself, right?  But while it's wet, you can if you wish sprinkle some embossing powder over it....


I used the Wow Vintage Peacock and it's sooooo pretty!  I thought it would be perfect for my Emotional Support Beverage sentiment.  My favorite part I couldn't capture, but when you heat this it's so fun to watch it change.  It bubbles just a bit as it sets and then you can watch the magic happen as more of your colors come out of that beautiful powder.


So not only do you have that cool sparkly embossing, but it's raised a bit too because of the paste.  I love it!!  To finish my card, I die cut my Coffee Cup and hearts from the Heart Board Fri-Dies out of Copic friendly paper and colored them using some colors that coordinated with the background.  I love the kind of tie-dyed look!


My coffee really does understand and love me.


So that's me for today!  I hope you enjoyed your stop and if you're inspired and ready to shop the sale I have something extra for you!


You can use my code or any of the Girl Fridays' codes for an extra 15% off these already fantastic sale prices!!  And don't forget if you spend $55 before shipping and tax you will receive Snow Angel for free!  That sweet angel needs to come to your house.

Happy Holidays and take whatever chance you have to relax and reflect (and maybe shop a little...lol... I know I will be)!  Come back again soon!


Wednesday, November 27, 2019

Caffeine Fueled Paper Play Reminder With A Jillian Vance Design


Just a quick reminder that you have through the end of the month to play along over at the Coffee Loving Cardmakers with the Caffeine Fueled Paper Play Challenge for November!  A Jillian Vance Design is the sponsor and you could win the new Hug In A Mug stamp set!

I used one of the sentiments from the set along with the dies from the Coffee, Tea & Me set:


I started with that fantastic paper from a Tim Holtz Christmas pad and kept the rest black and gold aside from my white sentiment.


Love this cup!  You can use it with or without the embellishment die.


And I can't say enough about that steam... my absolute favorite steam die!  The Coffee word die as well as a Tea word die are also included in the set.

And that sentiment from Hug In A Mug??...lol!  Just one of the many cute and funny sentiments (along with a really great cup image and seasonal images to go along with it).


So!  Hope you'll play along!   You have until the 30th at 11:55pm!  You can find the linkup and rules at this post here!

And don't forget Stampalooza is still going on... while supplies last get some great deals on some awesome products!


Thanks for stopping and come again soon!

Tuesday, November 26, 2019

Polka Dot Orchard 13 Days of Thanks Instagram Challenge!


Hello!  Did you know that Polka Dot Orchard is having a 13 Days of Thanks Challenge on Instagram that runs through November 28th?  You've got three more days (including today) to enter!  The theme is 13 Days of Thanks!

To enter:
~ 1. Post your Fall/Thanksgiving creation on Instagram
~ 2. Use #GiveThanksPDO1119
~ 3. Say something you are thankful for
~ 4. Follow Polka Dot Orchard on Instagram
I've got some inspiration for you today using a new digital set from the Polka Dot Orchard, Let's Get Basted:


Cute digi, right?  This adorable set has this image and a couple different sentiments.


He was so fun to color!... him with his little baster...lol!


Love this cute sentiment!

You can find all of the details for the challenge at the Polka Dot Orchard Blog here as well as a freebie and a sale!
You do not have to use Polka Dot Orchard products to win, but we'd love it if you do!  And your prize is bigger if you win and you've used an image from Polka Dot Orchard!  Hope you'll join us and I can't wait to see what you create!
Thanks for stopping!  Come again soon!

Monday, November 25, 2019

Crafty Elves' Countdown to Christmas - November 2019 Edition!


Welcome to the Crafty Elves' Countdown to Christmas!  Every 25th of the month, my friend Debra Davison from Meticulosity and I share the Christmas cards we've made during the month!  We made a pact in the beginning of the year to create at least one Christmas card a week for the year and we have stuck to it!  I have plenty of Christmas cards all ready to go... they just need to be stuffed, addressed and mailed!  (Sounds like a job for the upcoming holiday weekend).

This month I have made my quota and then some!  I normally post all of my cards for the first time on this day, however because I made so many in November, I've made one new one for today and I'll share some pics from the rest of the month with links to the posts in case you want more details!  Here's what I've made for today:


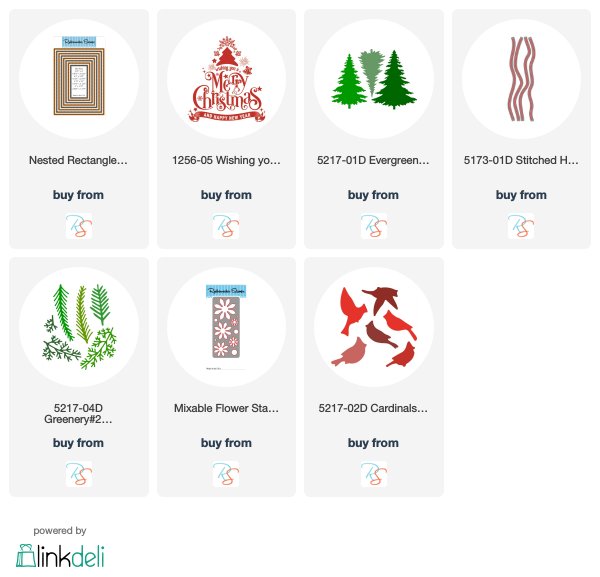
I love the new graphic sentiment stamps over at Rubbernecker stamps!  So good they can be the start of the card!  I stamped this one onto white cardstock using Gina K Red Velvet Ink.  My friend Verna made me buy this because she used it and it was so rich and ... well... velvety... I had to try it and I love it!  I used my Misti to be sure to get a good impression.


I added a little Distress Ink in Antique Linen to the sentiment panel that I cut using the stitched rectangle dies.  Seemed like the right thing to do with that plaid paper background (the paper is Tim Holtz and it was a vacation purchase last week!).  I added a cardinal at the top of the image because it just seemed to go... I think it almost feels like part of the stamped image!

I created a backdrop using the Evergreen Tree dies in black.


And then these lovely greenery dies were perfect in a spray behind the layered white flower.  Although it's not a poinsettia, I meant to give the feel of one.  I also used some of the Antique Linen distress ink on the flower layers and popped a pretty gold sparkly bling in the center.


To finish it off I just sprinkled a few more gems and sequins around.  I like the vintagey look this one has!  I've included links to all of the Rubbernecker products I used on this one at the bottom of this post.

And now for some more of the Christmas cards I created this month:

Here's a fun one using a stamp from The Rabbit Hole Designs that I posted during the Coffee Lovers Hop:


I had three in this post when I was a guestie with Trinity Stamps for their release... but I'm pretty sure this one was my favorite:


I absolutely love this one for Miss Ink ... also posted during the Coffee Hop...lol!


And then this guy for A Jillian Vance Design:


There were LOTS more this month and I won't make those of you who come here a lot suffer any longer, but these are just a few of my faves!

Now!  Let's see who won the Happy Mail from last month!


Pineconelass please PM me your snail mail address!

We're doing it again!  For my December post, I'll pick someone from all of the comments you leave here to receive some Happy mail from me!

That's me for today!  I hope you enjoyed your stop and will come again real soon!  Be sure to head on over to Debra's place and see what she's created for you today!


I've included links below to all of the Rubbernecker products I used today.  If you shop through these links, I will receive a small compensation at no additional cost to you.  And thank you!

Saturday, November 23, 2019

25 Days of Christmas Tags with A Jillian Vance Design!


It's A Jillian Vance Design's turn over at the 25 Days of Christmas Tags Event!  It's a month long celebration of the Christmas Tag!  Lots of sponsors are taking turns on the blog and sharing tags made with their products.  You can have chances to win prizes by commenting or playing along!  To play along just choose a tag from any of the Sponsor posts that inspires you and create yours with inspiration from that.  Link it up and share whose tag you were inspired by and from what day!

Here's mine for today:


I started with the Minnie Pearl Tag die set and cut both the larger and smaller tag from Kraft.  Then I stamped snowflakes onto the large tag from the Let It Snow and Jingle All The Way stamp sets in Versamark and embossed with Wow Gold Embossing Powder.  I added some Nuvo drops in white randomly in between the gold snowflakes because I knew I wanted to stamp my sentiment from Jingle All The Way in white onto the smaller tag and it would help to bring the two together.


And this Jingle Bell die set!!  You need this in your life!  I used the largest of the bells cut from gold foiled paper.  I also cut a couple branches from the Fresh Cut Pine die set and layered it all together.  While trying to decide on glitter Jingle Bells or foil Jingle Bells, I ended up with some glittery stars that made a nice little embellishment and some extra bows.  All it took was some baker's twine with gold in it to finish it off!

So that's me!  Hope you enjoyed it!  Be sure to head on over to the 25 Days of Christmas Tags post for today and check out what everyone else has created with some beautiful A Jillian Vance Design products!  Hope you'll play along and can't wait to see how you were inspired!

Check out all of these sponsors!


 And over at A Jillian Vance Design there is a huge sale going on!  Don't miss out!!


Come again soon!