Showing posts with label Shaving Cream. Show all posts

Friday, December 7, 2018

Fall/Winter 2018 Coffee Lovers Blog Hop-Last Day (Wah)


So!  Here we are!  Tears are flowing like a river in my crafty space.  It's the very last day of this hop and I am SO not ready to say goodbye!  So many things I haven't gotten to yet that I planned.  Don't worry (I know you are...lol)!  I'm going to continue on with my plans (including a giveaway) through the holidays!   This will more than likely be my last project for the hop unless I find some time this evening before time runs out.  If someone could just speak with my many bosses (I have a lot) and explain to them why this is much more important than whatever is going on at the office???

Anyway, for now, I knew I couldn't let the hop come and go without sharing something using this fantastic Dare2BArtzy Perfect Blend Stamp Set and Mug Die that I won from them a short while ago!   I have had this set on my wish list for a long time so I was very excited to give it a home in my home!  Here's how I was inspired:


Oh my garsh!  So much going on with this one, but I am SO excited about how it came together!  I started by cutting my base using some fantastic dies from Super Sponsor Elizabeth Crafts Designs.  The Fishtail Dies are such a great handy set and I love using it to create a nice Fishtail Banner shaped card!  For the white base, I just folded some cardstock and then used the largest die in the set to cut it out, begin sure to place the top of the die just beyond the folded edge of the cardstock so that part wouldn't cut.  Then I used the next smallest die to cut my first layer from a background made by embossing over a shaving cream background with a few different embossing powders.  I took my shaving cream background paper and swiped versamark all over it.  Then I sprinkled lightly a smackeral of Gold Glitter and Glitter Snow WOW embossing powder in random spots and then a good covering of clear and heated it.  One of my fave techniques for wintery cards!


I cut the Stitched Dot Instant Photo Frame Die from A Jillian Vance Design from white glitter paper and one from vellum and added them as a base for my focal point.  I stamped the awesome To Go Cup from the Dare2BArtzy set once on regular cardstock and then took some Yupo Paper and added some pinks and blues and blending solution.  When it was dry, I stamped the cup on that as well and then pieced some of the alcohol inked pieces onto the cardstock up and covered the rest with some beads using Liquid Glass as my adhesive.


I cut the steam from glitter paper using the steam die from the Mug Die Set from D2BA... LOVE that die!  I popped up the cup and added the steam with adhesive only at the bottom so that it would be free to look a little floaty.

Can we talk about those Funky Flakes dies from CAS-ual Fridays?? (Psst... they're on sale RIGHT NOW).   I cut some out of purple vellum and added some clear sequins from Pretty Pink Posh.


Stamped one of the great sentiments from the Perfect Blend set with versamark and heat embossed with some more Gold Glitter embossing powder from Wow-fussy cut it out and popped it up as well.  (Have I told you lately how much I love the popup tape I won from Super Sponsor Scrapbook Adhesives by 3L??-can never have too much!)


I think I've covered it all!  Now!  I'm playing along with some challenges (surprised?)...lol!  Dare2B Artzy has a challenge going on right now and it's all about Winter!  I'm also entering this into the WOW Embossing Powder Fans Group Challenge that is Gold and Silver... I've got the gold covered anyway!  Just join the group and add your project to the folder for the challenge!  And of course I'm linking up to the Coffee Lovers Blog Hop (Sniff).  And you should too!  You have until the end of the day to play along!  And don't forget that Three Amigos and Double Trouble Challenges are collaborating!  Get extra chances at Double Trouble for playing along with both AND the Coffee Lovers Hop!  I've done lots of embossing and I have Snowflakes so I'm linking up at Double Trouble... check them out here!

Thanks for stopping!  I'll be hopping along over the Coffee Lovers Hop tonight and throughout the weekend so if I haven't seen you yet at your place, I'll see you soon!  Thank you so much for all of the love over this past week and always!  I so LOVE to hear from everyone!

Happy Day!


Thursday, November 22, 2018

Casual Fridays-An Old Technique With A Twist


So glad you are here!  Today I'm up on the Cas-ual Fridays Blog and I'm showing you how I made this cool shaving cream background!  And after we'll talk about that tag!


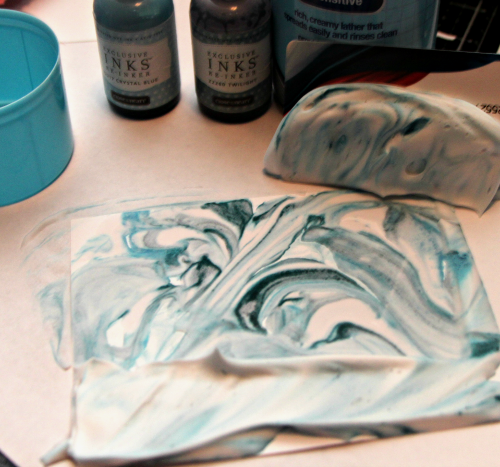
Some of you may already be familiar with this type of background and it may be new to some of you.  I just learned it last year and it's quick and easy and just a little bit messy!  You'll need some shaving cream (dollar store is just fine), some water based re-inkers (I just used my old CTMH ones), a paper plate (or a plastic one like I have here which would be re-usable), an old credit card, some paper (a bunch of white 5 1/2 x 4 1/4" sized pieces are just right), and also a plastic knife which isn't in the picture.  You'll want to have some paper underneath you too because as I said... little bit messy!


First you just spray a big blob of shaving cream onto your plate.  Then drop some of the reinker around into the blob... I had two different shades of blue so I made sure to make my drops in kind of a random pattern, interspersing the two shades.


Then you will use the knife to move the shaving cream around... "fold" in the inks.  You don't want to mix them together too much unless of course you want less contrast and swirl... but you'll see you can make multiples from this and as you go there is less and less contrast so you get a fun and varied set of backgrounds.


Next, lay your piece of paper on top of the shaving cream blob and make sure it gets covered with the mixture.. you can move it across the top, push it down into it more than once... lift it up and smoosh it back down if you've got more open spaces than you want.  When you lift it up and it's covered, you'll need to flip it over onto your protective surface:


You'll notice here I have some blank spaces, but everything turned out ok.. you just take the credit card and holding the card firmly against the paper scrape across the paper:


And as you scrape it across to remove the shaving cream, your piece of art is revealed!  Cool right?  


I made four backgrounds with this one plate of shaving cream and probably could have made a few more!  Notice the difference between the top and bottom ones... as you work with the shaving cream, the ink will blend together more and you'll have a little less white and a little more of whatever color you've used.  Then once they're dry you can use them as they are or I gave it a twist and I smooshed Versamark over the entire top.. sprinkled some Wow Sparkling Snow Glitter Embossing Powder over the top... just a little because the stuff will pretty much cover the swirlies (ask me how I know).. and then covered the rest with some Clear Embossing Powder and heated it.  And you don't have to use these as just backgrounds... I have a bunch that I use with diecuts... like the leaves I used on my Autumn Shaker here!


And that's how I got that pretty sparkly swirly blue background for my card!  And you may have visited me for the CAS-Fridays day over at 25 Days of Christmas Tags when I told you I made a 2nd tag inspired by Jane Taylor's beautiful tag because I wasn't able to use the snow mounds I'd created on my tag for that day... so here it is!  I used the Scalloped Tag Fri-Dies (to cover the scallops on the tag) and the Bubble Box Fri-Dies (to create my snow mounds).


I colored up these sweet fox from the Bushy Tail stamp set and did some no line coloring... but decided to make him a gray fox this time... such a cutie!  And this time he's holding a snowflake.


And left my sentiment short and sweet.  I used the Merry word from the Merry Christmas Fri-Dies and decorated with a few snowflakes from the Funky Flakes Fri-Dies!


Originally I was going to keep this just as a tag... but I loved it so much I decided to make a card out of it and it was a great way to use that shaving cream background!

And I'm playing along with the Sparkles/Christmas challenge over at the Wow Embossing Powder Fans Group.  You must join the group to play along but you'll love it... there is lots of inspiration over there!  I'm also playing along over at Color My Heart Color Dare where they have a Monochromatic Blue challenge going on and you should check that out too!

Hope you enjoyed your visit and thanks for sticking around until the end!  See you again soon!

Don't forget about the special that is going on right now too!


So here are the details regarding this stamp set!  It will be available for purchase for $6.50 or you can get it free with a qualifying order of $50 placed November 20-26th!  Your order must total at least $50 after discounts and shipping.  No code is needed-it will automatically be added to your order when it ships!  On the 27th, the set will be offered in the shop for $7.99!  You can find this set here!  And you can check out the tag I made using this set here if you'd like!  I have a giveaway for this stamp set going on at my blog here and all of my DT sisters are doing a giveaway too!  Find links in the main 25 Days of Tags post at CAS-ual Fridays here!

Woo hoo there is a sale going on here too!  With deep discounts on retiring items and all items in the Christmas/Hanukkah section are on sale through the 26th!

And if you feel like shopping here's this for you: