Friday, May 28, 2021

Miss Ink Stamps - Hey There!


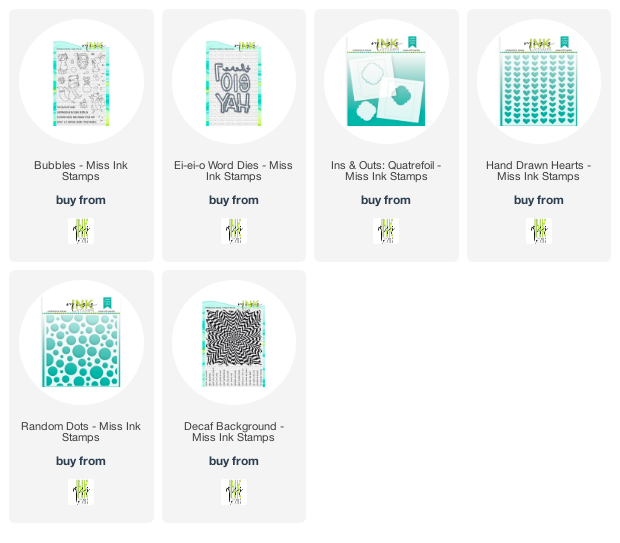
Hey there!  I've got some sweet Miss Ink Stamps for you today!  I colored all of the Bubbles critters for last week's project, but ran out of room to use all of them... and then I decided that this sweet bunny would be perfect all on his own!


I am so in love with the new Ins and Outs stencils.  I started this background by blending some ink onto the card using the Quatrefoil stencil.  Then I laid the Handrawn Hearts over the Quatrefoil stencil before removing it and added some faint hearts in that area and then removed both stencils.  Next I used the Quatrefoil Mask and covered up the already stenciled area and laid the Random Dots stencil over that.  The pink bubbles were stenciled through it while the mask protected the Sentiment area.  Finally I lifted the stencils and used the frame outline for the Ins and Outs Quatrefoil to add a frame in the same pink color.  I love how it came out!


Absolutely love the front for the EI EI O dies and also love that there are a couple different combos for the letters.  I extra love the "there" word die included in the set and it was perfect cut in black for this sentiment.  I added one of the tiny sentiments from the Decaf Background for the rest of my sentiment.  Finally I added the bunny, some bubbles and a couple hearts to finish it off!


Only a few Copics needed for this one!

Thanks so much for stopping and hope you will come again soon!


Tuesday, May 25, 2021

Crafty Elves Countdown to Christmas - May 2021 Edition


Merry Christmas!  It's that time when the Crafty Elves share the Christmas cards we made this month!  After you leave here you'll want to hop around and see Debra, Michael and our special guest Crafty Elf, Crystal and what they've created!

Here's how I was inspired:


I'm lucky to be guesting with Joy Clair Stamps this month and as soon as I saw these adorable bears in the Making Memories digital set I knew they'd be perfect for this month's Christmas Cards!


The set has three adorable bears and some cute sentiments and they are so fun to color and easy to fussy cut.  This snowflake is from Paper Smooches.


I picked my papers and then colored these cuties to match.  These are some very "vintage" papers from CTMH.  These lacy snowflakes were perfect for this one with the lacy feel.


I used my favorite stitched rectangles and photo frame from AJVD for all of today's cards.


I love this singing bear and that mini bold snowflake from AJVD.


And the sentiments were easy to cut by hand as well!  


For my last one, I created another stripey background using the Sentiment Strips from A Jillian Vance Design like my rainbow card from yesterday.  I added the Bold Snowflake and Merry & Bright sentiment for a quick and easy card (don't you love that pretty font)!


And the colors I used....

Thanks so much for stopping!  Before you leave I have a winner of some Happy Mail from last month's post:


Karen!  Email me at bzscrapper66 at gmail dot com so I can send you some Happy Mail!

We're playing again this month!  Leave me some love for your chance to win!

Thank you so much for stopping!  Don't forget to check out my fellow Crafty Elves places (links at the beginning of the post) and see what they have for you today!  And please do come again soon!


Monday, May 24, 2021

CAS-ual Fridays Stamps - Coffee Talk


I'm up on the blog over at CAS-ual Fridays Stamps making some pretty things.  Hope you'll hop on over there for links and details!

I'm playing along over at Double Trouble's current challenge, It's A You Day!  They're partnering with Stinkin' Inkers and their Girly Girl themed challenge and I'm playing along there too!  You should check them both out!


Thanks for stopping and hope you'll come again soon!


A Jillian Vance Design - A Rainbow Hello


I'm up on the blog over at A Jillian Vance Design with some stripey rainbow goodness!  Hope you'll give me a visit over there for links and details!

Thanks so much for stopping and hope you'll come again soon!


Sunday, May 23, 2021

Hello Sweet Friend!


I'm have these up on the blog over at Rubbernecker Stamps and I'm sharing some more tips about gel plate printing!   I am by far not an expert, but I'm sharing as I'm learning and hope maybe you'll give some of it a try!


Some of my favorite places to get inspiration are at Tania Ahmed IG Account, Gel Press IG Account and Gelli Arts IG Account!  With the short quick videos I find at all of these places it's always just enough to get my creative mind buzzing!


For these I created bunches of panels... some for backgrounds and some to use for diecuts!


And these bee die cuts from the shop... OMG... adorable!  I cut these from Copic friendly paper so I could color them in however I wanted.


And OMG again... these new word dies and that Build A Phrase stamp set!!!  LOVE!


And these are the Copics I used to color the bee die set pieces as I was putting them together.

If you'd like more details, please join me over there (link at the top of my post)!

Thanks so much for stopping and hope you'll come again soon!


 I've included links below to all of the Rubbernecker products I've used for this one!  Should you decide to purchase using these links, I will receive a small compensation at no additional cost to you.  And thank you!

Friday, May 21, 2021

Miss Ink Stamps - You Blow Me Away!


Welcome back!  Today I have a fun one using the Miss Ink Stamps Bubbles stamp set along with the Ins & Outs: Victorian and Random Dots stencils!


I stenciled the dots only within the Ins & Outs: Victorian stencil window similar to the card I shared last week up on the Miss Ink Blog and you can check that out here for details on how I did that.


For this one, after I blended the bubbles in blue, I added some Brutus Monroe Glitter Glaze.  When I was blending the ink through the dots stencil, I blended in a circle motion around the edges of the dots instead of trying to get a full blend to add some dimension to my dots (bubbles).  I love how it came out!


I'm having so much fun with these Ins & Outs stencils!  You know how I love frames, but these help me keep my cards a bit less bumpy... but don't worry... I'm still using plenty of foam tape...lol!


And here are the colors I used!

E's were used for the Hedgehog, larger mouse and Snail.
W's were used for the Raccoon.
YRs were for the Fox.
C's were for the smallest mouse.
BG was used on the bubbles.
Y13 and R81 was for the bubble bottles.
R02 I normally use for inside ears, paw pads, and other highlights.

That's me for today!  Hope you enjoyed it and you come back real soon!  Thanks for stopping!.


Wednesday, May 19, 2021

Sit & Stay for a Little While!


Welcome!  I'm up on the Coffee Loving Cardmakers Blog today with some fun products from Ellen Hutson and Hero Arts!


I've fallen in love with the Leading Ladies line of stamps and dies over at Ellen Hutson and I've paired one of them with that cool die from Hero Arts.  Head on over there for links and details!


Thanks again and hope you'll come again soon!


Monday, May 17, 2021

A Jillian Vance Design Beautiful Butterfly


I'm up on the blog over at A Jillian Vance Design with this one.  Hope you'll head on over there and join me for links and details!

Thanks so much for coming and come again soon!


Friday, May 14, 2021

CAS-ual Fridays Stamps - Don't Need Bail


Welcome!  I'm up on the blog over at CAS-ual Fridays Stamps!  You'll find links and details over there!

Thanks so much for stopping and hope you'll come again soon!


Miss Ink Stamps-Your Time To Shine!


Welcome back!  I've got some more Rub A Dub Doggies for you today!  This time I made a bubbly rainbow background using the Large Random Dots stencil.


These are all different doggies from yesterday's card (it's an awesome set!) and I stamped one of the sentiments from the set and then trimmed it down including cutting off the last word "shine".  Then I cut some alphas from Trinity to finish off the sentiment.  I cut them from Copic friendly paper and colored them myself so they'd be the perfect match!


I am SO in love with these pups!

And for those who want them:


Thanks so much for stopping and hope you'll come again soon!


Thursday, May 13, 2021

Miss Ink Stamps Ins And Outs


I'm up on the blog over at Miss Ink Stamps sharing some tips for the awesome new Ins & Outs Stencils in the shop!


It's so easy to create this masked scene and add a fun glittery outline!  Hope you'll join me up there for links and details!


Tuesday, May 11, 2021

Eaten By Sharks!


I've got this one on the Rubbernecker Blog and I'm sharing my process for creating that heat embossed background.  We're sharing lots of background stamp inspiration over there this month!


I've had this one rolling around in my head for a while... I love this cutie pie shark image and the sentiment is perfect for it!

The stamp stamps the entire image including the colored in parts... so I chose to stamp it in a blue and then gray over the top for that blue-grey shark color and then added some dimension using colored pencils.


I had stamped and embossed two panels using that cool Wavy Lines background stamp trying to decide which color to use, but I decided to use both!  I cut waves from the lighter color and then added some of the same embossing powder to the waves!


You'll find more details over at the Rubbernecker Blog if you'd like them!

Thanks so much for stopping and I hope you'll come again soon!


 I've included links below to all of the Rubbernecker products I've used for this one!  Should you decide to purchase using these links, I will receive a small compensation at no additional cost to you.  And thank you!

Monday, May 10, 2021

A Jillian Vance Design - Grande Words and a Gel Print Background!


I'm up on the blog over at A Jillian Vance Design with another card set made using the Beautiful Butterfly die and a Gel Print along with some other cool stuff from the shop!  Hope you'll hop over there and visit for links and details!

Thanks so much for stopping and come again soon!


Friday, May 7, 2021

Miss Ink Stamps - Happily Ever After


Welcome back!  I'm playing with the new Climbing Roses stamp set along with one of the fabulous frame stencils, Ins & Outs: Quaterfoil today and I've created this card for a wedding this month!


The Ins & Outs group of stencils in the shop are fabulous for creating a beautiful masked ink blended spotlight for any of your stamp sets!  Bunches of shapes and two piece sets that make it so easy to make a different colored frame and/or add some glitter paste like I did without seeping into your center piece.


Cool thing is there are lines on the stencil to help you center your stencil directly over an A2 card (if that's where you want it!).  And those roses???  I used some unexpected colors today.  It was meant to be a little more rainbowy, but my pink is maybe a little too purple to make it so, but I love these colors anyway, and they are perfect for the bride and groom that I'll be sending this one too!


I'll be sharing another one of these Ins & Outs stencils on the blog next week so hopefully you can see how easy they are to use.

And for those who want it:


My colors!

Thanks so much for stopping!  I hope you'll come again soon!