Thursday, February 28, 2019

Paper Sweeties Plan Your Life Series - March 2019


Welcome to the March 2019 Plan Your Life Series over at Paper Sweeties!  I've made a couple fun layouts in my planner for my very busy March!  I'm gonna need a lot of luck to get it all done...lol!  Plus it's tax season!!  So I've got quite a few four leaf clovers from last month's All Occasions stamp set!


I've used lots of green in this layout... the sweet flowers from the Hello Spring stamps and dies were perfect with the clovers and that rainbow from Somewhere Over The Rainbow... it's just pretty isn't it?  And I just happened to have that sun from Island Time laying on my table waiting to be used... it was just right!

My printable pages come without the weekday names printed on them.. love the Everyday Basics set ... I can add my weekdays when I want!


I had fun mixing and matching papers for this one... I wanted there to be a lot of green, but not just green and I love the way it turned out!


And notice the pretty scallops in plaid and stripes??  I'm playing along over at Mod Squad Challenges and this week the challenge is Stripes!  You should definitely check it out!

Before you do that though... hop on over to these places and see what all of the girls are up to:

Debbie Marcinkiewicz – Paper Sweeties
Lilian Forsyth 
Lisa Bzibziak (You Are Here!)


Tuesday, February 26, 2019

Cas-ual Fridays and A Copic Marker Background


I'm up on the Cas-ual Fridays Blog today I'm sharing with you a fun way to create a background using your Copic markers (or any other alcohol markers) and some blending solution (or alcohol).  These are the cards I created using two backgrounds I made this way.


I started with a white panel... I made two of these... one with regular white cardstock and one with 100 Lb paper that I use when I stamp and color with my Copics.  Both worked just as well.  I basically chose the colors I wanted that I thought might be interesting together and laid them out in the pattern I wanted.  My first strokes down the paper were with the wide flat end of the marker (you know ... the one that is usually only there for filling...lol!).  I quickly moved down the paper and swiped across.  Then I started at the top again and went through it all again.  I probably went over it about 4 times, and the last couple I switched to the brush end and made smaller swipes and filled in blank areas... I also made sure to put some unexpected strokes... a little purple in the blue.. a little blue in the green and finally ended up with this:


Next I poured a little bit of Copic Blending Solution into the cap... 80% alcohol works great for this technique, but I couldn't find my large bottle of alcohol so I decided to use the Blending Solution.  I dipped a paint brush (no water please) into the solution and then splattered it onto the panel that I colored.  If you want big blobs then add more alcohol... smaller splatters use less.  This is even less controllable than splattering water over distress oxides so be willing to let the liquid do what it does .. which is push the color away and you end up with something like this:


Pretty right?  I made two because I didn't think I was happy with the first and wanted to try it with the different paper, but once I was done, I decided I loved both panels and made two cards instead of one!


I started with this one... I used the full panel in the way back... it was the center of the panel that I was not happy with so this was the perfect use for this one.  I used the Bubble Box Fri-Dies and cut the larger one in plain white cardstock and the next size I cut from the second panel.


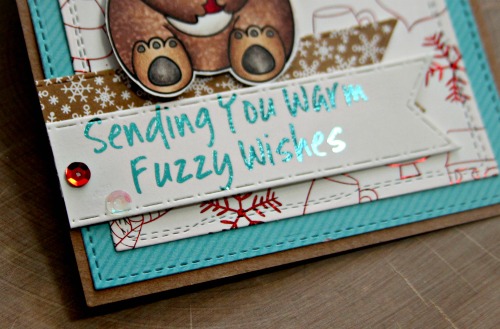
Before I layered everything, I stamped that pretty border design from the Bold Wishes Stamp Set onto the smaller Bubble Box using Versamark and heat embossed them in gold.  Then I stamped the Wish Big sentiment from the same set in a purple ink, fussy cut it and popped it up onto the inked panel.


I used the balloon dies from the Bunny Fri-Dies to cut out three balloons from some Copic friendly paper and then used some of the same markers that I used for the background to color them in.  I love that these colors don't completely blend.. I think it makes for a fun contrast... I attached some twine with popup tape and added the balloons to the card.


Finally I just added a couple sequins in similar colors to the rest of the card and done!  I thought I was done... but then I was looking at the piece that was left from cutting out the small inked Bubble Box layer and decided it would make a cool shaker frame:


So I made one!


First, I laid the window piece over the white layer so I could line up and stamp my sentiment from the Dream Then Do Stamp Set in the center.  Next I adhered a piece of clear cardstock to the inside of the window panel and then added popup tape around the outside edges.  I added some sequins ... enough to create a pretty sequin filled shaker, but not so much that the sentiment would be covered up.  I saved a few for the outside.


I decided this one called for some pretty flowers... so I used the 4 Petals Fri-Dies to cut some flowers and the Garden Fri-Dies to cut some leaves from white Copic friendly paper and then colored them in with the same markers I used for the background.  I layered the flowers together along with some leaves and then added a few sequins to the center.


I added a few more sequins to the outside of the shaker and this one was done!  I'm playing along with the Doodles Paper Playground #ShowMeYourShaker Contest on Instagram!  You can find info regarding the contest on the blog here!  I'm also playing along over at Mod Squad Challenges to use a Brand Name Clear or Rubber Stamp-No Digis... I've used all CAS-ual Fridays stamps here!  

I hope you enjoyed your visit today and hope I've shown you a fun new way to use your Copic markers!  Or if not new, maybe just a reminder that you can use them for more than just coloring images.

Should you decide to shop, I have this for you:


For more Cas-ual Fridays Inspiration, check out these places:


Monday, February 25, 2019

Crafty Elves' Countdown to Christmas-February 2019 Edition!


Welcome to this month's Crafty Elves post!  My friend Debra Davison (from Meticulosity) and I have promised to make a Christmas card a week for the year so that when the time comes, we'll have this part of our holiday all set!  I might even get my cards mailed out on a timely schedule... maybe... lol!  I especially love that it gives me the opportunity to use some of the many new products I purchased over the holidays that might otherwise be sitting and waiting for next November/December!  

And stay tuned because at the end I'll be announcing the winner from the comments on our first Crafty Elves post in January!

So here we go:


So let me just say that as soon as I saw this Happy Holladays stamp set by Darcie's Heart & Home over at Butterfly Reflections Ink I didn't even have to think about throwing it into my cart.  I knew I had to have it!  So many of my favorite things... coffee, that sweet deer, plaid, and that handsome lumberjack hipster santa..


I mean... cuuute right??  It was fun to use that pretty plaid from an old CTMH paper pack along with dies from Paper Smooches, Craftin Desert Divas, Lawn Fawn, and Pretty Pink Posh!  And it was also fun to use some denim material to texturize Santa's jeans.. tee hee.. love him!!


I'm linking this one up over at Double Trouble Challenge... this week there's a tic tac toe board and I'm taking the middle row across... Glitter, An Image, and a Sentiment.  (The board is at the end of this post) That was easy enough!  And I've met the twist which is Magic... I'd say that Santa and Rudolph are pretty magical (not to mention Coffee... it's made from a magical bean that turns me into a human being every morning!).  And since I met the twist, I can also enter into the Use Your Stuff Challenge which is Magic this time around!  They're partnering with Double Trouble and you have about a week to enter both challenges!

Next up:


O M Garsh I LOVE these adorable critters from Elizabeth Craft Designs... they are from the Winter Animals stamp set...so adorable!  I love how they all coordinated their outfits to go ice skating...maybe their mom was planning a scrapbook page and already had the papers picked out.  


Once Owl gets done skating he'll have some hot cocoa too... I'm sure of it!  I used some dies from CC Designs (the birch trees which I believe are no longer available), Kat Scrappiness and Craftin Desert Divas (which does have a nice die set with a birch tree here) to create my wintery scene... and lots of glitter paper... lots....


And then this Merry from the Merry Christmas word die from Pretty Pink Posh... I LOVE how it just happened to fit in the scallops perfectly!  This is one of my favorite word dies... you're gonna see it a lot this year!  And I almost forgot to mention that beautiful background snowflake paper from the Blizzard paper pad by Gina K.. LOVE!!


Did I mention I love this stamp set!  Wish I'd remembered that I did purchase the dies before I cut these out by hand...lol!

Oh... and if you are hoping you see this one in your mailbox next December... it's already spoken for.  You know who you are.... lol!

I'm playing along with Festive Fridays over at the Outlawz Challenges on Ning... the themes are Birthday, Get Well, Anniversary/Wedding, Christmas, and Anything Goes, so I'd say with Christmas, I'm good...lol!  I'm also playing along over at Mod Squad Challenges to use a Clear or Rubber Brand Name Stamped Image... I've used Elizabeth Crafts stamps on this one!

The next one is using some digital items from Graciellie Designs... she has the most beautiful digital sets ...


I started this one with a beautiful paper from the Rustic Winter Wishes digital paper set... that plaid... I wasn't sure if I'd foil it or not and decided not... then I thought I'd add some snowflakes with a stencil from Newton's Nook and some Deco foil transfer gel and foil those... so I added the gel and as it was drying I realized that wasn't going to work because the snowflakes would take the foil but so would the paper since i printed it on my laser!  So instead I added some gold embossing powder over the gel and heated it.  It's so much fun to watch it heat because it bubbles and has so much movement!  Crisis averted!


I printed a bunch of images from a few sets from Graciellie including Coffee or Cocoa, Christmas Cheer, and Winter Wishes and colored them with my Copics and added a little detail with my Prismacolor pencils.  I added a little sparkle using Liquid Pixie Dust from Ink On 3... love this stuff!!  I added it to the marshmallows and the poinsettia...just dropped a little into a container... just a tiny bit... and applied it with a paint brush.


I foiled the spoon and the sentiment... love that Gold Sequin foil from Gina K!!

I used one of my fave layering dies from Waffle Flower Stamps on this one!


I printed lots of images from these sets and can't wait to use them!

And last for this month but definitely not least:


I've had these images from Polka Dot Orchard printed and hadn't had a chance to use them yet so I was excited to use them this month!  That sweet bear!  There is something about his snout that reminds me of my dog... lol!  He's from the Winter Bear digital stamp set.


I colored up Winter Bear ... the furry parts first and then used some material from an old wash cloth and some Copic Blending Solution to texturize it.  And I love that the set comes with that adorable background already made up!  I just printed it; die cut it, and ran it through my Minc with some red sparkly foil from Gina K!  And that nose was perfect for some liquid glass... I just wanna boop it!


When I print my sentiments I'm sure to leave room around them so I can use dies to cut them out... and then I foiled this one with some turquoise foil... perfect with the color scheme!  I love that the Gina K Designs foils come in a flat pack so I don't have to deal so much with the curling... it's tricky enough as it is!!

I used dies from Kat Scrappiness, Stamplorations and Craftin Desert Divas on this one.


He's such a cutie!!  Also printed out some more images from Polka Dot Orchard so I'm sure you'll be seeing those in a coming month's post as well.

Hope you enjoyed your visit today!  And now for the winner from the January post!  Thanks so much to everyone for stopping by and leaving me some love!  The winner of some Happy Mail from me is:

Vannessa Osbourn!


Vannessa, please email at bzscrapper66 at gmail dot com with your address and also your blog address and/or Instagram if you have one... I'd love to see the cards you've created so far!

And hey!  Let's do it again!  I have lots of cards to mail out so leave me some love and I'll pick a winner and announce it in next month's post!

Now head on over to Debra's place and check out what she's created for you today!


Thursday, February 21, 2019

Cutting Cafe Inspiration - Shadow Box Cards!


Welcome to this edition of Cutting Cafe Inspiration!  Today we're playing with the Shadow Card File and I've used that and lots more today!  Lots of photos because it's almost two cards in one...lol!  I decided to go with a bit of a St. Patrick's Day theme...and Regina has a bunch of files in the shop that are good for this... you can find some of them here and a bunch more here!!


And for the Shadow Card itself, the wow is on the inside!  This card is so cool because it lays flat when it's closed but then you get this great pop up shadow box when you open it!  I used papers from the Authentique Charmed paper pad that I purchased last year... you may still be able to find one... if you do, pick it up because it's fantastic!


I started with the Lucky To Know You Overlay... I resized it so that it would fit inside my scalloped die cut background.  I got super lucky that it fit inside the stitched frame as well!  It gave me plenty of room to add some wider popup tape to create a shaker!


I used a few dies from my stash as well to decorate using "lucky" as the theme... and lots of sequins from my stash from all kinds of places!


Another cool thing about this Shadow Card File is the window pieces also come in a Circle shape (which has cool circle shaped sentiment frames!) and a heart shape.  So many possibilities!  Perfect to add a shaker on the inside if you wanted!  There is a fantastic video that you should watch before you start... so helpful and made this quite easy to put together.  You can find that at the bottom of the page where you'll find this file... right here!


I used a sweet sentiment from the Authentique paper pad... perfect wish to send to a friend that you are Lucky To Know.


And a view so you can see the depth this adds!  I can't wait to see what you create using this file!


I'm playing along over at Simon Says Stamp's Work it Wednesday... it's all about Green and Gold!  I've got that covered!  And I'm also linking up to the Simon Says Stamp Wednesday Challenge which is No Stamps Allowed... I didn't use any... not one!  I'm also playing along with the Doodles Paper Playground #showmeyourshaker contest on Instagram!  You can find info about the contest on their blog here!

That's me for today!  Be sure to head on over to the Cutting Cafe Blog to see what my teamies have created for you today and comment there for your chance to win one of three files of your choice!  And please be sure to tag me should you use this file so I can see how you use it!

Thanks so much for visiting today and I hope to see you again soon!