Friday, May 31, 2019

Paper Sweeties Plan Your Life Series-June 2019


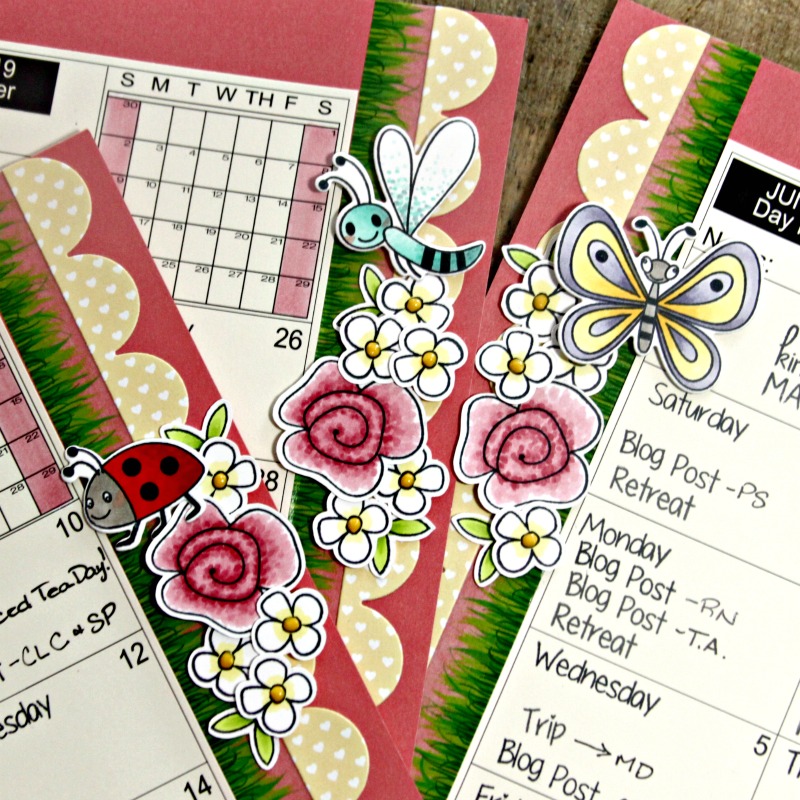
It's the first of the month and over at Paper Sweeties we're planning our lives!  I've got a busy crafty and vacation life this month.. yay!!  I used the Hello Spring, Pretty Posies, and Bee Happy sets to decorate my printable planner this month!


Along with some fun washi and pretty papers cut with the scallop border from the Sweet Borders Sweet Cuts makes for a summery June planner.


I love the sweet insect critters in the Bee Happy set... so cute and quick to color up!  And of course you know those little sweet flowers from Hello Spring along with the Pretty Posies flowers are among my faves!


I've used quite a few of the planner sets from Paper Sweeties to fill my days!  One of my most used is Get Your Craft On.  I also love the Everyday Basics set to fill in my weekdays and Business Basics are great even when I'm not talking Business!  I also love to use the balloons from the Celebrate set to mark any kind of fun celebration!


So cute, aren't they?
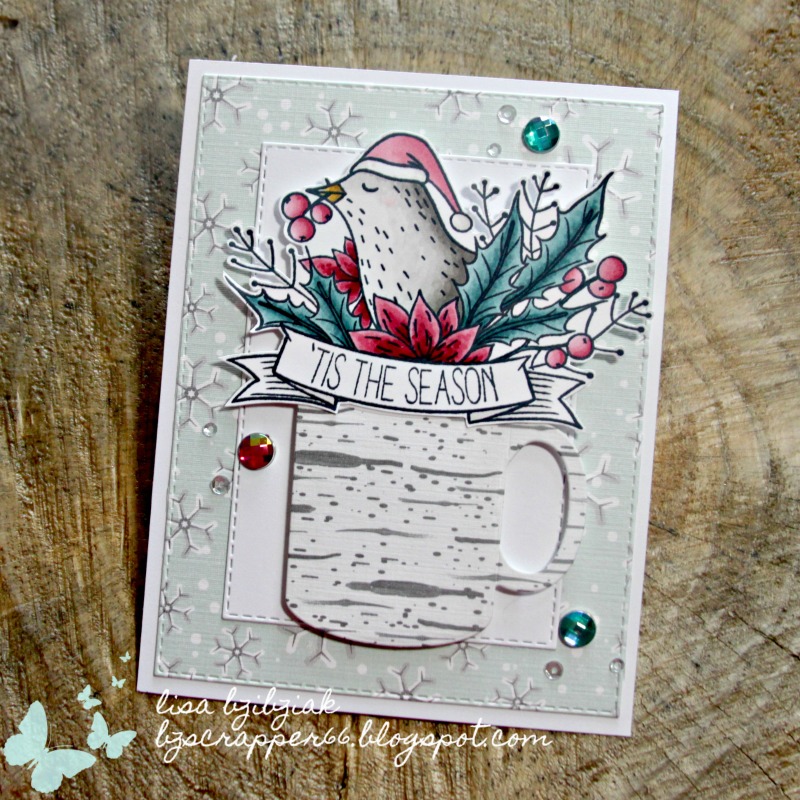

Thanks for stopping today and be sure to head on over to these places to see what my teamies have created for you today:

Debbie Marcinkiewicz – Paper Sweeties
Lilian Forsyth 
Lisa Bzibziak (You Are Here!)

Tuesday, May 28, 2019

Die Cuttin' Divas Challenge #422 - Tic Tac Toe!


Excited to be guesting over at the Die Cuttin' Divas Challenge Blog for this challenge!  This time around the challenge is a cool Tic Tac Toe Board.  Pick three across, down or diagonally to create your card or other item and as is the rule for every challenge, you must include at least one die cut on your newly created project!  You can enter up to three times and you have until next Monday, June 3rd to submit your entries!  See the Die Cuttin' Divas Blog here for all of the rules (there aren't many).


I chose the bottom left corner to the top right; Three Colors, Polka Dots, and Gems!  Here's how I was inspired:


I used a fun paper pad from Pink & Main called Sunrise for my colors.  I chose Pink, Orange, and Yellow.  And of course they have Polka Dots!

I started with the Lovely Frames Die from Pink Fresh Studio.  I cut the die once from white cardstock and then out of each of the three different polka dot papers.  I adhered the outline of the white Frames panel to a white piece of cardstock and decided what order I'd insert the pink, yellow, and orange pieces inside the frames.  Once I was happy with the look, I adhered the polka dot pieces.  Then I die cut the entire panel using a Rubbernecker Stamps die for a simple stitched outline and added that to a notecard sized piece of cardstock.


Next I took a notecard sized piece of white cardstock and cut one of the Beautiful Blooms die cuts but placing it on the corner edge of the piece so that the die cut would fit nicely in the corner of my card.  I carefully removed the outline and the pieces to insert back into the flowers.  I used popup tape to keep them in place and then popped all of the extra pieces out of the leaves and then added the die cut to the corner of my card.


I used the Word Series: Happy Stamp and Die set for my sentiment and colored in the flowers on the word Happy with orange and yellow to keep with my color scheme for the Tic Tac Toe Board.  I had an extra piece of the Beautiful Blooms die from a previous cut and trimmed off the leaves and tucked them under the sentiment.  To finish it up, I added some sequins in pink and clear, and some Gems in black.. completing my diagonal on the board!


I am also playing along over at Pink Fresh Studio's May Challenge which is Anything Goes!  I was so lucky to win the entire April Release from the PFS blog and I am so grateful!    The dies that I used today were from that release.  So many thanks to Pink Fresh Studio!  I cannot wait to crack open the rest of the beautiful products I received!  And I'm playing along at Simon Says Stamp's Bright Colors Mood Board Wednesday Challenge!  Check all of these great challenges out!

And thanks for stopping by today!  I hope you'll hop on over to the Die Cuttin' Divas Challenge Blog and check out what the Design Team has created!  Get inspired and play along!  Which row will you choose??


Saturday, May 25, 2019

Crafty Elves' Countdown to Christmas - May 2019


Welcome to the May edition of Crafty Elves' Countdown to Christmas!  Each month on the 25th, my friend Debra Davison from Meticulosity and I are sharing the Christmas cards we made for that month.  We've made a pact to keep each other going making a Christmas Card a week so that at Christmas time, we're all done and only have to mail them!  So far so good!  It's May and we've both more than stuck to our commitment!  Without further ado, here is how I was inspired:


I'm starting with these adorable deer from Your Next Stamp's Oh Deer stamp set.  It's not really a Christmas stamp set, but these two deer are easily added to a Christmas card.  I used papers from Papertrey Ink's Wonderland Paper Collection, Evergreen Dies from Impression Obsession, Holly Leaf Cluster from I.O., Scribble Snowflake Die from CDD, Mini Snowflakes from Lawn Fawn,  Jingle All The Way Die from Kat Scrappiness, and the Nested Rectangle Small Stitch Dies from Rubbernecker.


I basically used a similar layout and just moved things around a bit.  I made the white sentiment stand out just a bit against the background by stacking it over a dark gray die cut.


I love this leaping deer...lol!  So sweet!


Don't tell Debra, but I decided to use this one with the butterfly on her tail and the flower on her ear on a Summery card!  The sentiment is from the Oh Deer set.  I stamped it on one of the wonderful Bannerific Dies from Paper Smooches.  I also used the Nested Circle Scallop w/Holes Dies from Rubbernecker.  That adorable fence is from Whimsy and I believe it's retired.  The grass is from Craftin Desert Divas and those beautiful flowers I borrowed from my mother... they're from Impression Obsession and a set called Spring Branches... and I will have a set as soon as possible.

With this one I'm playing along over at Your Next Stamp's Bi-weekly Challenge #114!  It's School's Out For Summer and you can create something with a School or Summer Theme... I went with Summer!


Next I turned to this fun set from The Cat's Pajamas called Fat Cat Christmas; I also used the Nested Deckle Rectangle Dies from Rubbernecker and Stitched Scallop Dies from CDD along with some of my other favorites listed above.


Just love these adorable sassy cats with their even sassier sentiments!


And that old plaid CTMH paper was just the ticket!

I'm playing along over at Double Trouble Challenge Blog... their challenge this time around is to use Kraft!  Check it out before you start because you there are extra chances to win if you meet a couple other requirements in your project!


And last but certainly not least... a Lil' Inker... on this one I used the beautiful and adorable 'Tis the Season stamp set and that cup from the Coffee Talk 2 Die Set cut from the Papertrey Ink birch patterned paper from the same pack I used for the first few cards above.

Another month of Christmas cards in the books!

And now for the winner for some Happy Mail from my April post:


Verna Angerhofer!  Email me at bzscrapper66 at gmail dot com with your snail mail address so i can get something in the mail to you!

Thanks so much everyone for visiting and letting me know you were here!  We'll do it again this month!  Leave me some love and I'll pick another name for my post in June!

Now be sure to head on over to Debra's blog and see what she's created for you today!

Friday, May 24, 2019

Always Believe - Polka Dot Orchard


Sometimes an image just strikes you and you just gotta color it... and then when you get done, you just gotta hurry up and get it on a card.. this beautiful flower from the Flowers in Bloom Digi Set from Polka Dot Orchard was one of those.


And then once I got it colored up and cut out it was so hard to design a card around it because it had to be just right... one of those where I have lots of extra background panels and die cuts left over and waiting to be used on another project because they just weren't exactly right!  I knew I wanted to use these beautiful scalloped circles from Rubbernecker Stamps to frame it... it just took me a while to figure out what colors to use...lol!


For my background I finally decided to use this one.  I cut the panel using this Kat Scrappiness die and then applied some Decofoil Transfer Gel using this Newton's Nook Stencil and this awesome foil from Brutus Monroe.  I splattered my background with some Heidi Swapp Gold Color Shine and some red and black watercolor that I mixed with Inkon3 Liquid Pixie Dust to add some shimmer.


This sweet sentiment is from another beautiful set available over at Polka Dot Orchard, Spread Your Wings.  I created a bouquet with a Wheat die from Frantic Stamper and another leaf die from MFT and "wrapped" it in a corner doily die that I believe is no longer available at Brutus Monroe.


And that's it... I added a few red gems to scatter the red just a little... my red splatters didn't stay red on that black cardstock so it felt like it needed something and it made my eyes happy.

I'm playing along with the Simon Says Stamp Monday Challenge which is all about Stencils!  You should check it out!

Thanks for stopping!  Hope you'll come back tomorrow for the next installment of Crafty Elves Countdown to Christmas!  I'll announce the winner from April and Debra and I will be sharing the Christmas cards we've created this month!

In the meantime, check out Polka Dot Orchard's shop here!

These are the Polka Dot Orchard sets I used today:


Wednesday, May 22, 2019

Caffeine Fueled Paper Play - Stamplorations


I'm up on the Coffee Loving Cardmakers Blog and playing along with a few challenges over at Super Sponsor Stamplorations!  Hope you'll hop on over there and check out the details.  Here's a sneaky peek!


CAS-ual Fridays Full On Floral Eclipse


I'm up on the CAS-ual Fridays Blog today and sharing a card using an Eclipse technique.  If you're not familiar, the Hello in my card is what we're talking about.  It's a raised area that could be a Word like in today's card or a shape or anything really that almost seems to raise out of the background... visible, but you can sometimes almost miss it... almost ghost-like.

Here's how I made mine:


I started by stamping the Full On Floral background stamp onto some mixed media paper in Versamark and heat embossed it in gold.


Next I used Picked Raspberry and Spiced Marmalade Distress Oxides and blended them over the embossed image.  When I was done blending the inks, I wiped over the top of the image with a dry paper towel to remove the ink from the top of the gold to let the shine through again.


 I splattered some water and Gold Color Shine over the top and when it was dry, I die cut the Hello die from the Sweet Friend Dies from the center of the embossed panel (you would want to cut this from whatever area you wanted to add your eclipse to because the negative space will be where you place it.  (Note: Be sure to save those little pieces from the middle of your O's, E's, L's.. you get the idea... because you'll need to place those inside their negative spaces so you don't have white showing through your eclipsed word or shape).


I added all of the layers to my card including the embossed panel with the Hello cut out of the center.  Next I die cut three more of the Hello words from white cardstock.  I glued and stacked all of my Hello words together with the embossed piece on top.  Sometimes I like to offset the top piece just a bit so that there is a tiny bit of the color from the bottom layers that shows around the outside in some places to help the word stand out just a bit.  Then I glued the stacked word into the negative space and added the little center bits that I saved (center of the O, etc).  I also added a thin layer of Glossy Accents to the top of the word... again so that it would stand out just a little bit more.


I included a simple sentiment from the Bushy Tailed stamp set and a few sequins to finish it off.


And there you have it!  A simple Eclipse design with a big impact!  I think it's cool anyway!

I hope you enjoyed your stop!  If I've inspired you and there is something you need to have, you can head on over to the shop here and use this code for a discount on your order!


Tuesday, May 21, 2019

The Cutting Cafe Inspiration - Paper Lace!


Welcome to some Cutting Cafe Inspiration!  Today we're playing with the Paper Lace cutting file!  I've used the Square Sheet.  There are three sizes and I believe I used the Medium size and re-sized it to 6" wide before Ungrouping the cuts.

I cut the full grid from some gray cardstock and then used the single square to cut the remaining small squares to fill the spaces.  I cut them out of three different design papers from a coordinating pack 9 times each.


I attached the gray grid to a 6x6 sheet of cardstock.  Then I arranged my squares to my liking before adhering them.  I made a quilt!  And I had fun turning my lined designs different ways.


Next I added all of the goodies!  I used various dies, stickers, chipboard pieces and sequins to decorate my card.  I love this sentiment because I could use this card for almost any occasion!


It was fun to put this one together!  And quick!  There are a few different options in this file!  Be sure to head on over to the Cutting Cafe Blog to see how everyone has used it.  Comment there for your chance to win three files of your choice!

As I write this everything in the Cutting Cafe Shop (The Cutting Cafe's sister site), everything is 50% off with the code HALF OFF SALE for a limited time!  Check it out here!


Thanks for stopping!  Hope you'll stop back again soon!

Monday, May 20, 2019

Rubbernecker Stamps - Happy Wishes!


Sharing with you a project today that I made using some great Rubbernecker Stamps products!

I started by die-cutting my 2nd layer using the largest of the Nested Rectangle Small Stitch dies (one of my most used) along with the 2nd largest of the Nested Circle Scallop dies.  I used washi tape to hold them in place and ran them both through at the same time so I only needed to make one pass with my die cutting machine.  The scalloped circle created my window and I saved the inside piece for another project!


I cut a circle slightly larger than my window and blended a couple different colors of Distress Oxides onto it.  Next I stamped the sweet flowers from the Wishes Buds stamp set onto the ink blended circle and splattered it with Prima Metallic Watercolors.  While that was drying,  I cut two of the Flower #4 Die in black cardstock along with the Grass #2 Die.  Once the splatters were dry, I placed the flowers where I wanted them, using my window as a frame before I attached it permanently.  Then I made it all permanent and popped the window layer up over the stamped and die cut flowers.  I glued the tops of the flowers down very loosely for dimension, letting the beautiful tendrils pop up out of the window.  Then to finish, I used the little grass pieces to add some additional "foliage" just peeking up over the window.


I ink blended another piece of cardstock in the same colors as my background and die cut the Wishes word from it and again twice more from black cardstock.  I stacked and glued them together for dimension.  Then I stamped the "happy" from the Birthday Balloons stamp set in Versamark onto black cardstock and heat embossed with WOW Bright White Opaque embossing powder. I fussy cut it out and then added them both for my sentiment.  I rarely keep track of my "dots" so I like to use a gem or Nuvo drops to dot my I's.  A few sequins and it was done!


And there you have it!

I'm playing along at Simon Says Stamp's Wednesday Challenge which is Stitches this week!  You have until tomorrow (Tuesday) to play along!  I'm also playing along at Die Cuttin' Divas Flowers and/or Mother's Day Challenge!


Thanks so much for the visit!  I hope you enjoyed it and that I'll see you again soon!


For your convenience, I've included links below to the products I've used on today's make!  The Rubbernecker links are affiliate links and if used, I will receive a small compensation at no additional cost to you.  The others just link to some of my favorite places to shop!