Thursday, January 11, 2018

A Little More Christmas Cheer with CAS-ual Fridays!


I'm back today because I stopped over at the CAS-ual Fridays Challenge Blog to see what was going on and the Challenge was All That Glitters... and although glitter is a REAL challenge for me (lololol!  Hahahahaha!  Oh .. that's funny) I thought I'd give it a try...lol! :)

I started by cutting my base with the Stamplorations Crazy Double Running Stitch Dies from some MFT Merry and Bright Plaid Papers as well as the pink vellum panel (I love saying Crazy Double Running Stitch Dies because in my head I say it like I would- Wacky Waving Arm Flailing Tube Man...lol)


So during the last hop when CAS-ual Fridays released that awesome Peace, Love, Coffee set and of course I had to get it right away, I saw this adorable Ornament Tag die set and HAD to get it because I knew I could use it for so many things.  I decided I may as well keep the Christmas going and used it for this challenge.... what's better with glitter than Christmas?? (Honestly, I was first planning a Valentine card for my husband and he would not be surprised to find glitter on that either... glitter goes with everything!)

I cut the ornament out of green glitter paper.  I loved that I didn't even have to cut the two circles apart!  I just left them together and I'll never have to figure out how to space my inside cutout properly so all of my outside edges are even!  Time saver!!  And mind saver!  I can use both!


And what's better to fill my pretty glittery ornament than those adorable little coffee mugs from the new Coffee Cup Fri-Dies!?  The die is just like the large mug on the set, but teeny tiny!!  And the handle cuts out... LOVE LOVE LOVE!  I also filled my shaker with a pretty sequin mix from Craftin Desert Divas.  They were the just the right colors!


This sentiment from CDD was perfect and I stamped it on this banner that was laying on my table... it was exactly what I needed.. color, size (didn't even have to trim it!)... love when that happens.  And then another one of those cute mugs.  I added a few Lawn Fawn snowflakes that I also had leftover from a previous project and threw around some more sequins.

Can I say... I think one of my favorite parts of the ornament set is that pretty little hanger... I'm thinking it would make a very cute long stream of steam for the right sized coffee cup...lol!!

SO!  Hop on over to CAS-ual Fridays challenge and check it out!  And did you see there's a coupon code to use while the challenge is going on?  Just look at that graphic below!  Cool, right!?  Nothing to lose!  And come back tomorrow for something cool!


Wednesday, January 10, 2018

Unless You Can Be A Unicorn Kitty!


You may or may not be familiar with Little Acres Creations... if you're not, you should make yourself familiar!  I'm excited to announce that I'm on the Little Acres Creations Design Team now and I'm up on the Little Acres Blog today sharing this cutie pie using the kitty, sentiment and stars from the Unicorn Dreams stamp set. 

I stumbled across the adorable Coffee House Mouse stamp set by Little Acres last year and I've fallen in love with the company.  They make their own blending tools as well which I'll be using on my next card, but for now, will you hop on over to the Little Acres Blog by clicking here and I'll tell you a little bit more about this one!

I'm playing along with the Outlawz Twisted Thursday Challenge Anything Goes!  This week's twist is a shaker card... I didn't make a traditional shaker, but my kitty shakes!  Does that count?  If not, that's ok... you can still play along with just Anything Goes!  You should check it out!

And here's the kitty in motion (she's on a spring!)


Monday, January 8, 2018

Atlantic Hearts Sketch Challenge #246


Welcome to this week's Atlantic Hearts Sketch Challenge!  Today, I'm playing along using some Paper Smooches stamps and dies...


When I saw the vertical lines on this sketch I almost immediately thought of this background die I got from Paper Smooches in the clearance section!  Although this particular item is no longer available, there are lots of other cool stamps and dies there at great prices!  I'm so happy I snagged this one while I could and love it so much!  I die cut the panel and turned it sideways and cut it to fit the width of the card to mimic the layout of the sketch.  Then I placed a piece of Seaglass glitter paper that I cut just a smidge bigger than the diecut layer to leave a border.

I'm playing along with the Paper Smooches Anything Goes Challenge for January and also with the Winter Blues Challenge over at Heart to Heart Challenges!  You should check both of these challenges out!


For the sentiment area, I cut a piece of vellum about 1 1/2" across and longer than my area I needed to cover.  Then I got out my Warm Hearts stamp set (one of my faves) and stamped the sentiment to the right of the piece in Versamark and heat embossed it using some white embossing powder.  Then I layed the vellum piece at an angle on my card and realized the sentiment wasn't showing up as much as I'd like it to.. so I took some Juniper cardstock and cut it just a bit bigger than the sentiment and placed it behind the vellum and centered the sentiment over it... then I adhered the whole vellum piece across the card and trimmed off the edges.  My cluster includes that adorable snowman and cardinal from the Warm Hearts set along with the beautiful snowflake from the Snowflakes Dies and a few of one of my favorite sequins, the Shimmer Sequins from Craftin Desert Divas.


And of course I wanted to use the cute little coffee cup and heart from the Warm Hearts set, so I found the perfect sentiment on the Verve Stamps Fill My Cup stamp set.  It was perfect when I masked off the bottom part and stamped "And Coffee" on the front... and then on the inside:


I masked off the top part and stamped the rest of the sentiment...lol!  It makes me giggle... yup... love will keep us warm... but you know... it might take a bit of coffee too..lol!  So, hope you'll come and play along with us over at Atlantic Hearts!  I can't wait to see what you do with the sketch!


Sunday, January 7, 2018

The Cutting Cafe Inspiration - It's A Plan!


Welcome to your first Cutting Cafe Inspiration for 2018!  What better time than now to show you all of the fantastic printable planners available at the Cutting Cafe!  I'm using the 2018 Planner Printable Set and the Design Team Planner set this year and I love it because I can print just the pages I want to use.  I've been trying to decide if I'm going to stick with a three ring binder style, and I've decided the answer is yes!  I love that I can move some pages as I go and I'll explain more about that later.  Now, I just have to decide if I'm sticking with this particular binder before I decorate it.


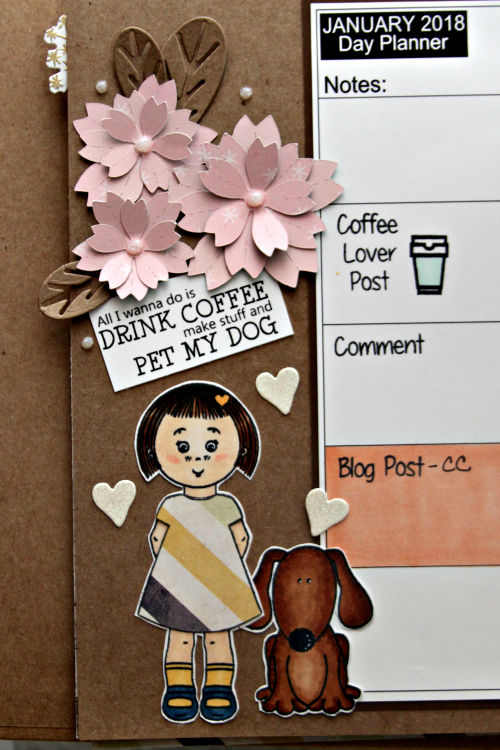
I've decided I like the Day Planner pages from the 2018 Planner Printable Set... there are about two weeks on each two page spread.  I printed it on Copic friendly paper so that I can color in with my markers freely if I choose to.  I also decided to cut the pages down and then mount them on cardstock and DP so that I can decorate or add other planner add-ons to the edge if I want.  This calendar design gives me enough room to write what I want as I go for each day.  I love that each page also has the full month calendar at the top.  I've colored in my weekends with a Copic marker.


I found that the monthly calendar is also nice to quickly see at a glance what I have due for the month.  I may use the other one to do the same for birthdays.  Just a quick jotting down of initials let's me look at the whole month to see what's coming up.


And these are from the Design Team Planner.  You know I love to participate in various challenges with my makes but I so easily forget to check back to see if I've won so I've been searching for a way to track that.  I pulled the jpgs into word for these two parts and sized them how I wanted to fit on my pages.  The left page is a list of challenges I've entered with due dates and when to check back.  And the two smaller pieces are to jot ideas as I have them.  Not meant for a full plan because that all happens in my head, but just enough info to remind me what I was thinking.  I've decorated this page sparsely because I will move the page as I go and then when I have it filled up, I'll remove it and add a new one because I won't need it any more... at least not here in my planner.  You should check out both of these planners because there is a LOT of pieces in there and I'll be sharing as my planner evolves.  You can check it out each 1st of each month for the Paper Sweeties Plan Your Life Series and then I'll post at various times as I figure out my system.  I am SO excited about these printable planners!  I am looking forward to tayloring it to what I need!

And my favorite part:
 

The fun!  I've decorated my pages using this cutie pie little girl from the Every Day Elisha Jean & Friends stamp set and adorable pup from the Yappy Birthday stamp set (it's only $3.50!!!)  Both stamp sets come with free cutting files and I LOVE them!  I cut my paper flowers using the Layered Flowers Templates and Cutting Files.  The leaves were diecut and that cute sentiment is a digi from JLO.  I had those pretty hearts in my extras container and I find that Nuvo drops make great embellies in a planner because they aren't real bulky!

If you want to see all of the Planner files and add-ons available in the Cutting Cafe, you can click here!  There are a lot of options!

So that's me for today!  Be sure to head on over to the Cutting Cafe Blog to see what the rest of the Design Team has planned!  Comment on the Cutting Cafe Blog for a chance to win some free files!

 Hope to see you again! I'll be back tomorrow with this week's Atlantic Hearts Sketch Challenge and there are a few other things going on around here!  You can PLAN on it!  (tee hee... sorry... can't help myself sometimes)


Saturday, January 6, 2018

My Finished Cubbies-After The Funkie Junkie 12 Tags


So... recently I participated in the Funkie Junkie 12 Tags of Christmas.   Over a period of 12 weeks, Linda over at the Funkie Junkie revealed one tag a week, and we were to create something inspired by her tags.  It could be a tag, a card, or anything else.  My friend Mitra had been playing along for a few years and I don't think she ever made a tag...lol!  You can check out her wrap up post here (I highly suggest you do!).  She encouraged me to play along this year, and after she picked up an old golf ball display cabinet and transformed it into the beauty above, how could I refuse?  Plus the thought of filling up all of those cubbies was exciting.  (The jars in front were for her projects... like I said... check it out!)  Now, you may notice, there are more than 12 cubbies here, so once the challenge was over, I still had some work to do!  And you may or may not have believed I'd ever finish it... it's ok... I wasn't sure myself.. but over the New Years weekend I was "organizing" my room and in order to finish, I had to put away my boxes of all of the stuff I'd collected to finish this up and I knew if I did that, I wouldn't finish so I did it and yes, I did get the boxes put away :).  Here's the finished project:


I hope you like it.  I'm quite happy with it.  I love each and every cubby and below I have some closeups.  I did include individual photos of a few of the cubbies that weren't in the challenge, but not all... didn't want you to be here all day... I mean I do want you to be here all day... but you know... free will and all...lol!


The cubbies I finished up here are that pretty little coffee tray in the upper right hand corner and the little birdie nestled in amongst the holly leaves and pinecones. 


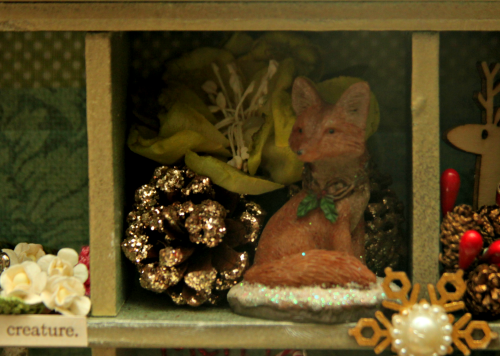
The new cubbies here are again the coffee set, that cute little foxy fox, and a collection of vintage looking buttons, flowers, and a spool.


I still love that Peace, Love, Joy wooden piece that was one of my "tags".  I placed a piece of acetate behind it and filled the cubby with silver bells.


These four cubbies were all post challenge.  I realized as I was editing my photos I left a few gray hairs behind...lol!  So sorry, but I left them as is here (I'll make sure they aren't still there before I put it away).


Here, I added that owl and the deer in the forest.


This Santa frame was another one of my favorite "tags"... and that cute squirrel is a new addition since the challenge ended.


There's that cutie pie squirrel, another cluster of vintage looking items with flowers.. and my argyle tree (that was a tag)... another favorite.


So here's my coffee cubby... you knew I'd have to put some in here right?  I placed a crocheted doily on the bottom of the cubby and then glued the coffee set to the tray so it wouldn't keep falling down... adhered that in the cubby and then added the flowers.  I think the only thing I may add in the future is something in the back there.. I thought a nice Victorian framed pic would be nice, but that one will have to roll around in my head for a bit.  For now, it's finished.  (Side note: you may think that is a tea set, however, in my house, it would have coffee in it..lol!  So it's a coffee set!)  If you come here often, you know I'm in a wonderful group called Coffee Loving Papercrafters on facebook.  Our fearless leader Amy Tsuruta inspires me constantly with her awesome coffee cards and you should check out her blog her blog here!  And while you're at it, check out the Coffee Loving Cardmakers Blog here!  If you love coffee and crafting you'll adore both places.. if you just love beautiful cards and to be inspired, then still visit Amy's blog because there's lots more there too!


This one was fun to put together.  I added another one of those cute little clay creations made by a co-workers daughter.  She (the daughter) was going to throw them away!!  But, my friend Jamie rescued them and they came to live with me.  And the crocheted doilies... the large one in back was sent to me from my friend Tracey all the way from Australia!  You should check out her blog here for sure.. it's one of my faves to visit!  And the little one in the center was made by either me or my mom.. this was my way of spreading around that pink.  I didn't want to do the same arrangement as the snowflake one, so I decided these items were perfect!


There's one of those pesky gray hairs!..lol!  This wooden snowman was purchased on clearance last year.  I made the conscious decision to leave him plain because I liked the simple look of it... and then glammed it up with some gold sparkly snowballs (aka pom poms).  And next door... I got that sparkly house on clearance last year and rather than make a real house (I didn't have small enough items to put around it), I made it into a bird house and added those cardinals I found at a rummage sale.  I let the liquid glass drip drop down the roof.. it's ice!   To be honest, the first one was a mistake, but I loved the way it looked so I added more.


At the same rummage sale I got a baggy of these vintage looking buttons and charms and decided a couple cubbies with them "randomly strewn" were in order... (random = lots of time figuring out how to position them just right).


That bird is from Yvonne Yam (You'll want to check her blog out!)... I was happy to be able to put it here... and those holly leaves/berries are from Mitra... LOVE crafty happy mail and was so happy I knew exactly where both of these items were.


And this cutie pie fox, the owl, and the squirrel were in a pack I got on clearance last year as well along with those pretty gold glitter covered pinecones.  And that pretty Petaloo flower I purchased at my LSS last week.  It was perfect here and in the owl cubby.

I'll end here!  I hope you enjoyed looking as much as I enjoyed making.  I'll play along with the challenge again next year and I'm already rolling around ideas in my head!  You should give it a go to!  Sign up to get emails from the blog here so you know when it starts next year (You CAN make tags... you don't have to make a 3D piece) and you should also check out the shop here... many of the items I used in this piece were from there and/or are available there along with SO much more!  And you'll want to sign up for email there too so you get notified of sales... there's always something going on over there!

Thanks for stopping and come back soon... lots going on here this month!


Wednesday, January 3, 2018

Caffeine Fueled Paper Play with CAS-ual Fridays!


EDITED TO SAY:

I was a winner!!


I'm up on the Coffee Loving Cardmakers Blog today with a new Caffeine Fueled Paper Play!  Here's a sneak peek!  Join me there for details and maybe you'll play along too!  Click here to see the entire card!


Tuesday, January 2, 2018

Three Amigos Blog Hop-January 2018 Anything Goes!

Happy New Years my Bloggy Friends!  It's time for a new Three Amigos Blog Hop Challenge!  We're changing things up this year and each month we'll have a unique challenge, but for January, since we all got super busy over the holidays and never made a decision what it would be, we decided to make it super easy and Anything Goes!

My background and layers were cut using the Stamplorations Crazy Double Running Stitch Dies.  The largest die fits a 4 1/4 x 5 1/2 card front.  I used a Buffalo Plaid that is very similar to one of the papers in the retired Jack paper pack.


I've had this llama sitting on my workspace for months!  I was going to use it in a color challenge when I realized it wasn't going to fit (after I had colored and cut it out) so I stuck it onto one of my desk organizers and I've been looking at that cutie ever since!  He's from the Prickly Pear cardmaking stamp and thincuts and I LOVE him!  It was my goal to use him for this challenge... so I did!  And I've started my 2018 Christmas cards.  Maybe I'll actually get them out on time this year :)


I used the Be Merry Thincuts dies as my sentiment and diecut a little bow out of the same glitter paper using a die from Peachy Cheap.

That's it!  So please do hop on over to Susan and Donna's blogs to see what they've created for you today!  And head on over to the Three Amigos Blog to see if you were the winner for the December Challenge!

Be sure to check out my other post today as well... I'm up on the Coffee Lover's Blog and playing along with another Sponsor challenge.