Thursday, August 30, 2018

CAS-ual Fridays Challenge #207- Mint & Neutral


Welcome to a new CAS-ual Fridays Challenge!  This time around we're playing with Mint and Neutral inspiration!  Create your project using this color scheme and link up for your chance to win some free stuff!  Here's how I was inspired:


Have you seen this month's New Release??? Some pretty awesome stuff!  I was inspired by the new Be A Unicorn Stamp Set and Fri-Dies to create a small canvas... I thought this might be the perfect gift for one of my nieces.

Whenever canvases of various sizes are on sale, I pick them up to have them on hand so I pulled this one out when I decided what I wanted to do.  This one is about 5x7".


I had these colors out to work on another canvas and they were perfect for this challenge, so it was fun to have two projects going at the same time... while one was drying I could work on the other.  I painted the canvas by almost dry brushing the mint/metallic blue/green paints until the canvas was covered.  Then I added some gold and finally I used a star stencil and some gold embossing paste to add a little bit of texture.

***Added***: For Janice Wolf and anyone else who wants to know, the paints I used are Acrylic Paints, Americana Bahama Blue, FolkArt Metallic 653 Emerald Green, and Folk Art 4033 Gold Enamel-for some reason I'm unable to reply to my comments.


While waiting for things to dry, I painted a chipboard star from my stash using the gold paint.  Then I stamped that gorgeous unicorn in Versamark Ink onto Copic friendly paper and embossed it in white.  I cut it out using the coordinating Fri-Die and colored him in with some BG000 and BG11.  Since my lines were white, it was important to shade in all the right places... I think I did ok!  Then I used a gold Wink of Stella fine tipped marker to color in his main, ears, hooves, and wonderful magical horn.  I used some black Nuvo drops for his eye and colored in his nostrils with some silver Wink of Stella.  Then I set him aside to dry.


My biggest struggle was the best way to add the sentiment and keep it magical!  Then I remembered this acetate that is specifically made to be able to be heated.  I got mine from The Cutting Cafe.  I used one of my favorite go to dies, the Bubble Box Fri-Dies, to cute out the acetate piece and heat embossed that awesome sentiment from the Be A Unicorn stamp set onto it.  This acetate works well if you don't heat it too closely or too hot... just enough to get the embossing powder to melt... it will warp and/or melt if you heat it too much.  Also, I used my antistatic pad before I embossed because the powder will definitely stick all over.  I knew I wouldn't mind a little stray powder so I brushed some off but didn't worry too much about what was left.  Then I swiped some Versamark on the edges of the sentiment piece and sprinkled some Shabby White Embossing Powder and heated that (another fave in my craft room!)


To finish it off I added some more faves in my stash... some pretty paper and velvet flowers, gold gems, gold star sequins. Just love all of the shimmer!

One more peek!


So... now I just have to have someone pry it out of my hands so I can mail it...lol!


That's it for me today!  Hope you  enjoyed your visit!

Hope I've inspired you!  What are you playing for? 10 winning entries will be highlighted on the CAS-ual Fridays Blog the Thursday before a new challenge goes live!  We call it the Happy Hour!  In addition a $25 gift certificate goes to the overall winner.  AND if the chosen winner uses CAS-ual Fridays stamps and/or dies as the main focus for the card, the gift certificate increases to $50!

So what are you waiting for!  Nothing to lose and $25 to $50 of awesome stuff to gain!  Hope to see you over there


Thanks for stopping by!  Be sure to checkout this challenge... I can't wait to see what you create!  And don't forget to check out the inspiration from the team!  Some pretty awesome stuff going on there!


Just Breathe - A Little More Graciellie


Quick post today to remind you that you have until the end of today, August 30th to comment and hop for a chance to win a $10 gift certificate to the Graciellie Design Digital Shop on Etsy!  Last Thursday we started a Collaboration Hop up on the Coffee Loving Cardmakers Blog here!  We're showing off the new Stay Strong Digital set (also available in rubber from Unity Stamps!  I wanted to share one more using the new set along with another from Graciellie... the Beautiful Birthday Wishes (those gorgeous butterflies are from that set).


I've loved using these sets along with the Prima paper pad Wild and Free... the two together were perfect for the feel of these sentiments.  Today I used it again... I paper pieced the wrap and colored in my swirly iced coffee with my Copics.  I just love using digis because I can re-size the images how I want... I made the flowers from the set tiny for this one so they'd be just an accent.


I decided to accent with yellows and gold for this one because I noticed just a tiny bit of yellowish tones in the paper pad but I was sure to scatter it around to balance it out because it was such a departure from the main color scheme... and I love it.  This sentiment was in the paper pad and it works perfectly with the sentiments in the Graciellie set.


I die cut my previously printed sentiment with this banner die and the white was just so stark against the rest.  So I colored it with my Copic markers and then created a Bokeh effect with my Copic Blending Pen... after it was colored, I just swirled the blender in various areas in a circular pattern... different sizes and then on some I went over a second time for a variation in color...it mimics the Bokeh in many of these papers and I was quite happy and will do this again for sure!


That's it for today!!  Be sure if you haven't already that you head to the Coffee Loving Cardmaker's Blog and start hopping and commenting for your chance to win!  And check out Graciellie's shop because there are tons of sales going on right now!


Tuesday, August 28, 2018

Be A Warrior!


As soon as I saw the adorable designs by Tracey Hey on Instagram I knew I had to have them... especially this adorable Brave Lion and another that you'll be seeing soon.  And if you fall in love too, you can find them at the Alpacapals website here!  I can honestly say there is not one set that I wouldn't love to have!

I'm so not over the rainbows and I thought it would be fun to give him a beautiful rainbow mane so I used my watercolor pencils and colored him in.

  I wanted a rainbow background also, but didn't want it to compete with the little guy too much so I printed one of the fun digital backgrounds I recently one over at the Outlawz Challenges from We Are 3 digital shop on Etsy!  You should check it out... lots of cool stuff!  I decided to give foiling on Kraft a try... and I love the way it came out... the foil didn't seem to transfer solidly and not sure if it was my heat settings or just the kraft paper, but it worked out perfectly because it looks a little distressed.  I cut my foiled paper out using the Crazy Stitched Rectangle dies from CDD.


Isn't he just the most adorable??  I added a few leaves cut with some MFT dies because of course he'll be in the jungle!


Love the sentiments on this set and I used my favorite banner dies from CDD... I also decided an arrow would be appropriate for a warrior, but since this guy is obviously a lover and a fighter, I made it a heart arrow from CDD.  I took a stab at covering the die cut with adhesive from a decofoil pen and ran that through with some foil... it took came out a little distressed looking.... maybe I didn't cover it completely... but again!  Happy accident!


So that's it for me today!  A quick one!  And I highly suggest you check out the stamp offerings by Tracey Hey!  I'm positive you'll fall in love with at least one set... but probably more...lol!

I'm playing along with the Outlawz Twisted Thursday today!  No twist for me... got a little to carried away with the color...lol... as the twist is Primary Colors, Red, Blue and Yellow... but you could go for it!


Sunday, August 26, 2018

A Lion's Share of Courage


Well, this one has been in the works for quite some time... mostly in my head because first I had to decide what to do with that gorgeous embroidery patch Lion from The Etsy Cutting Cafe Shop.  Do I add it to a piece of clothing that may or may not last for a long time... maybe a tote bag (I have a thousand and those get abused)... or perhaps I'd use it on a piece of mixed media... yes... that's what I'd do... now... do I make something I can hang on the wall?  Do I use it for the cover of my planner that remains plain after almost a year of use?

I finally decided on the canvas piece... but... how would I start it... what colors did I want to use (of course I knew there would be gold)?  What type of background?

And then, I knew the sentiment I wanted to use with it right away.. one of my very favorites and was so excited when I found it in the Unity Shop a couple years ago.  Then finally...


I remembered I had this awesome piece of handmade paper that my oldest son had made when he visited us for a couple weeks last year.  He even made the frame/screen that he'd use to create the paper!  He recycled some of my old mail... added some natural materials...made the paper and then created a journal for his girlfriend.  I was lucky to get my hands on a couple of leftover pieces and knew this one would be the perfect base for the perfect canvas.  I mod podged it to the canvas and then I needed something to raise up the embroidered lion a bit and found these blank coasters in my stash that I had bought so long ago when coasters were the thing.  I mod podged those together as well and attached them where I knew my lion would lay.


Then I started layering paints.. some metallic blue, some mint, some gold... all of my favorites.  I was a bit unhappy at this point because it looked so stripey... but LOVED the texture the handmade paper was giving.  But I trusted the process and knew I'd be covering much of it up and hoped it would look much better when I was finished... if not, I figured I'd find some way to morph it into something else.


I added some splatters of Heidi Swapp Color Shine in gold and some embossed woodgrain using a Tim Holtz Stencil and some gold embossing paste.  Still hated it...lol!  But again... this would be just the underneath layer... it will be fine... I hoped.  I splattered some white and black acrylic paint as well before I started.

Once it was all dry, I used the Mod Podge again to attach the patch and left my largest acrylic block over it (after I checked to be sure it was clean) until I was confident it was dry... and then I just went to town:


I dumped so many flowers all over my table in the colors I knew I wanted to use... I tried to stick to a few varieties in the color scheme I was using and put the rest away once I had a bit of a start.  Tucking things in and smushing and holding them together.  I used Liquid Glass from CTMH to attach these because it's done so well for me in the past.  It take a while to dry so you still have time to move things around... which is both good and bad..lol... sometimes I'd get them just where I wanted them and then when I added the next the ones before moved... but I just kept mushing them together to leave no space.


I wanted the flowers tight around him, but certainly did not want to cover too much of this majestic creature either... is that not just the most beautiful embroidery by Regina??  Speaking of... you should check out her embroidered offerings in her Etsy Shop here... SO much beauty and fun!  I purposely left a little opening at the top and just added a little Versamark re-inker and then some beautiful Shabby White embossing powder to it and heated it... I didn't want it to be a complete "wreath" around him, but it needed a little something.


Then... what to do for the sentiment??  I didn't have a chipboard piece the write shape or size and then I remembered those coasters and this awesome Bubble Box die from CAS-ual Fridays... I cut it out, painted it black and decided that wasn't right... so then I thought the mint would be perfect, but I put too much on and as I was wiping it so that it could dry and I could try again, flipped it over and saw that it was perfect just that way!  I let that dry completely and embossed my sentiment over it the next day... that sentiment stamp, Quiet Voice, from Unity... one of my very favorites!!


I swiped some more Versamark on the edges and heat embossed with the Shabby White Embossing powder, popped it up with some plastic pieces (tape centers I believe) that I've saved figuring I'd use them for something... and added lots more flowers and such so that they were hugging my sentiment frame... as well... then I threw some of those wonderful gold gems (retired) from CTMH that I love and hoard so much around... tucked in some gold stamens from Fun Stampers Journey.. some tassles from Hobby Lobby... yeah... I venture in there from time to time... stepped back and then zoomed in close to be sure there weren't any gaps where I didn't want them and considered it done!


So there we are... I LOVE it now.. so happy I stuck with it ... if you've been visiting me for sometime you won't be surprised when I say these are very hard for me...lol... I hate waiting for things to dry.  I had three projects in various forms of done going at the same time so while one was drying I could turn to the other.  And it takes a lot of Faith and Courage to keep going when you're not quite sure... but I've found if you are just using a bunch of things you love... in the end, you'll love it!  If you decide to give it a try let me know so I can see what you create!

Thanks for hanging in there and so sorry for the terribly long post!


Edited to add: This one was a Top Pick at Mix It Up Challenge Blog!


Thursday, August 23, 2018

Coffee Loving Cardmakers and Graciellie Design - Stay Strong


Welcome to a special Collaboration with the Coffee Loving Cardmakers and Graciellie Design!  We are going to share some makes with you with this awesome new set from Graciellie, Stay Strong:

Hopefully you've arrived here from Amy's place!  If not, I'm glad you found me and if you get lost along the way just head on over to the Coffee Loving Cardmaker's Blog where you'll find the entire list of Coffee Loving Cardmakers and links to their projects!  There is a random drawn prize and a sale!  You can find the details at the bottom of this post!

Gorgeous, right??   Every time I see one of Gracie's new designs I fall in love.  If you want to see some really beautiful images and the best sentiments, check out her Etsy digital shop here!  AND if you prefer rubber, even after we show you all of the cool things you can do with these digital images, you can get some of Graciellie Designs sets in rubber from Unity Stamps.. including Stay Strong!


I've had this pad of paper from Prima, Wild and Free, for a long time.  I bought it because it was so pretty... you know how it is...lol!  And when I was looking at the digis I decided this paper would be just right for what I had in mind.

For this one, I started in Word and pulled in the feather image from another beautiful Graciellie Designs digital set, Dream On.  I copied the image and flipped it, changed the size of the second and placed the two on the page around where I thought I'd like them on a panel; leaving enough room to die cut the images after printing them on my Laser Printer.


After I cut out the panel with the feathers, I ran it through the Minc with some Gold Sequins Foil from Gina K (because I printed these on a laser, I'm able to foil them in the Minc).  Then a few splatters of Heidi Swapp Gold Color Shine and some Nuvo drops in black.  I pulled a bunch of the coffee cups, sentiments and flowers into new documents in Word in various sizes and printed them all out on Copic Friendly paper... enough for these projects and quite a few more...lol!  Then I printed a sheet of the cups onto some of the Prima paper.  For this one, I fussy cut one of the cups in the white and colored in the wrap with some W5, W3, and W1 Copics.  I cut the cup pieces out of the design paper and pieced them onto the cup.  I cut out the heart from the wrap and created a shaker.  Popped it up... added some of the flowers I colored with R81, RV34, and RV17 for the flowers and YG01 AND YG03 for the leaves.  Then some simple black Nuvo drops for the centers.


I die cut one of the sentiments I printed and popped it up with a few more flowers and some sequins.

For the next one, I layered my papers onto a card base and then used a border die to cut the front piece so that a little bit of the inside piece shows on the side.


This time I used the entire design paper piece for the entire cup except for the whipped cream.  After I adhered the DP to the white cup, I used some W3 and W1 Copic marker to add some slight additional color to the wrap part of the cup to make it stand out a bit from the rest of the cup.


Love these little sentiment labels from the Dream On set (the one with the feathers).  So easy just to cut them out by hand... part sentiment, part embellishment!


I love the challenge of finding the perfect die to cut out my sentiments!...lol... the hardest part is to make sure they're straight if you can't see through the die... there is probably a trick.. I just eyeball it.. but with this one I was lucky and the frame had an open middle...lol!

And then, I did this:


It's lots of fun to create a sentiment background in word using digital sentiments ... I started with the document I made originally with all of my sentiments in different sizes.  I moved them all so they were closer together and tried to create a random pattern with them.  (Be sure to Save As so you don't lose your original...lol... a little techie public service announcement...lol!)  Once I had them where I wanted them, I printed it out onto one of the Prima design papers and ran it through the Minc with some more Gold Sequin Foil... SO cool, right??  Well, I think so anyway!


Aside from how versatile digis are for size and direction, I think my other favorite thing about digital stamps is the Foilability (if that wasn't a word it is now.. 'cause I said it).

I framed one of the larger sentiments I printed with some layering die cuts,  flowers, sequins and this time I colored my cup!


I used the same colors in my flowers along with a bit of E35 for my coffee bits and made my swirly delight... it's almost 10:00pm here and time for bed, but if someone offered this to me, I'd snatch it up right away!

So that's it for me!  Hope you enjoyed your visit!  Your next stop along the way is Helen's    place!  And don't forget if you lose your place along the way you can always head on back to the Coffee Loving Cardmakers post for the full list!

Oh!!  And did I mention this!?  Leave some love at all of your visits and have a chance to win!


Commenting open through August 30th with the winner announced on Saturday, September 1st. Winner selected from the comments across all of the participating blogs.

And so awesome!!  Graciellie Design is having a sale on a Coffee Bundle:


Buy these sets together and get them all for 20% off here!


And don't forget to play along here:


Wednesday, August 22, 2018

Caffeine Fueled Paper Play - Gerda Steiner Designs!


I'm up on the Coffee Loving Cardmakers Blog today and playing along with challenges at Gerda Steiner Designs and Kat Scrappiness!  Hope you'll hop over there to check out all of the details! Here's a sneak peek:


Tuesday, August 21, 2018

The Cutting Cafe Inspiration - Fun With Rosettes


Welcome to some Cutting Cafe Inspiration!  Today we're playing with the Fun With Rosettes file!  I had a lot of fun with this one!  I used some pretty Prima October Moon papers... they're from last year, but you can probably find them on sale somewhere if you love them as much as I do!

There are a few sizes in this file as well as some different designs!  I created two rosettes in the 3" and 2" scallop designs and two in the 1.5" size... one with the little holes around the outside and one without.  I just pulled the svg file into my Cricut Design Space and resized according to the directions, attached and cut them out in the papers I chose!


I love using paper pads for projects like this because you can really mix and match the different design papers and they always look good together!


I used a variety of glues for these... some Nuvo glue to put the rosettes together; some chunky glue dots and score tape to layer my rosettes and attach them to my stick, and all of the above and some liquid glass to attach all the little pieces parts and embellishments.  I bought this ribbon in the Cutting Cafe Shop!  It's in the Shades of Green Ribbon Collection.


This ribbon is an upcycle... my coworkers always save me ribbons and other items from gifts they get because they know I love to re-use them rather than have them throw them out... it was perfect for this project!


My initial plan was to make just the one sided flower, but I thought it would be cool to make it even more dimensional and so that both sides could show!  Now, I can display it as a centerpiece and all the sides are pretty!


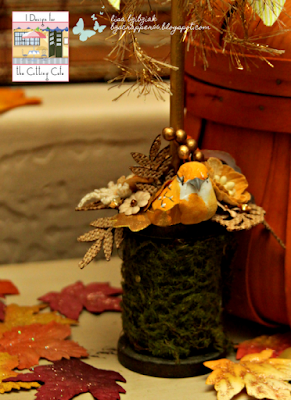
This chunky spool I picked up on clearance at Michael's last year was just right for the base.  I added some birds, leaves, flowers, fibers, and sequins from my stash.


It's as if these items were just waiting to be used on this project!!  I think I might be getting in the mood for some Fall!  Might have something to do with the 110 degree weather we're having here...lol!  But also... soooo pretty!

I am playing along over at the Outlawz Twisted Thursday Challenge... this week's optional twist is school supplies, but I'm just playing along with the Anything Goes portion of the challenge!

So thanks for stopping here!  Be sure to head on over to the Cutting Cafe Blog to see what everyone has created using the Fun With Rosettes file!  There are some pretty cool things you'll see.  And while you're at the Cutting Cafe Blog, be sure to comment there for your chance to win three files of your choice!

Come back tomorrow for some more awesome!