Thursday, December 31, 2020

CAS-ual Fridays Stamps Release Day 1 - Pop Fizz Clink Stamps and Champagne Flute Dies


Woo hoo!  It's time for a fun new Release from Cas-ual Fridays!  Today we're sharing makes using the new Pop Fizz Clink Stamps and Champagne Flute Dies!  I've used the stamp set for this one!


I started with a foiled background using some Transfer Gel and the new Bubbly Stencil!  Then I stamped, colored and cut the flutes.  And finally added a cute sentiment from the set ... embossing and fussy cutting the wind up and then the punchline was stamped, embossed and cut in a rectangle.


That's me for today!  Be sure to hop on over to the blog and see what everyone else has for your viewing pleasure and how you could win!

Should you see something you must have, I have this for you:


Thanks for stopping and come again soon!


Monday, December 28, 2020

Happy New Year With A Jillian Vance Design!


I'm up on the blog over at A Jillian Vance Design with this one!  If you'd like more details and links you can hop on over there and give us a visit!

Thanks so much for stopping and come again soon!


Sunday, December 27, 2020

Miss Ink Stamps - The Morning After


Welcome back!  I have this fun card for you today which I must say made me giggle quite a bit as I was creating it!  If you checked out this month's Crafty Elves post then you saw my favorite card I made during the month... and this little scene occurred the morning after that one!


This poor guy got Blitzened last night and this is where his little woodland friends found him this morning and they are rallying around to see how they can help!


I had so much fun using some Distress Oxide Inks for the background and critters from Blitzened and Little Angel and a sentiment from Blitzened!

Thanks so much for stopping and hope you enjoyed it and come back soon!


Thursday, December 24, 2020

Crafty Elves' Countdown to Christmas - December 2020 Edition


Hello and Merry Christmas! (if that's your jam... and if not Happy Almost The End of 2020!)

We have a special post for you today and I'm gonna be honest.  I'm writing this up at the last minute because I almost forgot that tomorrow is the 25th!  (Yes, I know tomorrow is Christmas... but sometimes things like Christmas Day and the 25th of the month don't connect in my head.)  We are each picking our fave card of our teamies and then one newly made card from us.  I was driving around with my mask today delivering Christmas surprises to some friends so I'll be sharing my fave Christmas card from this month (you may have already seen it... so sorry... not sorry!)  Feeling cheeky 'cause it's late and it's 2020.

First my fave from Debra:


Isn't this just the cutest??  I love Debra's cards because she find some of the most adorable and fun images and I love her designs!  This one is SO 2020 and I love that the kitty cat looks like her Pixie.  And of course... you know I'm Mad4Plaid.  You can find her post for this one here!

And I knew right away which one of Michael's was my fave because it was very recent AND it's spectacular!


I mean.... right???  Michael's cards are always beautiful or fun or both and I especially loved this one... Snowmen are my favorite and check out all of these cutie pies... and that double decker bus!!!  You can see how he put this one together in his post here!

I can't wait to see which one of mine was their fave!

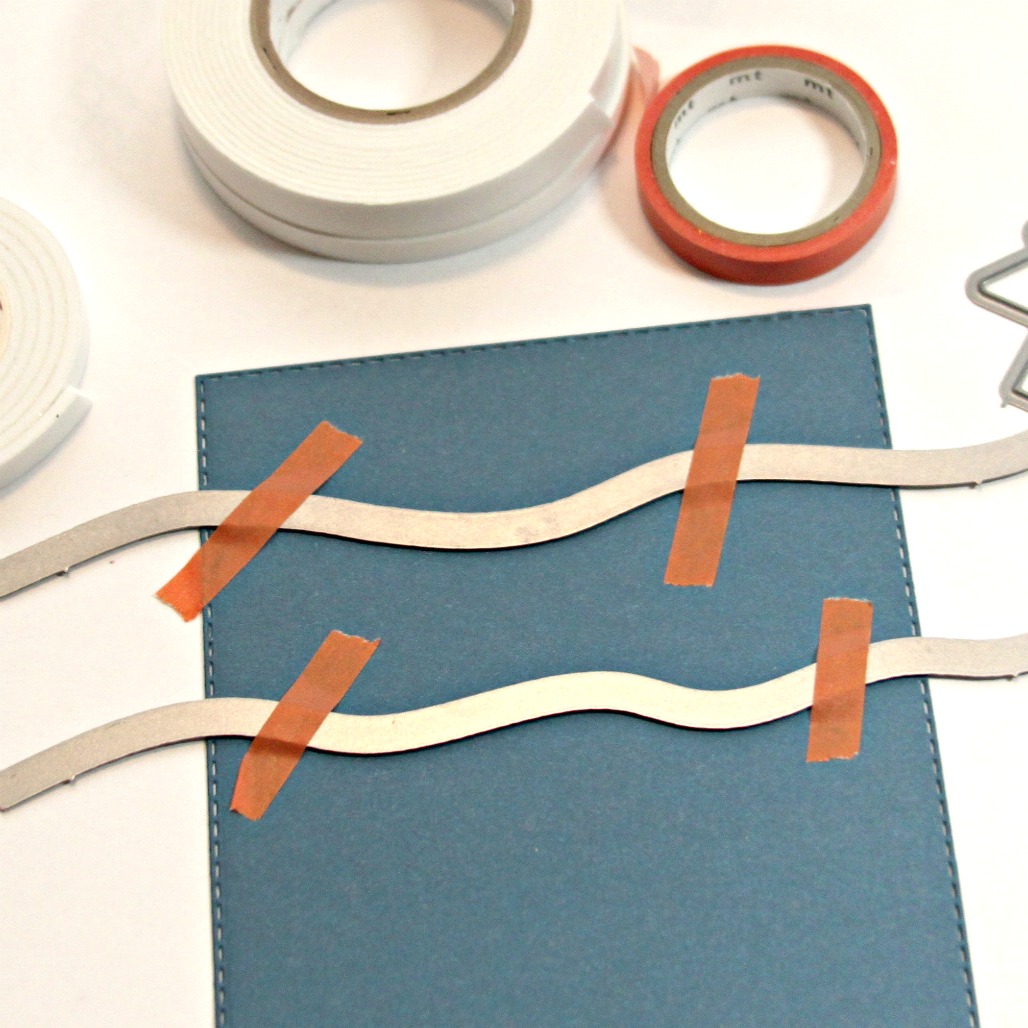
And here's my favorite card of mine from December!


Ha!  I had so much fun making this one!  It's really more a card for just after Christmas, but hey... my cards are more often than not late anyway (yes, even though I make them all year and they are ready to go in the beginning of December) I would definitely send this one for a Christmas card... I have a few friends that would enjoy receiving it.  (And yes, I am still in the process of sending out cards...lol!)

Thank you SO much to everybody for stopping and I hope you are enjoying your day whether or not you celebrate Christmas.  I appreciate so much all of you that stop by each month to see what we've got going on and we are continuing next year as well!  I just love this thing we've got going on here and enjoy my fellow Crafty Elves muchly!

And now for last month's winner of some Happy Mail:


Hey Comopark (I like to call her Donna!), send me your snail mail so I can get you some Happy Mail!

And I'm doing it again.  Leave us some love and I'll choose someone to send some Happy Mail to!  Stay safe all because I want to hear from you in the coming year!  (Let's hope it's a good one... or at least better... I'll settle for better...lol!)


Rubbernecker Stamps - To All A Good Night


Welcome back!  I'm using a beautiful new Rubbernecker Stamps clear stamp set, Winter Wonderland!  I love that the images on this set are all separate so I can combine them in whatever way I want.  Here's how I made it:


  • A white piece of cardstock was cut about 6 x 4 1/2" (big enough to place into the stamp positioner and place magnets and still be able to stamp the 'Twas The Night background.
  • After taking out the extra foam piece, the white cardstock was butted up to the corner of the Misti and held in place with magnets.
  • Anti static powder was wiped over the front of the cardstock.
  • The background stamp was positioned onto the cardstock and then stamped in Versamark ink.  
  • Rose Gold embossing powder was sprinkled over the stamped area and then heated to a beautiful shine. 

  • The frames were cut using the Rectangle Combo OPC #3 die.
  • The two largest frames were flipped upside down onto the work surface.
  • Thin foam tape was applied over the seam of the two frames to adhere them together.

  • The embossed piece was trimmed down to fit inside the window but not cover the holes of the scalloped frame.
  • The protective layer was peeled off of the two sided foam tape.
  • The embossed script panel was turned upside down and adhered to the frame, making certain that the words were straight when flipped over.
  • Addition adhesive was applied to the back side and then adhered to a 5 3/8" x 4 1/8" panel of gold cardstock.
  • The gold cardstock was adhered to a 5 1/2" x 4 1/4" panel of white cardstock.

  • The images were stamped using the Misti and then colored with Copics and fussy cut.
  • Next the images were arranged in the corners of the frame and when the position was right, adhered with varying thickness of foam tape.
  • This sentiment from Winter Wonderland was perfect!  It was stamped using the Misti and some Color Fuse Ink.
  • The sentiment was trimmed down with scissors and popped up on the card.

All that was left to do was add a few sequins!


Have I told you how much I love this stamp set??

Thank you so much for stopping!  I hope you enjoyed it and you'll be back again soon!

I have links below to all of the Rubbernecker Stamps products I used for today's card!  Should you choose to purchase using these links I will receive a small compensation at no additional cost to you.  And thank you!

Wednesday, December 23, 2020

Caffeine Fueled Paper Play - Cheers!


I'm up on the blog over at the Coffee Loving Cardmakers with this one!  I gifted myself a couple new things for the holidays!  Also a reminder about three challenges we've got going on over there including the monthly Caffeine Fueled Paper Play challenge!  Hope you'll hop on over there and check it out!


Monday, December 21, 2020

CAS-ual Fridays Stamps-Merry Christmas!


I'm up on the blog over at CAS-ual Fridays Stamps with this one.  Hope you'll hop on over there and see how I created this background.

Thanks so much for stopping and hope you'll come again soon!


A Jillian Vance Design-Sleigh Bells Ring


I'm up on the blog over at A Jillian Vance Design with this one!  Hope you'll hop on over there and join me for more details and links.

Thanks for stopping and come again soon!


Double Trouble Challenge # 73 - Die-lirious Part II


Welcome back!  I have another one for this month's Double Trouble Challenge!  I'm the Crazy Cousin for December!


Use your favorite cutting tool and play along!  I used some dies AND my Cricut for this one.  Those flowers are from an SVG file from The Cutting Cafe and I love to cut bunches of them at once to have on hand for projects!


I have a whole 12x12 sheet setup in my Design Space so I can cut more from any color I want.  I used white ones for these and wet them, crinkled them up and sprayed them with some Gold Color Shine.  I added them to those great scalloped tags from CAS-ual Fridays and that fun Santa I've had forever in my stash.  A quick sentiment from Miss Ink and some ribbon and I was done!

If you haven't played along yet, hop on over to the Double Trouble Blog to check out all of the details and link up for your chance to win a prize!

Check me out as Crazy Cousin:


Friday, December 18, 2020

Miss Ink Stamps - Christmas Is Here!


Welcome back!  I had a lot of fun with this one... I used a few different sets from Miss Ink Stamps and I think they go perfectly together!


I started with the background.  I heat embossed the adorable cottage from Holiday Home and some snowflakes from a couple different sets in white.  Then I blended on some Tumbled Glass and Broken Glass Distress Oxide and then sprayed on some Ink On 3 Liquid Pixie Dust and splattered on a bit of white and blue glitter watercolor.


Then I stamped, cut and colored my images... I cut the center out of the Woodland Hearth image so that the cabin embossed in the background would show through... I was going for the feel that it's snowing and the home is in the distant background and you can barely see it through the snow.


And you may know by now how much I love frames and this large banner from Springtime Banners makes an awesome one!

Thank you so much for stopping by today!  I hope you enjoyed it and you come again soon!


Monday, December 14, 2020

A Jillian Vance Design-Beauty of the Season


I'm up on the blog over at A Jillian Vance Design with these quick cards!  I hope you'll hop on over there and give us a visit for links and details.

Thanks so much for stopping and come again soon!


Friday, December 11, 2020

Miss Ink Stamps - Let's Not Talk About It


Welcome back!  I decided to get my Minc out for this one!  Turns out the Rabbit Hole stencil is perfect along with the Happy New Year stamp set from Miss Ink!...lol!  Do you think 2021 is going to be better?  I think eventually it will be.  But I don't expect to wake up the morning of January 1st to a whole new world...lol!  Hang in there!  Thank goodness I can escape into my craft room which I do often.  I hope you can find some peace too.


I discovered a new to me product this week!  The Heidi Swapp Reactive Paint is a great and easy way to apply foil to a stencil.  You know I love my dimension so the Transfer Gel from Decofoil is a go to quite often for me.  But the paint is great for when you don't want that added weight to your project or for a stencil like this with wide spaces!  It would take a lot of gel to fill all of those spaces, but easy peasy to use a paintbrush and apply the paint.  I just waited for it to dry and ran it through with some rainbow Deco Foil.  I used CTMH cardstock, and used the #4 setting on my Minc.  I let the panel sit for a minute or so to cool off before I carefully removed it and I got great coverage!


I just stamped, colored and fussy cut my images and added them to that cool background... along with a few sequins of course!

That's it!  Thanks so much for stopping and hope you'll come again soon!


Thursday, December 10, 2020

Miss Ink Stamps - Getting Blitzened!


Hello!  Today I'm up on the blog over at Miss Ink Stamps with this fun one!  Hopefully everyone gets to take a couple days after the holidays to relax!  If you'd like links and more details hop on over there and join me!


A Wintery Christmas Wish - Rubbernecker Stamps


Welcome!  I've got one for you today using one of the great new clear stamp sets in the Rubbernecker shop along with a few other very cool products!


  • The front window panel was cut using the largest of the Small Stitch Rectangle dies and Winter Trees In Circle die by placing both together onto a panel and using washi tape to hold them in place.

  • Another panel was cut from white cardstock  larger than the stitched panel.
  • Inks in blue, purple and black were blended onto the panel.
  • A heat gun was used to dry the panel and then anti static powder was wiped over it.
  • The Field of Stars background was stamped onto the inked area in Versamark.
  • White embossing powder was sprinkled over and heated.
Tip:  Usually I will stamp and emboss the background first and then add the ink to avoid extra powder sticking to the background.  Sometimes drying it first will avoid that.  This time, however, I still had a lot of stray powder stick to the background.  I blew some of the extra off and decided to heat it up the way it was and I liked the look of the extra sprays of white.  I thought it looked either like more clusters of a stars in the sky or snow falling!  One of those times a mistake worked out!


  • The starry panel was trimmed down smaller than the window panel and attached to a base of 5 1/2" x 4 1/4".
  • Clouds were cut from some glitter paper using the slimline cloud die, trimmed down and two layers were added at the bottom of the starry panel making sure that it was in the right position for the window creating some snowy hills.
  • The window panel was popped up over the background.

  • Before the critters were added, another stitched rectangle panel was cut and then the hill dies were used to cut hills for the front of the panel.
  • The hills were attached to the front of the card below the window.

  • The stamped, die cut and colored critters were added to the front of the card with varying thicknesses of foam tape.
  • The sentiment from the Wintery Friends set was stamped and heat embossed with white onto the same blue used for the front panel.
  • Each word of the sentiment was cut separately and then popped them up in a straight line at the top of the card.
  • Finally, sequins were added!
That's me for today!  Thanks so much for stopping and hope you'll come again for some more Rubbernecker Stamps inspiration!

I have provided links below to all the Rubbernecker products I used today.  If you purchase using these links I will receive a small compensation at no additional cost to you.  And thank you!

Wednesday, December 9, 2020

CAS-ual Fridays Stamps - Holiday Wishes


I'm up on the blog over at CAS-ual Fridays Stamps!  Hope you'll hop on over there and give us a visit!

Thanks so much for stopping and hope you come again soon!