Showing posts with label Mouse Flower Stencil. Show all posts

Friday, May 15, 2020

A Happy and Quite Glittery Birthday-Miss Ink Stamps


Hello there!  I'm here with a little glittery goodness for you today!

I started by making some glitter paste with some Lucky Dazzle Dust and some Glossy Accents and applied it to my background panel through the Mouse Flower Stencil.  I set it aside to dry.


I had some flowers left over from last week's card... I colored some extras up and decided they'd be perfect for this card.


I stamped this sentiment from Unbirthday in green using the Misti.  I stamped it a couple times to be sure I had a nice solid impression and then once in Versamark.  Then I added some Wow City of Angels embossing powder and heated it.  The cool thing about City of Angels is it is a bit see through so the green shows through... and I love how it matches the background!  I fussy cut it out because I love the way it looks that way and it doesn't cover up too much of the beautiful background.


And isn't it cool how the Dazzle Dust color shifts from gold to green??  So fun!  And super pretty!


I popped up all of my pieces onto the card and added just a few sequins and I was done!

Thanks so much for stopping by!  Come again soon!

Friday, May 8, 2020

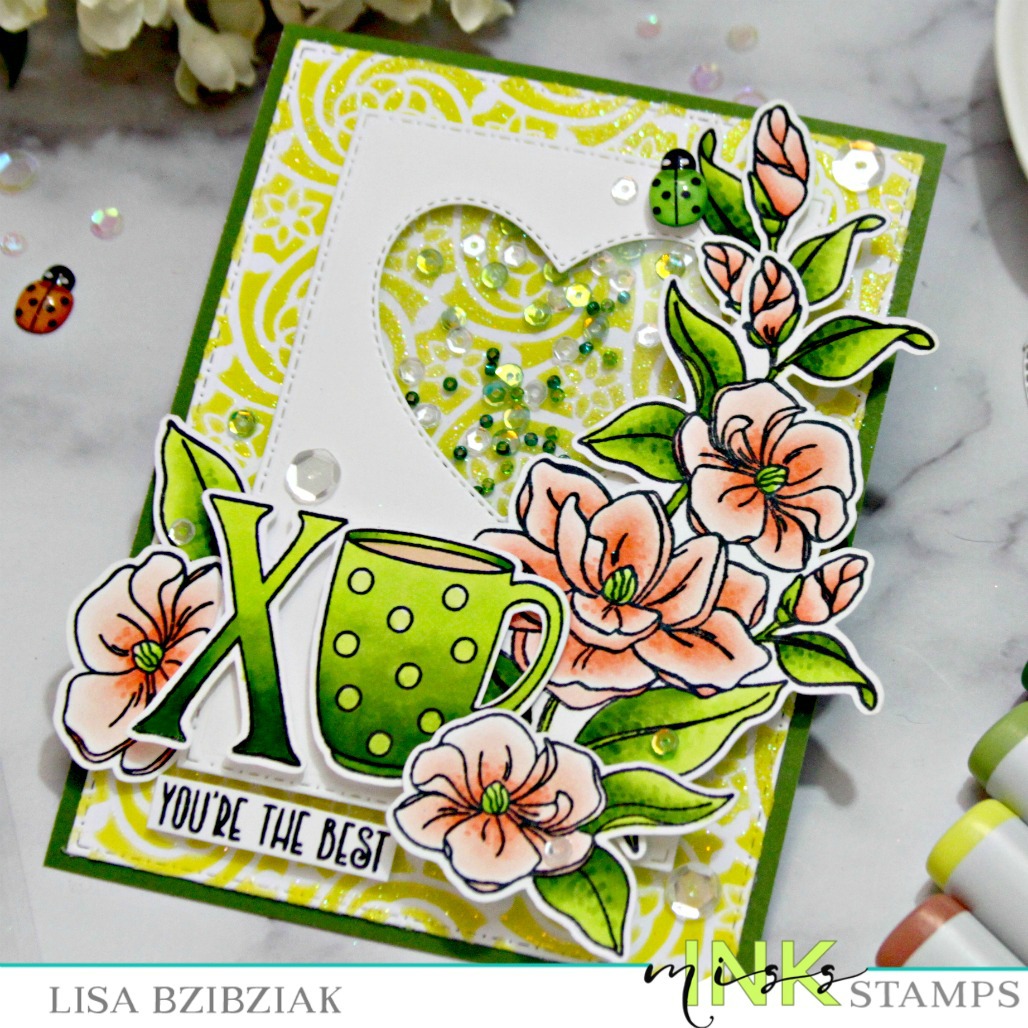
You're The Best - Miss Ink Stamps


Welcome to some Miss Ink Stamps inspiration!  I am sharing a card for someone very special today!  Someone who is the best!

I started with the background.  I used the Mouse Flower Stencil to apply some Color Fuse Inks in a couple different greens.  I rinsed and dried the stencil before placing it back over the ink blended background and added some Ranger Gloss Translucent Texture Paste.  Then while it was wet I sprinkled just a little bit of glitter over it.. not evenly because I didn't want a totally glittered background but just some sparkle here and there and I figured whatever stuck... stuck!  I set it aside to dry.


I stamped, cut and colored all of my images from the Gardenia and Brewtiful stamp sets ahead of time and colored them... the flowers using some Copic in R000, R00, R01, and R02.   For the leaves I used YG01, YG03 and YG17.    

I cut a rectangle panel with a heart window by placing both dies in place at the same time and taping them in place with some washi.  That way I only had to run it through the Gemini once.  I added acetate to the inside of this panel and then foam tape around the heart and then as support to the rest of the panel.  I eyeballed where the panel would go and added some sequins to that area... just a few so that my stenciled part would still show through.


I colored the "XO" from the Brewtiful stamp set in an ombre style using the same colors as for the leaves of the flowers.  Then using varying thicknesses of foam tape, I added all of my pieces parts to the card and this sentiment from the Everyday Sentiments set!


I almost forgot about that sweet green ladybug up in the top right!  Isn't that so fun and cute!?  You can get those in the shop too right here and they come in a few different colors!

And that's me for today!  Well, no... I'm not going to tell you who it's for...lol!  But she's pretty special and I think she'll like it ok...lol!

Thanks for stopping and hope you'll come again soon!