Showing posts with label MFT Camp Create. Show all posts

Thursday, August 24, 2017

MFT Camp Create Bonfire Bonus: Awesome Ombre!

Welcome to my last MFT Camp Create project for this round of Camp Create!  Today I'm taking on the bonus challenge, Awesome Ombre!  Here's what I created:


This one has been rolling around in my head for a few days now.  And when I started in my head it did not look like this at all... wasn't even about coffee!  But in the end... this beautiful coffee cup die from Stamplorations was calling me so who am I to deny it?

I started with some watercolor paper.  I simply swiped on brown watercolor paint right across the paper... and as I worked my way up the panel, I used more water and less paint.. this is all the same color since my pallet didn't have but ONE brown.. can you believe it??  When I got to the top, I just started over again from the botton with some heavy paint and again added a bit more water as I went up... tried to blend it  and I guess I was somewhat successful... 


Once the paint was dry, I began randomly stamping the coffee bean stamp from Paper Sweeties.  I stamped closer together at the bottom where it was darker and got further apart as I worked my way up the page.  I felt it would lend more to the ombre effect that way... idk if it did, but I like it!


I've been using vellum and embossing lately for quite a few of my cards mostly because I don't want to cover up my backgrounds too much.  I love the way it looks with gold.  And those pretty little flowers are my favorite to have on hand... they come in all kinds of colors although the white are my favorite and these natural colors come in a close second.  I stock up at Hobby Lobby when they are on sale... last time they tried to hide them on me.. they weren't with the rest of the flowers and embellishments.. but I found them and brought a few packages home with me.


I cute quite a few of these coffee cups out while trying to land on the perfect color and it turned out to be the one I cut originally from the base!  So I'll save the others for future projects.

And those sequins... I used the special limited edition Latte blend from Paper Sweeties (that you can still get here as I type this) and added some pretty tiny gold hearts from Kat Scrappiness and just a few tiny dark brown ones from Pretty Pink Posh. 


I mustn't forget to mention those awesome stitched layers from Stamplorations, the fantastic sentiment from MFT, and my favorite banners from CDD.

So much fun has been had!  I've learned so much participating in these projects and am so thankful to MFT for hosting this fun!  You have until sometime on the 24th to link up to any or all projects so what are you waiting for??  Head over there and check it out!  There are lots of prizes to be handed out on the 28th!

See you again soon!  Tomorrow morning I will be back to cleaning up... right now it looks like a tornado hit camp.. yikes... stop again!


Wednesday, August 23, 2017

MFT Camp Create Day 5: Delicious Diecuts!

Back to Day 5 of MFT's Camp Create August 2017!  It's the last day, but I'm gonna circle back to the Bonus Campire project tomorrow.  For today it's all about Delightful Diecuts and here's what I made:


This was a lot of fun and I love the way it came out!


I started by ink distressing two panels in blue and purple... then I picked my favorite one and set it aside for my background...


And then I took the second and diecut my Snowflake doily from Cottage Kutz and since I had extra room on the panel, I also diecut some snowflakes from Lawn Fawn.  A couple "tips" from me:

First... see that cool green tool... if you love to diecut intricate dies such as doilies and snowflakes this is a must have!  Mine is from Fun Stampers Journey and there are a few different tools out there.  I can't speak to those, but I can tell you I love mine... it has that cool brush on one end and a poker on the other... this one also has some other tools that I haven't even used yet... but just for those two I'm in love.  The brush is fantastic for rubbing across the backside of an intricate die after you cut something to get all of those little pieces out easily.  Trust me... it's worth it.  I still use the poker tool to get the extras out of my actual paper diecut just because I'm afraid to ruin it, but I have been known to take it to the back of one here and there...

Also, these awesome snowflake dies from Lawn Fawn... I didn't even bother cutting the dies apart for this one.  If I'm going to want one snowflake for a project, I'll probably want more and I just keep the extras in a little container and they have been very handy in the past.  I've done the same with my autumn leaves as well... 

That's it.. nothing earth shattering, but maybe an aha moment for one or two of you...


I do love this snowflake doily so much and am looking forward to being able to use it more because I'm gonna be starting on my holiday cards very shortly..

So... after I cut my snowflake, I cut my background panel to size and attached the snowflake.  Then I splattered some water droplets onto the whole thing and dabbed the puddles off leaving this awesome distressed but almost snowy look.
 

Love the Hug In A Mug sentiments set from MFT... it was perfect for this... I chose to stamp and emboss mine in white on vellum cut using my CDD Flag Banner Dies because the thought of covering up that pretty background was not pleasing to me...I'm usually a little messy with my embossing powder.  I just love the look of a little stray powder ... idk why... it pleases my messy mind... I know it probably drives some of you crazy, but that's ok... you can be more careful with yours...
 

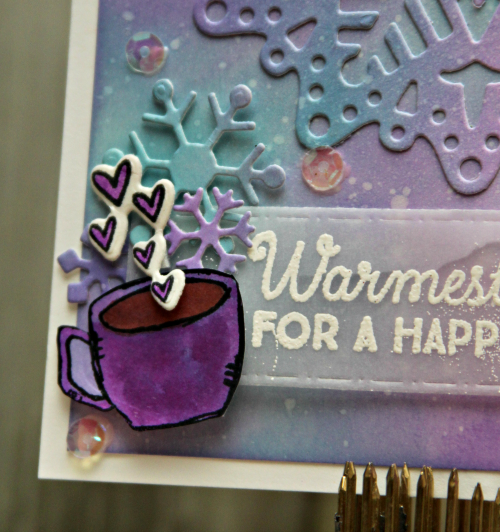
I decided to add this pretty sketchy cup from Stamplorations.  I stamped it onto some of the leftover ink blended paper and cut it out.  I added some extra purple to make it stand out using my Zig watercolor markers and of course made my coffee brown.  I couldn't help but add a few snowflakes and my favorite steam using the hearts from the Somewhere Over The Rainbow set from Paper Sweeties and my favorite clearish sequins from CDD...


That's it for me.  Hope you enjoyed it and I hope you'll play along!  You have until the 24th and you can play along with one day or all... lots of prizes... check out the MFT blog!  And come back here soon!  Tomorrow I'll have my last project for Camp Create!


Tuesday, August 22, 2017

MFT Camp Create Day 3: Background Bonanza!

Still finishing up Camp Create and I'm circling around back to Day 3: Background Bonanza...


I created the blended background using some Tim Holtz Distress Inks... Oxides if I had them and original if I didn't have the new color in Oxide... then I used an MFT stamp to create the white embossed flowers and sprayed a little bit of water on it then patted dry to create the splatters...


The mission was to create a background that made a statement... I used this Amazing word die from Stamplorations along with an old CTMH stamp for my sentiment... boom!

Thanks for stopping today!  I have a couple more projects to go and if you'd like to play along, just link up by the 24th!  Lots of prizes to be had!


Friday, August 18, 2017

MFT Camp Create Day 4: Monochromatic Magic


Skipping around a bit for MFT Camp Create!  I had this idea for Day 4 so I'll go back to Day 3 tomorrow! 

These are some of my favorite colors/shades... Love that turquoisey, greenish blue... it really is ONE of my favorites.. (you know where I stand on favorites).

I created this background with some watercolors.. smooshed them around.. used a stencil to add some of those dots with ink... and then added more with clear texture paste... then a few splatters and done!


I got a fantastic deal on this sentiment die set from Penny Black at a crafter garage sale while I was back in Buffalo at Buffalo Stamps N Stuff... why anyone would part with this die set is beyond me!!  It was perfect for this card cut from glittery paper..


And I also got these MFT heart balloon dies at the same sale!!  Whaaaa?  Why???  But I'm so happy they were willing to part with them because I love them.  I cut one from the glitter paper and then the other two from some colored vellum.  I popped up the one with a 3-D glue dot because right now I can't find my clear foam tape... it's here.. under something... and although you can really see it in the photo it barely shows in real life... and that cute balloon string die is from L'il Inker... LOVE that!

So thanks for stopping by today!  I'll be back again with Day 3 and Day 5 of Camp Create projects... I've got some ideas brewing!


Wednesday, August 16, 2017

Camp Create Day 2: Magnificent Masking


I'm back for Day 2 of MFT Camp Create: Magnificent Masking!  I'm using some new stamps I got from Victorine Originals today....


I don't know why I love Alice in Wonderland images so much... but I do and when I found these stamps over at Victorine Originals I knew I must have some (preferrably all-but at least some) of them!  Here's how I created my background using masking (yes... I actually remembered to take a couple pics along the way!)


I started with a piece of white cardstock a little larger than what I knew I'd want... I like to have the option of cutting down the piece or diecutting it after I'm done.  I used some washi tape (I have plenty of it!) and placed it down in diagonal stripes on the paper.  Then I took my Milled Lavender Distress Ink and blended it in the open white areas.  When that was done, I peeled the tape off and tossed it.


Then I took some fresh washi and placed it the opposite way across my inked lines... I decided to alternate skinny and wide rows for the darker color and once it was inked and the washi was peeled off I was so happy I did... LOVE the look of it.  My last step was to splatter some water droplets over the whole thing and blot off the excess water to distress it just a tiny bit... you can see that in the finished photo...


Just love this White Rabbit stamp from Victorine Originals!  And that scalloped rectangle is from My Favorite Things... it's a set of varying sizes and I used the second largest here but cut it in vellum so as not to completely cover up my background masterpiece...lol!


Let's face it... I usually am, so I'm sure this card will come in handy fairly soon...lol!  The sentiment is available at Victorine Originals also and the banner was cut using my oh so frequently used CDD Flag Banner Dies...


I used a little bit of beautiful purple seam binding from  and my favorite fabric hearts from Fun Stampers Journey.

I'm joining in on the Victorine Originals Purple Challenge... it's not too late to play... you have about a day left and you don't have to use Victorine Originals stamps to play along!  And do be sure to check out MFT Camp Create... learning and creating!  Can't ask for anything more!  Shopping?  Well, you can do that too!...lol!


Tuesday, August 15, 2017

MFT Camp Create Day I: Inlaid Made Easy

 So excited to be playing along with this round of MFT Camp Create!  5 Days of awesome projects and lots of prizes to win!  Today is Day 1 and it's all about inlaying dies... there is a very cool video here if you aren't sure how to get started!  When I saw the first project I immediately thought of some of the awesome Paper Smooches dies that lend themselves perfectly to this technique!


I love these dies because they cut out the outline and then all of the pieces.  I started by taking a white piece of paper and cut the flower out of the center.  This is the Houseplant Die from Paper Smooches.  I kept all of the pieces in white and used my Zig watercolor markers to color each of the pieces.  The other option would be to cut the flower a few times from some different colors of paper, but I really liked the idea of just coloring the pieces...


I flipped over the paper that I diecut the flower out of onto my workspace.  As I colored each piece in, I placed it into the negative space where it belonged, like putting together a puzzle.  After I filled in all of the spaces, I used some scotch tape to hold the pieces together and when I was done I could flip over the piece and all of the inserted parts stayed put!  This was so much fun and I am definitely going to do this again... thinking of the Paper Smooches cactus die!!


I had this Hello Sunshine diecut cut with a Stamplorations die sitting on my table ... a leftover from a previous project that was rejected because believe it or not... it was too sparkly!  Whaaaaat?  Yeah... I knew I'd use it somewhere else thought so I saved it... and I was right because it was perfect for this project.


Hope you enjoyed it here and please do check out the Camp Create posts... it is so much fun to learn new techniques and/or get tips on easier ways to do them at the very least!  


Saturday, June 17, 2017

MFT Camp Create 2017-Glitzy Glitter


Last day for MFT Camp Create 2017-Glitzy Glitter!  Great video (again) on the blog regarding adding a special tape to your paper before diecutting and then adding glitter to it after you cut it but before you adhere it... I didn't have enough colors of actual glitter for my liking, so I cut my dies directly from glitter paper... I am filing the video away for later though because I have glitter... and I have the tape.. and I have the dies... I just haven't used them all together yet!  Anyway, here is my project:


One of the cards on the blog has a flamingo on it and I don't have the MFT flamingo, but I did have this Reverse Confetti one that I bought... a while ago... and hadn't used and wanted to ... so I inked it up!  (I got it so long ago that I think it's retired now...lol!)   I also used the Reverse Confetti True Love paper pad I got not AS long ago, but it was a while ago also.  That pretty scalloped Rectangle is from My Favorite Things... that set is one of my favorite...


Isn't she sweet?  I had her body and legs all stamped before I remembered I had also bought the dies...lol!  So since I didn't want to start over, I decided I'd pop up the wing and I love the way it looks so I'm glad I did...


A couple more of my favorite die sets are the leaves you see here... they are from the Leafy Greenery set and it is quite awesome!  I also used the Flourish die from my dry embossing project.  I cut them all of glitter paper since this is a glitter challenge and I have lots of it...lol!  I love these paper flowers from Hobby Lobby... they were the perfect addition because they feel a little tropical... I think anyway... but I love them so I keep a bunch hanging around and replenish every time they have a sale.


And this sentiment is from the Reverse Confetti Paper Crane set.  It's got some great sentiments on it and pssst!  It's on sale right now... the Flamingo set also had some great sentiments, however they were too big for my space so I was happy I had these.


And for a little more glitter, I used some glittery gems instead of sequins.. did I mention I love glitter??  Don't fear the glitter!

So I earned this badge:


And I'm done!  I made it through all of the projects for all of the days.. learned some new things for sure... looking forward to my next camp!  Speaking of... this coming Friday is the start of the Summer Coffee Hop!!!  Maybe I should have been getting ready for that?  Nope... it will be a flurry of paper confetti, sequins and glitter all over again!  Come back this week for The Cutting Cafe Inspiration and maybe a couple surprises... idk... maybe...