Showing posts with label Bold Flowers Stencil. Show all posts

Thursday, October 1, 2020

CAS-ual Fridays Stamps Release Day 4 - Happy Birthday!


Welcome back!  It's the last day of New Release inspiration over at CAS-ual Fridays Stamps!  Today we're sharing the Birthday Fridays!

I used the Bold Flower stencil and some beautiful Catherine Pooler inks to create my background.  First I stenciled on the flowers using the inks and a sponge.  Then I dabbed the remainder of the ink from the sponges all over the panel in a random pattern.  Finally I smooshed a little ink onto a piece of plastic packaging and used a water brush to splatter some over the panel.


I cut the Happy Birthday from glitter paper and twice more from white cardstock.  I didn't save the little curvy underscore lines, but I did make sure to hang onto the dot for my eye.  I stacked all of the pieces together and popped it up over the background.  Finally, I heat embossed a sentiment from the Sassy Celebrations stamp set onto purple cardstock and matted that one pink and then white and popped that up underneath.  A few sequins and I was done!

That's me for today!  Be sure to head on over to the CAS-ual Fridays Stamps Blog to see what everyone has created for your viewing pleasure!  And if you've seen something that you must have, I have this for you:


Thanks so much for stopping and hope you come back again soon!


Monday, July 13, 2020

What's Up Friend - CAS-ual Fridays Stamps


Welcome back!  Today I'm sharing another card using the Bold Flower stencil along with the Somebunny stamp set and a few other things!  I'm painting with Glitter again on this one because I'm playing with this technique this month and I love it!


I started by using Distress Oxides and the Bold Flowers stencil to add the two largest flowers to my slimline sized card.  I knew I wanted to use a few colors on the petals so I stuck with the largest flower on the stencil and added one off the left edge at the top and off of the right edge at the bottom.  Then I took a paint tray and added a little bit of anemone colored Eco Sparkles glitter from Wow and some Glossy Accents and mixed them together.  You don't need a lot and you can always add just a little water to the mix if you need to thin it out a bit while you paint.


After I got done "painting" the glitter onto the purple areas, I rinsed out my paint tray and grabbed pink, orange and yellow glitters from my stash and repeated the process with each.... rinsing out in between so that cleanup would be easy... and it was!  Before I set that aside to dry I sprayed some Distress Oxide Spray in purple over the panel and then set it aside.


I cut the Friend word die from the Sweet Friends word die set once from purple card stock and twice more from white and stacked and glued them together.  Then I decided it would be fun to paint the sentiment with glitter too, so I did!  I wanted even more dimension for this part of my sentiment so I decided to add additional Glossy Accents over the top of it and set it aside to dry.


I colored in my bunny and balloon and then decided the balloon could use a little sparkle too...lol!  So I broke out the chunky orange glitter and liquid glass and proceeded to paint that too... I can't get enough!


I absolutely love the shimmer of the glitter and glossy accents painted on!  It's much lighter than just adding glitter to your project.  The Glossy Accents is light enough that it doesn't buckle your paper, and there is no glitter to fall off of your project either at your house or your recipients!  It's all securely in place with the Glossy Accents... smooth and sparkly!

I used one of the short sentiment pieces from Somebunny along with the Friend word die to build my sentiment.


I just added some jewels and sequins and I was done!

So thanks for joining me today!  I hope you enjoyed it!  Should you see something that you must have today, I have this for you:


And you just might find some really great deals in the sale section too!

Come again soon for more CAS-ual Fridays Inspiration!


Saturday, July 11, 2020

Thinking of You - CASual Fridays Crafting of Hue Sponsorship!


Welcome back!  Today is a fun day because CAS-ual Fridays is sponsoring over at the Crafting of Hue Facebook Group (Be sure to check that out) again and this time around we're featuring Stencils!  AND all stencils are $5 through Sunday, July 12th!  (AND... shhhhh... you may or may not find some items in the shop marked down to a low... loooowwww price of $.99!!  YES.  Ninety-nine cents.  And don't forget my discount code at the end of this post!)  AND one lucky commentor from all of the hop stops will win a $50 gift code to the shop!  So be sure to visit and leave some love at all of your stops!

Now!  On with our stencil inspiration:


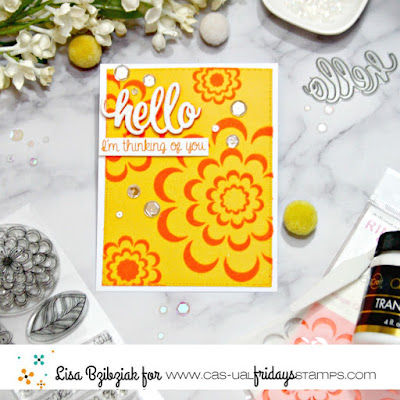
Oh... I'm sorry... forgot to tell you to put on your shades!  I've made a bright and cheery card today using some Neon Pop Flock, Transfer Gel and the fun and pretty Bold Flower Stencil from the CAS-ual Fridays shop!  (Along with a couple other items!)


I started with that bright yellow cardstock and applied some Deco Foil Transfer Gel through the Bold Flower Stencil and set it aside to dry.   While it was drying I cut the Hello from glitter paper with a die from the Sweet Friend Die set and then again from white cardstock and a third time from orange.  Then I stacked them together with the orange at the bottom and offset it just a bit to give the Hello a bit of an orange "shadow".


I stamped the sentiment from Pretty Posies in orange.  At this point, I still had some drying time to go so I started on another card for tomorrow!  Once the gel was completely dry, I laid the Neon Pop Flock sheet over the stenciled cardstock (flock side touching the dried gel) and ran it through my Minc after heating it up on the 4 setting.  It came out perfectly and I assembled all of the pieces of my card along with some clear sequins.


And that's me for today!  IDK why but I've been all about the yellow lately.. feeling kind of sunshiny I guess!  And it's so fun to feel the texture on these flocked flowers.. just love it!!

That's me for today!  Check out the hop list below for your next stop!  Get ready to be inspired by all of the stencil techniques!  And be sure to come back here Monday because I'll have some more CAS-ual Fridays stencil inspiration for you!  But if there are some stencils you want, grab them at $5 by tomorrow, Sunday, July 12th!  And don't forget, I've got this for you:


And don't forget to see what you can get at $.99!!!

And here are links to all of the goodness from my teamies:


Lisa Bzibziak (That's me!)

Thank you for stopping and come again soon!


Wednesday, April 22, 2020

CAS-ual Fridays Stamps Release - Bold Flowers & Blossom Bubble Stencils


Welcome to Day 4 of CAS-ual Fridays Release Inspiration!  Today we're playing with the Bold Flowers and Blossom Bubble Stencils!  I created a couple coordinating cards using two different types of texture paste.


For this one, I applied some Grit Paste through the stencil and then splattered the panel with some Glitter Watercolors and white acrylic paint.  I added a band across the bottom so that Hello word die wouldn't get lost.


For this one, I used some Pearlescent Embossing Paste to add just the flowers (without the outline) from the Blossom Bubble stencil and splattered some white acrylic paint.  This time I used a couple banners as a resting place for my Hope word die.  I just love the pretty font of these word dies!  I like to cut them at least three time and layer them for dimension.

Now be sure to head on over to the CAS-ual Fridays Stamps Blog to see what everyone has created for you today!  And should you see something you need to have, I have this for you:

That's me for today!  Thank you so much for stopping and I hope you'll come again soon!