Showing posts with label Glitter. Show all posts

Monday, July 26, 2021

CAS-ual Fridays Stencil Release - Falling Leaves Stencil


Welcome back for the final day of New Release Inspiration at CAS-ual Fridays Stamps!  Today we're sharing projects using the Falling Leaves Stencil!


I decided to create a Fall-ish card using a panel cut from a gel print background.  I used the stencil to apply some gold texture paste.  I cleaned the stencil and dried it and then placed it back over the gel and pressed on some Flower Soft in autumn colors, pressing it into the gel and then I added some glitter in an autumn orange.  I pressed them both in slightly and then let it dry.  Once dry, I used a stiff paintbrush to remove the excess.


Finally the Big Thanks Duo was the perfect sentiment... in gold and brown.

Thanks so much for stopping!  Hope you'll come again soon!

Now be sure hop on over to the CAS-ual Fridays Stamps Blog to see what everyone has created for you using this fabulous stencil!


Friday, March 12, 2021

Miss Ink Stamps-New Stencil Release-Sending Hugs


Happy Friday!  Today I'm showing off another one of the new stencils over in the Miss Ink shop and I've created some Glitter Paste using the Pink Flamingo Dazzle Dust available in the shop mixed with Glossy Accents!


This is the new Heirloom Blooms stencil and don't you love how that Dazzle Dust changes colors... here you can see the difference where the light is shining brighter it's a soft opalescent pink and as you angle it it becomes a deeper flamingo pink!


It's perfect along with some images from Springtime Banners and the Alice Background and a simple sentiment from Everyday Sentiments.

Thanks so much for stopping!  I hope you enjoyed it and you'll come again soon!


Tuesday, March 9, 2021

CAS-ual Fridays Stamps Release Day 1 - Raindrops Duo and Scattered Showers Stencil


Excited because today we are sharing projects made using some of the fun and fabulous new CAS-ual Fridays products!  We've got a new stencil and a great new stamp and die set.  I've used both on this one!


I just love the new Raindrops duo!  The cute clouds, lightning and raindrop stamps and dies are perfect and the sentiments are the icing!

I started by blending some Distress Oxides onto a panel and then laid the stencil over the panel and added more of the same blue through it.  Next I added some clear texture paste through it and while it was wet, sprinkled a little glitter over it and set it aside to dry.


The clouds, lightning and raindrops were cut from white glitter paper and I stamped the sentiment and then cut it into strips.  When the paste was dry, I layered it onto two cardstock layers and then popped the sentiment and diecuts onto the front.  Finally just a few sequins and done!

Thanks so much for stopping!  Be sure to head on over to the CAS-ual Fridays Stamps blog to see what everyone has created for you for today and you can find all the new products here!

And should you decide you need anything, I have this for you:


Be sure to check back tomorrow for more New Release Inspiration!


Friday, March 5, 2021

Miss Ink Stamps Stencil Release - Latte Love!


Welcome back!  Excited because today we've got some awesome new stencils in the Miss Ink shop!  I'm sharing Latte Love with you today!


Sometimes all you need is a fabulous stencil and a great sentiment!  I blended some Distress Oxide Inks in a circle pattern through the stencil I offset on the side of this one.  I was planning on a full rainbow, but decided to go with these colors instead.  When I was done blending the inks, I wiped off the top of the stencil and then applied some clear texture paste through it.   While it was wet I sprinkled on just a tiny bit of white glitter for a little bit of sparkle.


While it was driving I stamped one of the sentiments from Unbirthday using a few different purples and fussy cut it out.  I added foam tape and then popped it up over the stenciled area.  We all know some one who doesn't like to celebrate their birthday and this sentiment is perfect for the other 364 days of the year!

Thanks for stopping and hope you enjoyed it!  You can find all of the fantastic stencils over at Miss Ink at this link here!  We'll be sharing makes with all of the new stencils over the next week or so and there's a giveway over at the Miss Ink account on IG!  Head on over there for the details!


Friday, February 26, 2021

Miss Ink Stamps - Heavenly Day!


Welcome!!  Hope you put on your sunglasses before you popped over here!  I've got some color for you today!


I had some fun with Evo Paper, Alcohol Inks and Texture paste again and with that gorgeous Stained Glass Floral stencil...sure does make me happy!


I added a little bit of holographic glitter before the alcohol ink was dry again...and some of the inks are Pearls so I'm loving the shine on that background.  And it was fun to color that banner in a rainbow pattern to match the background... as well as the flowers!


And along with these beautiful images from Little Angel and Springtime Banners... This would be heaven to me.

Thanks so much for stopping!  I hope you enjoyed your visit and that  you'll come back again soon!


Monday, July 27, 2020

Background With A Bang - CAS-ual Fridays Stamps


I'm up on the blog at CAS-ual Fridays Stamps with this one!  If you'd like more details and links, you can join me over there!

Thanks so much for stopping by!  Hope you enjoyed it you'll visit again soon!

Friday, July 24, 2020

How Do You Make A Mouse Smile? - Miss Ink Stamps


Hello!  Welcome back!  I have been having so much fun this month playing with the Say Cheese stamp set and painting with glitter!  I think I saved the best for last.. well, at least my favorite!


With a sentiment like this, you just NEED to have a photo with friends!  I used all of the critters from Say Cheese along with the present, balloons and birthday hats from Punny Farm Pigs!


I painted the balloons with chunky glitter mixed in Glossy Accents in each color of the balloons!


And you may be able to tell that right now I'm quite partial to the Halftone Diamond stencil!  It is SO much fun and I love the white space it leaves along with all of that color!

We've got some cool stuff coming up from Miss Ink starting next week so be sure to check back!  SO excited!

Thanks for stopping and hope you'll come again soon!


Friday, July 17, 2020

I Will Sit With You - Miss Ink Stamps


I'm back again today with some more Miss Ink Stamps!  I'm taking a break from using the Say Cheese stamp set just for a moment (big plans for that one for next week!) to bring you some pretty Gardenia florals along with the In The Dark sentiment... and of course I'm painting with glitter again!


I painted my stenciled background again but this time I painted over some black texture paste that I applied through the Circular Harlequin stencil.  After I added the paste, I added a mixture of white and chunky black glitter over it.  I threw a few of those Dazzle Stars in also while it was wet.


I painted some of the white glitter onto the flower petals too after coloring them lightly with Copics and then added the frame, florals and heat embossed sentiment to the card.


And that's me for today!  Thanks so much for stopping and hope you'll come again soon!

Thursday, July 16, 2020

Have An Ice Day - Miss Ink Stamps


I'm up on the blog over at Miss Ink Stamps and painting with Glitter!  If you'd like links and details on this one, please do join me over there!

Thanks so much for stopping and come again soon!

Friday, July 10, 2020

Don't Worry Be Hoppy - Miss Ink Stamps


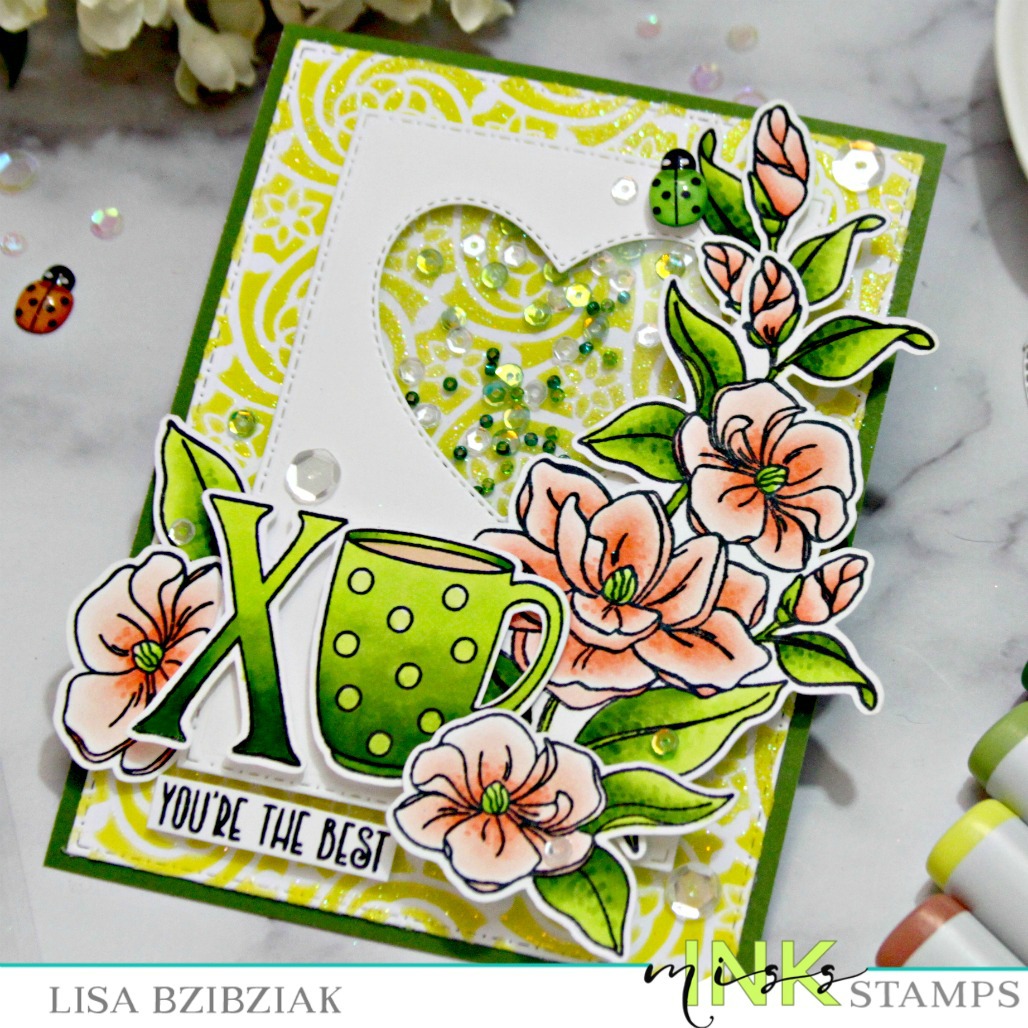
Welcome back!  I've got some more Miss Ink cuteness for you today and I'm painting with glitter again!  Check out that pond!


This technique was perfect for the water in the pond... I love the way it shines like water would!  I used the Scene Builder stencil to create most of the background.  I used a curvy edge from my stash for the grass with some Lucky Clover and Twisted Citron.  Then I added the clouds using Tumbled Glass.  Next I used a heat gun to dry the ink before I added my sun so that the yellow and blue wouldn't blend to green.  Then I masked off the grass and blended on my sun with Squeezed Lemonade and Spiced Marmalade.  Then blended the pond onto some scrap cardstock using Mermaid Lagoon and Broken China and cut it out.  I stenciled some grass tufts directly onto the grass area and also onto some scrap and cut that out.  I popped up the pond over the grass and then placed the extra grassy tufts around the pond.


Once the pond was attached,  I took a paint tray and squirted in a little Glossy Accents and added some glitter.. stirred it up and painted the water with it.  then I added the extra grass pieces around it.


I then started adding all of my Copic colored images with varying thicknesses of foam tape.  I just love these adorable critters from the Say Cheese set... the cutie pie costumed mice and their little cohorts make me smile every time!


And the little coneflowers from the Springtime Bunny set made the perfect accents around the pond and I saved a couple to place with the punny sentiment.


Do I even need to mention my favorite Trinity sequins??


And that's me... don't you just love how that glitter makes that water glimmer??  Loving this technique of painting with glitter!

I'm playing along over at Double Trouble's current challenge which is a Tic Tac Toe Challenge:


I'm playing right down the middle top to bottom!  And since I've got sequins on my project, I meet the twist of "Bling".  Also, DT is partnering with Cupcake Inspirations this week whose challenge is Flowers w/Pearls or Sequins!


  You should check these two out for sure and play along for chances to win a prize!

Thanks so much for stopping and hope you'll come again soon!


Friday, May 22, 2020

Coffee Lovers Blog Hop - CASual Fridays Stamps


Hello!  Welcome to the Coffee Lovers Blog Hop!  I have a few posts today and here I'm sharing with you some CAS-ual Fridays Stamps Inspiration!  CAS-ual Fridays is one of the many sponsors offering up awesome prizes for linking up to the hop!  

You just need to create something with a coffee, tea, or cocoa theme and link it up for your chance(s) to win!  (Yup! You can link up multiple new creations for multiple chances!).  For all of the rules and to check out who the sponsors are, link up or just start hopping, check out the main hop post here up on the Coffee Loving Cardmakers Blog!  And for even more fun, if you're not already a member, join us over in the Coffee Loving Papercrafters Group on Facebook here where we share caffeinated inspiration all year long!  (Be sure to answer all of the questions to get added right away!

Here's how I was inspired:


At CAS-ual Fridays we're sharing projects using the newly released Coffee Chips Chipboard!  I had lots of fun with mine today and did some foiling on them!


I started this one by blending inks in a rainbow pattern onto my panel.  Then I laid the By The Beans stencil over it and applied some Translucent Embossing Paste through it.  I sprinkled some glitter over the top.   I wasn't trying to cover the entire embossed area with glitter... whatever stuck was fine and when it was dry I just tapped it off and then ran a wide brush across it to remove the excess... it leaves such a pretty sparkly surface without a ton of glitter... not that there's anything wrong with that!


I took a small paintbrush and applied some transfer gel onto the chipboard pieces.  I was fairly generous but not too heavy handed and made sure to cover the entire surface of them.  I set those aside to dry completely.  Then I cut some white cardstock using the Bubble Box Fri-Dies and secured it in the Misti to stamp the sentiment from the Stay Strong stamp set onto it leaving room for my coffee cups when they were ready.  Once the gel was dry (the jar says an hour... I'll be honest, I left it overnight because I'm impatient and went on to something else...lol!) I placed some Rainbow Deco Foil over the three pieces and ran them through my Minc on the 4 setting.  So pretty aren't they??  And I love that the Coffee word chipboard piece fit perfectly over the Coffee word in this sentiment stamp so I didn't even have to piece the sentiment together!  


I just added a few of my favorite sequins and I was done!

Thank you so much for stopping by today!  Be sure you check out what my teamies have created for you today!

And should you decide to shop, Coffee themed products are 25% off for the hop!  And in addition you can use one of the DT codes for an additional 15% off any products!  Here's mine:


Now get making and link up for your chance to win!  CAS-ual Fridays is sponsoring a $25 gift code and three flash prizes of the Coffee Chips Chipboard packs!!  What are you waiting for?


Friday, May 8, 2020

You're The Best - Miss Ink Stamps


Welcome to some Miss Ink Stamps inspiration!  I am sharing a card for someone very special today!  Someone who is the best!

I started with the background.  I used the Mouse Flower Stencil to apply some Color Fuse Inks in a couple different greens.  I rinsed and dried the stencil before placing it back over the ink blended background and added some Ranger Gloss Translucent Texture Paste.  Then while it was wet I sprinkled just a little bit of glitter over it.. not evenly because I didn't want a totally glittered background but just some sparkle here and there and I figured whatever stuck... stuck!  I set it aside to dry.


I stamped, cut and colored all of my images from the Gardenia and Brewtiful stamp sets ahead of time and colored them... the flowers using some Copic in R000, R00, R01, and R02.   For the leaves I used YG01, YG03 and YG17.    

I cut a rectangle panel with a heart window by placing both dies in place at the same time and taping them in place with some washi.  That way I only had to run it through the Gemini once.  I added acetate to the inside of this panel and then foam tape around the heart and then as support to the rest of the panel.  I eyeballed where the panel would go and added some sequins to that area... just a few so that my stenciled part would still show through.


I colored the "XO" from the Brewtiful stamp set in an ombre style using the same colors as for the leaves of the flowers.  Then using varying thicknesses of foam tape, I added all of my pieces parts to the card and this sentiment from the Everyday Sentiments set!


I almost forgot about that sweet green ladybug up in the top right!  Isn't that so fun and cute!?  You can get those in the shop too right here and they come in a few different colors!

And that's me for today!  Well, no... I'm not going to tell you who it's for...lol!  But she's pretty special and I think she'll like it ok...lol!

Thanks for stopping and hope you'll come again soon!

Friday, January 24, 2020

Sending Big Hugs - Miss Ink Stamps


I'm back again with some more Miss Ink Dazzle Dust!  Today I'm playing with the Rose Garden variety!


It's a beautiful pink to green shift that made me think of Spring!


I made a paste again by mixing the glitter along with some Glossy Accents and applied it through the Halftone Lines Bold Edges stencil.


Once it was dry, I laid it under my Misti and placed a heavy box on top of it because it was a little curly.  I left it over night and it worked very nicely to flatten it.  I used strong adhesive from Scrapbook Adhesives along all of the edges to be sure it stayed that way!  And the adorable bunny and beautiful florals and sentiment ribbon from Springtime Bunnies and Springtime Banners were perfect to decorate along with a sentiment from the Decaf Background set (I just curved it a little on my block so that it would fit perfectly in the banner).


And there you have it!  I think this would make a beautiful Springtime or Valentines card for anyone!

Thanks for stopping!  Be sure to come back soon and often for more inspiration!