Monday, July 31, 2017

Paper Sweeties Challenge - August 2017 Anything Goes!


Hip Hip Hooray is right!  Not only is it time for a new challenge over at Paper Sweeties, but it's also time for a Birthday Celebration!!  That's right... August is the 5th birthday of Paper Sweeties!  You can read all about Debbie's journey here if you need some inspiration to just do what your heart says you should do!

And here is what I've made for you today:


I don't know why it took me so long to realize that the Window Sweet Cut makes a great layering die also!  I used it here to frame my cake... mmmm.... cake.... oh sorry!  Was distracted for a minute...


I'm celebrating with some cake... because I mean... what's a birthday without cake??  I've used the cake from the Party Time Stamp and Sweet Cuts sets and stamped an extra of the top of the cake to cut out some of those same flowers to embellish my table.  I accented the center of my flowers with some glittery gel pen and liquid glass.  I also used the Rectangle Scallop Frame Sweet Cuts to cut a little bit of frosting decoration for my cake.  The more frosting the better in my opinion!


The Birthday Banners Stamps and Sweet Cuts ... what can I say... so much fun!  I also may or may not have used some glitter gel pens on them and also possibly on the sentiment... speaking of the sentiment....


Well, that's cool isn't it?

Well, of course I scattered around a few Marshmallow Sequins for good measure!

Also!  Check this out!

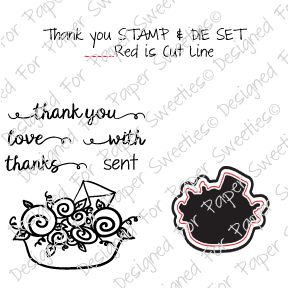
---> SPECIAL ANNIVERSARY ANNOUNCEMENT <--- strong="">

In honor of our 5th birthday, we are giving all of our valued customers the opportunity to earn SPECIAL GIFTS in August - whooo hooo!  Everyone who places a $25 order through our website (before tax, shipping and discounts) will receive a complimentary VIP 'Thank You' stamp set!  Everyone who places a $50 order through our website (before tax, shipping and discounts) will receive a complimentary VIP 'Thank You' stamp set AND coordinating Sweet Cuts die!

So thanks for stopping by!  Be sure to join the Paper Sweeties Group on Facebook here!  I have a feeling there might be some stuff going on this month and you don't want to miss out!
Now be sure to check out what all of my teamies have made for you this month including our most awesome guest designer, Tasha!

Debbie Marcinkiewicz – Paper Sweeties
Michele Henderson
Michelle Bala
Nancy Salkeld
August guest designer: Tasha RJ

And I sure hope you play along with us this month!  You could win some free Paper Sweeties awesomeness AND also be a future guest designer!


Monday, July 24, 2017

Atlantic Hearts Sketch Challenge #222


Welcome to this week's Atlantic Hearts Sketch Challenge!  Today I'm using some Doodlebug papers and a digi called Dog that was created by Anne Fenton from Anne's Digital Art.  I'm playing along with the July Progressive Challenge over at the Outlawz.  Each month you get a free image to play along and if you continue to play each month you continue to receive the free images!  It's a fun challenge!


This sweet image reminds me of my dog, Jack a bit so I colored him a reddish brown to match him.  I added a little bit of grass and grassy hills to the image and colored it all with Copics.  I printed the image and then die cut it with an MFT Double Stitched Circle die.  Then I colored him in and then decided to add a little to the background.  A tip-it's much easier to create your background first... but if you forget you can make it work... just have to be a bit more careful.. after I got done creating the background, I added a few more flicks to his fur to fill in any spaces.


I used some MFT dies for the heart and Elizabeth Crafts dies for the paw.  The sentiment is from the Doodlebug paper pad, Puppy Love, I got mine from CDD here (love that they add some of these to the pads..sometimes it's just what you need and I don't have to hunt for a sentiment).  A few old metal sticky embellishments from my stash and done!
Here's the sketch!  Hope you'll play along with us this week!


And in case you're wondering, here's Jack!


Wednesday, July 19, 2017

Owl Be Seeing You!


Popping in with a quick post .... a quick card I realized I had to make for a co-worker who loves owls... I decided to use this owl stamp I got a long time ago... it's a Darcie's stamp and I knew she'd love it because she loves owls like I do... and she's not really about the cute owls... so I dug this one out and can't figure out why I haven't used it in so long!  In fact, I think I'll take this one with me on vacation and use it again...


I needed to keep it very simple because most of my stuff is packed to go right now so I took some kraft paper and mounted it onto some pretty gold foil cardstock from a Christmas paper pad I got at Michael's on clearance last year.  I stamped the owl in Versamark and heat embossed it in gold.


While I had the embossing powder and heat gun out I thought I'd add the flourish from the set at the top knowing I'd cover some of it up, but I thought it would add a nice touch.  In case she wanted to keep this on her desk I didn't want it to say Happy Birthday on the outside of the card, so I chose this sentiment from an old CTMH set that I love and used it along with a strip from the gold card base...I added a few sequins from the Latte Coffee sequins from Paper Sweeties... LOVE this mix!


And that was that!  I had such a hard time photographing this one and still don't feel the photos do it justice... it really is so pretty in person... and she loved it!  I made it and gave it to her yesterday...

So... I'm on my way tomorrow... I have a few scheduled posts while I'm away and hoping to have lots of things to show you when I get back!

See you soon!  Don't be a stranger!  I've been super busy at work and home this past week getting ready, but I'll be visiting you over the next week while I'm away... Happy Crafting!

Oh!  And don't forget about my 100 follower celebration in July!  You can find out more by clicking here!


Cutting Cafe Inspiration-Silhouettes


Welcome back for some Cutting Cafe Inspiration!  This time around we're playing with Silhouettes!  The Fun With Silhouettes Printable set is fantastic!  Lots of printable images and some come in a cutting file format also.. I used a few of the SVG images and cut them from my Cricut.  (I'm having some printer issues... luckily my birthday is coming soon!)  The Teapot, Cake Plate, Cupcake and Teacup are all cut from this file.


I was wishing I had a corner die that I could use for this.. originally because the sentiment I wanted to use was kind of large and I was going to add it to the corner, but didn't want to cover up my pretty floral border.  I had an extra piece of this beautiful paper from the Authentique Beloved 6x6 paper pad (which you can find in the Cutting Cafe Shop here!).  Since I didn't have a corner die that would work here, I used the same stitched background die and cut so it was placed in the same corner as my original (my paper wasn't a full sheet... I had cut something out of it... but the corner was in tact which is all I needed).  Then I took a die that was curvy on the outer cut.. say.. another layer or a label die... and placed it inside that piece I just cut to leave as much width as I wanted.  Then all I had to do was cut in a couple strategic locations on the top and side to make it a corner.  Could I have cut my inside curve by hand?  Probably.  Would I have messed up the cut on my only piece of that paper I had left?  Most likely.  So the die was the perfect solution!  I ended up choosing a different sentiment, but loved the depth the corner piece gave anyway...


I chose to cut my teacup from some more pretty paper from the Beloved paper.  I'd buy that cup!  I used my gold paint pen to add some gold touches to it.  I love how highlighting that one shape with the pretty floral brings the teacup forward as if the rest is in the shadows.


And here is my sentiment!  I was so happy to still have the rest of my sentiments from the 3D cup I made during the Coffee Lovers Hop laying around.  I used a flag banner die to cut it out and it ended up being just right!

Love the look of these silhouettes!  They are very dark and I think it helped to have a touch of black in my printed papers... hope you get a chance to play with these!  And be sure to checkout what my teamies have made for you.  On the 21st start at the Cutting Cafe blog here , comment there for a chance to win some free files, and then check out what everyone has created for your viewing pleasure!

Thanks for stopping and come back again soon!  I'm on vacation, but I'll be posting here and there and while I'm away I'll be creating more stuff to share with you when I get back!

Monday, July 17, 2017

Atlantic Hearts Sketch Challenge #221


Welcome to this week's Atlantic Hearts Sketch Challenge!  This week I'm sharing a card I made using an image from Createful Heart Digis & Design, some Doodlebug papers, and some CDD and Heartfelt Creations dies.


This Dragonfly Hi image is available for free if you play along with the challenge that runs until July 21st!  Join the group on facebook and play along!  He's a cutie!  I colored him in with Copics and then added some dots on his wings with some glitter gel pens and when those were dry added some Wink of Stella... of course as usual, the shine doesn't show up very well in my photo, but it really sparkles in person.


I added a few paper flowers from my stash.. believe I got these at Hobby Lobby when they had a sale... the little white ones are my favorite.. in fact I emptied my package today so I'll need to watch for the next sale.

Instead of banners under my strip of glitter tape I cut some of the Heartfelt Creations leaves out of green vellum.. LOVE the way they turned out... 


These leaves from Heartfelt Creations are among my favorite... I use them altogether like this in a bunch or they are also great to cut apart and just use a few when you add flowers to a piece... and isn't that pretty inside scalloped frame from CDD beautiful... I added some vellum to the inside to help Mr. Dragonfly stand out a bit...


And instead of spending half an hour trying to pick a sentiment, I used one of the sentiments from the Doodlebug papers I was using.. and those pretty clear flower sequins are from Kat Scrappiness... I love clear sequins and love that these are flower shaped.

So there you are!  Hope you'll play along with Atlantic Hearts this week!  It's another great sketch from Michelle!


Saturday, July 15, 2017

Paper Sweeties July 2017 New Release Rewind!


Welcome to the Release Rewind over at Paper Sweeties!  Today we're sharing with you projects where we've mixed the old with the new... I used some images from the I Love Summer Stamp and Sweet Cuts sets along with the new  Kindness Matters Stamps and Sweet Cuts and the new Rectangle Scallop Frames Sweet Cuts.  


Love the sentiments you can build from the Kindness Matters set...love the fonts and love the sayings...


The butterfly, bird and birdhouse are from I Love Summer.. and just love this wreath from Kindness Matters!  It just makes everything a little sweeter!


It really is... thanks so much for stopping and hope to see you again soon!  In the meantime be sure to visit my teamies to see what they've made for you today:

Nancy Salkeld

There's this going on!  Sale is limited to in stock items only and some sets won't be available much longer!  Get 'em while you can!


And don't forget to play along with us!


Friday, July 14, 2017

Paper Sweeties July 2017 New Release Party!


It's a Release Party over at Paper Sweeties!   Today all of the new products are available in the shop!  I thought I'd bring a little sunshine into your day today... we've got plenty here to go around!


I made a shaker by cutting the Rectangle Scallop Frame and cut one out of the stripey paper and then cut one out of some white cardstock.  On the stripey paper I was left with the outer scalloped outline.  I added my acetate to the back of the striped piece and then glued the scalloped frame back onto the acetate so that it fit flat into the cutout.  Then I added popup tape around the frame and over the back of the entire front piece to give it support...glued my stamped piece to the base, added some sequins on top and adhered my top piece over them.


I love that the sweet cuts for this wreath cut this dainty wreath out leaving a thin circular frame that is so fun and playful to add to almost any piece.


Here it is shaken up... love it!

Thanks for stopping here and now stop at these places...

Debbie Marcinkiewicz – Paper Sweeties
Nancy Salkeld

Don't forget about this!  Throw some Holiday items in your cart and use the code to get 40% off of Holiday sets!  Sale is limited to in stock items only and some sets won't be available much longer!  Get 'em while you can!


And please come and play with us for a chance to win!