Showing posts with label The Cutting Café Shop. Show all posts

Friday, September 20, 2019

Cutting Cafe Inspiration - An Awesome Backpack?!


Welcome to some Cutting Cafe Inspiration!  We have some very cool projects for you today!  There's a new file in town and you are gonna love it!  This Backpack cutting file is quite awesome and so easy to use!

I picked out some beautiful Photoplay paper that I got at the stamp show last weekend for mine!


There are two separate compartments in the assembled backpack.  The main compartment could fit lots of cute little things... maybe some Chapstick and pencils and small notebook... or some embellishments and ribbon and twine... or a cute set of coordinating cards.... you get the idea!


And the front compartment can hold a few things too... including this cute little 3x3 card.  I used magnets to keep the flaps closed.


I used the same papers for my card and these Layered Flowers were perfect for the front.  I used a cute little sentiment from the Wheelbarrow Deliveries stamp set from The Cutting Cafe Shop.


Adorable and cool right??  Wait until you see what everyone has done with this file!  Head on over to the Cutting Cafe Blog and check them out!  While you're there, comment for your chance to win three files of your choice!

Thanks for stopping!  Come again soon!

Wednesday, August 7, 2019

The Cutting Cafe - Back To School Inspiration!


Welcome to some Cutting Cafe Inspiration!  We've got some fun Back To School projects for you!  I've used the Bus Shaped Card and the adorable From Owl of Us stamp set to create a fun thank you for the person that delivers our treasures safely to school and then back home each day!  I don't have little ones in school any more, but I remember the worry once they left home.  Nothing was right until they got home again.  But it was a little easier when you knew the people who cared for them during the day were wonderful and cared about them too!


This file is fun and SO easy to cut and put together.  I pulled the SVG version into my Cricut Design space; chose colors; and the machine did the rest!  You remember Sassy Owl??  Still love her!  She looks like she doesn't put up with any nonsense!


I mean look what she's got to put up with every day ... and if I remember from my school days, this is pretty accurate.  AND she's gotta drive that huge bus!  Thank goodness for Sassy Owl!  I used some dies from my stash for the heart and sentiment.


Love this file!

Now!  Be sure to head on over to the Cutting Cafe blog to see what everyone has created for you today!  And comment there for your chance to win three files of your choice!  Maybe you'll pick this one!

Thanks for stopping!  Come again soon!

Friday, June 21, 2019

Cutting Cafe Inspiration - Anything Goes!


Welcome to some Cutting Cafe inspiration!  Regina has given us a Free For All this time around and we could use whatever files we wanted... I decided it had been a while since I used this Ready for the 4th of July Elisha Jean & Friends set and since we are nearing the holiday, I thought it was about time!


She is such a cutie!   And the Doodlebug papers I used were perfect!  I die cut the little hearts on her shirt and on the sentiment from one of the design papers in the pad.  I added gold polka dots on her bow and gold gel pen to the stars on the bow and her shoes.


This set comes with some adorable sentiments... I couldn't help but use this one!  And that silver star was just sitting around in my stash waiting to go on this card.


That's me for today!  Be sure to head on over to the Cutting Cafe Blog to see what everyone has created for you.  Comment there for a chance to win three files of your choice and then hop around and check out all of my teamies makes!

Thanks for stopping!

Wednesday, March 6, 2019

The Cutting Cafe - Popcorn Box Inspiration


Welcome to some Cutting Cafe Inspiration!  This time around we're playing with the Popcorn Box File!  I know... I know... those kinda don't look like popcorn boxes and that's definitely not popcorn in there!  But I was in an Easter mood, so I decided to do something different!


I picked out some real old papers that were in the right colors.  I cut the small popcorn box once in white cardstock and then again in the design paper.  I used the DP cut to trim each panel down by just a bit to layer the lighter papers over the cardstock for a sturdier box.  You could definitely cut these out of any kind of paper and put them together as is, but I knew my load was going to be a bit heavier than popcorn, so I re-enforced it a bit!

This set also comes with some really cute striped layers that you can print on your printer and cut out to layer on yours or if you print and cut on your machine, some of the cut files have stripes on them!  If you actually want yours to look like a popcorn box ...lol!


The file comes with a large and small popcorn box with all of the cuts and folds in all the right places... even with the layers specially cut it took me minutes to put the base of these together.  Then I took out that adorable Happy Easter From Your Peeps stamp set from The Cutting Cafe Shop and stamped, colored and cut out a couple images.


I used my dies to add the stitched grass and clouds and then stamped one of the sentiments from the set on black cardstock with Versamark and heat embossed it in white.  I love to add these little label type sentiments to my cards lately!  So sweet, right?


And you know I'm not one for staging my photos too much, but ... I mean... they're Easter Baskets!!!  And while I was in Walgreen picking up some candy ...


This little cutie pie asked if he could come home with me and of course I said yes... I may or may not be playing with this adorable wind up chick while eating some chocolates as you read this!  You'll never know!


So these will go to somebody... I haven't decided for sure yet... maybe I'll just pick someone randomly at work... or if I can figure out how to mail them a little surprise in someone's mailbox...

I'm playing along today with Simon Says Stamp Wednesday Challenge... Simon Says to Create a Scene... oh... I'm creating scenes wherever I go!!  

Now be sure to hop on over to the Cutting Cafe Blog and comment there for your chance to win three files of your choice!  And then see what everyone else has done with this cute Popcorn Box!  And come back soon!  Thanks for stopping!


Monday, January 7, 2019

The Cutting Cafe' - Getting Our Planners On!


Over at the Cutting Cafe we're getting our planners on!  This will be the second year I've been using Regina's Printable Planner pages for my planner and I just love them!  Today I'm sharing with you this year's planner cover.  I changed my format a bit to make my planner a little bit smaller and more convenient to "store".  I've made my pages 6x8" and simply added them to a large ring.

For my cover I started with a thin piece of upcycled cardboard... like from the back of a notepad.  I covered both sides with cardstock and then decorated the front.


I came across this coffee cup shaped card that I created a while ago using this file here and some pretty papers.  I decided to use some leftover papers I had and that cup for the front of planner.


I printed this cute sentiment from the 2019 Planner file on my laser, die cut it out and then ran it through my Minc with some gold sequins foil.  And I had some of those pretty flowers leftover from making my embellishment gifts in December ... already splattered with gold even!  So I added those to it too along with some another cutie pie llama that I cut out of the papers and a few sequins.

On the inside of my cover I added a calendar of the whole year along with another foiled sentiment from the Cutting Cafe Planner file.


And the next page I printed these Special Dates sheets in a small size so they'd all fit on one of my pages for a quick reference of special dates for each month.

And here's how I'm "storing" my planner these days:


As long as I hang it up where it belongs, I won't have to unearth it from wherever it's gotten buried.  Hopefully it will help me to not forget things!

I'll be sharing more of my planner during our next Cutting Cafe post on the 21st!  But until then, head on over to the Cutting Cafe Blog and see what everyone has created and how they are using the planner files!

Thursday, January 3, 2019

Three Amigos Blog Hop Challenge #22 - Shaped Cards!


It's time for a new Three Amigos Blog Hop Challenge!   This month it's all about Shaped Cards!  Create any card with a shape other than a Rectangle or Square!  Here's what I have for you today:


You may remember my recent post using the Ugly Sweater cutting file from The Cutting Cafe!  I had cut a couple extra cards at that time and decided to use the file for something other than Christmas sweaters.  And I had these Janes Doodles images all colored up to use during the Fall/Winter Coffee Lovers Hop and ran out of time (thanks job!) so I decided Fall Sweaters would be awesome!


I chose a brown argyle from the Lawn Fawn Knit Picky Fall paper pack.  I had my card bases cut already so I cut two of the sweater layers .. one from the print and one from brown cardstock.  (And of course this guys got some pumpkin spice coffee!  Are you new here??)


After they were all cut out, I layered on my pieces and swapped the cuffs, neck and waste bands out for a little contrast.  I used the Taylored Expressions Cable Knit embossing folder to emboss the plain cardstock for some sweater texture.  Love that folder!!  I've used it so much during the chilly season.  Then I chose the images and sentiments I would use from the Hello Fall Sentiment Set, Nuts About You, and Pumpkin Spice sets that I had previously colored, cut them out and layered them onto my sweaters.


Aren't those cutie pie squirrels so cuuute!?!  Speaking of pie... I've still got lots more images from these sets so you may be seeing some more soon...lol!

That's it for me today!  Be sure you head on over to Donna's and Susan's places to see what they've created for you today and then head on over to Three Amigos to play along!  We can't wait to see what you create!

Friday, December 21, 2018

These Are A Few of My Favorite Cutting Cafe Things!


Welcome to some Cutting Cafe Inspiration!  Today we're showing some of our favorites... old and new!  To start I'm sharing one of my new favorite files... the Ugly Sweater file!


There are SO many different combinations for this file!  Papers, stamps, cut shapes, die cuts, embellishments!  Here i used it with some winter papers.  I embossed the main part of the sweater using a folder and trimmed it with some plaid (of course).  Then I used this adorable printable owl stamp from the shop!


Then I used some red plaid and cardstock for this one along with the snowflake and HoHoHo cuts from the Ugly Sweater file and some leftover snowflake die cuts I had on my table.


And ... if you know me at all... you can't be surprised I added a little caffeine to one of the sweaters!  This adorable pup from the Cat's Pajamas along with the wreath and bow from the file and the Falala sentiment from a Paper Smooches stamp set!

I cut all of my accessories out at once in white cardstock and used my Copics to color them the colors I wanted.

So there's my new fave set!  Here are a few things I've made with some old faves!


Well, of course this coffee cup shaped card is one of my faves!   I made these two fairly recently and you can get more info at this blog post here!


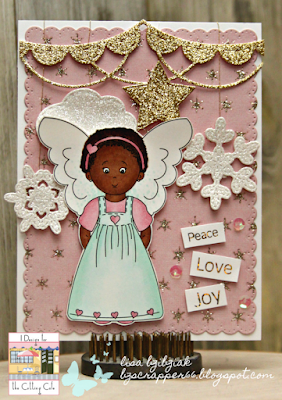
I just love the Elisha Jean images and this Angel printable file is just super sweet!  You can find out more about this one at this blog post here!


And I've got a couple faves in here!  That printable owl... the snowflakes.. and those beautiful ornaments!  You can find out about all of these here!

I'm playing along with the Anything Goes Challenge over at Word Art Wednesday with my ugly sweater!  You should check it out!


Thanks so much for stopping by today!  Hope you've enjoyed your stroll through some of my faves!  Be sure to hop on over to the Cutting Cafe Blog to see what everyone else's faves are!  And comment at the Cutting Cafe Blog for your chance to win three files of your choice!  Maybe they'll be some of my faves too!


Wednesday, December 5, 2018

The Cutting Cafe Inspiration - Christmas and Coffee


Welcome to some Cutting Cafe Inspiration!  This time around it's Designers Choice-Christmas!  Well, of courses I threw in a cuppa!


Did you know that The Cutting Cafe has a whole bunch of Coffee Themed files?  You can find some of them right here including one of my faves, this Coffee Cup Shaped Card 2!  It contains all of the pieces you need to put together a fun To Go Cup shaped card.  I used some Photo Play Mad 4 Plaid Christmas papers for this one.


Then I added that pretty Sentiment that I printed from the printable stamp set.  I diecut the beautiful scene inside the circle from the paper pad.  Then I embellished with some of those pretty handmade flowers that I made a couple weeks go to go in the pretty Embellishment Gift Boxes.  You can check those out here if you'd like!


My second card was lucky to get dressed up with the Echo Park Coffee papers!  You can get those right in the Cutting Cafe Shop here!


For the sentiment I used one of the die cut pieces from the Ephemera Pack that goes with the paper pad.  I added a few of the white flowers to this one.


What's really cool about this Coffee Cup cutting file, is it includes a little pocket for the inside of the card so that you can slide a gift card right into it... you can use it or not!

Be sure to pop by the Cutting Cafe Blog on the 7th and comment there before you hop around and see what everyone else has made for Christmas!  You could win three files of your choice from the shop!

Did you know that the Cutting Cafe is Sponsoring the Fall/Winter 2018 Coffee Lovers Blog Hop??  Just create a new project with a theme of Fall or Winter that includes coffee, tea, or cocoa and link it up for a chance to win one of many wonderful prizes!  I'm linking my Christmas card up over there!  You should play along!  You have until Friday at 11:55 pm Pacific time!  Be there or be square!


Sunday, October 7, 2018

The Cutting Cafe Inspiration - Pillow Boxes


Welcome to some Cutting Cafe Inspiration!  This time around we're playing with Pillow Boxes of the Halloween sort!  We were also lucky to get to play with some Digital Papers from Tabitha Skagg's CuteNCraftyMommy Shop on Etsy!  Tabitha is one of our new teamies and a big welcome to her, K M Meena Herale, Kim Hodgson, Justine Dandrea, and returning to our crafty family, Donna Espiritu!  Lots of new places to visit!

Edited to ad this (Woo hoo)!


These Pillow Box files are just about the easiest!  The box itself cuts in all one piece and scores where you need to fold.   With the scores the Cricut took a while to get it cut and once I pulled it off the machine I had it together in no time.   Although instead of leaving the window clear, I decided to make shakers out of them!  And the ends are not adhered so they are easy to open, get out the goodies and save! (make sure you tell the kids that though so they don't just rip it open...lol!)


So usually when you put these together, you'd pull them off of your cutting machine, place a piece of acetate over the window on the inside of the box, and then fold it up and glue it together!  All I did differently was add some foam tape around the hat and spider, a few sequins on top of the window, and then attached a piece of design paper to that, choosing which side I wanted to have show through the window (well, of course I chose the plaid... this yummy paper is from Authentique and I got mine in the Cutting Cafe Shop here... thinking I might need to get another 6x6 pad!

Speaking of design paper... don't you just love the paper that I cut the boxes from?  This was made using the digital paper set from CuteNCrafty Mommy!  I just opened the paper I wanted, printed in an 8 1/2 x 11 format, and placed it on my Cricut Mat for cutting!  The sizes indicated just fit on the printed 8 1/2 x 11 sheet but you could adjust the size of the box and make it smaller... just make sure you size the box and the included outline at the same time if you're going to use the outline... which I did on my next one:


I felt like this one needed an outline so that his many many legs would stand out... love the way it looks.  This shaker doesn't shake as much because the wide window is a bit more curved than the hat so it makes it tighter... but it shakes!  And you may have noticed I used the inside cut from the spider outline as an embellishment on my witch hat pillow box!  This beautiful distressed orange paper is also from the digital set and was just what I needed!  I wanted something not too busy, but still with a little bit of interest.  And there is an October challenge over on the Cute N Crafty Challenges Group and I'm adding this one to that Challenge!

For most of my embellishments I just pulled out my box of crafty Halloween goodies and went to town!

I'm linking up to the current Double Trouble and Crafter's Cafe Challenges... they are partnering this time around and both are Black/White and one Additional Color!

So thanks for stopping!  Be Sure to head on over to the Cutting Cafe Blog... comment there for a chance to win three files of your choice and then see what everyone else has created for you today!  And be sure to leave some extra love for our new teamies!

Be sure to come back on Tuesday for something special!