Showing posts with label Visions of Sugarplums. Show all posts

Monday, December 4, 2017

Visions of Sugarplums 2017 - Day 3


Welcome to Day 3 of the Visions of Sugarplums Blog Hop hosted by Lori at Choux Choux Paper Art!  This is what I have for you today:


I've been wanting to transform a tin for quite some time and finally got the inspiration to use one to create an ornament!  I'm also excited to be the Guest Designer for Paper Smooches this month and I've been lucky to get to play with the new release and I've used a couple of those items on this piece.

I started with a little tin like for mints or something.   I took some metal tape from Lowe's that is used to keep duct work together and embossed it with a snowflake embossing folder.  I applied the tape to the tin and then I painted the entire tin with some white gesso to cover up any printing or flaws on it.  When I had applied a couple layers of that to it, I used some acrylic paint in seaglass and added a couple layers of that... tapping fingers... waiting for it to dry.
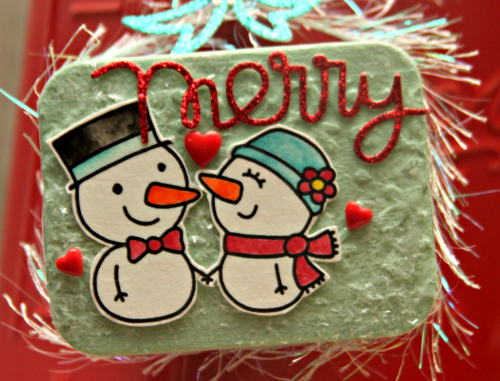

When that was dry, I added some Modge Podge to the front and inside and added a few layers of glitters and glass beads (the beads are just on the inside).  I then watercolored some images from the Cool Dudes (this cute couple is one of them) and Warm Hearts stamp sets.


I added that sweet snow couple to the front along with the Merry from the Merry Christmas 2 Die Set which I cut from red glitter paper.  And that beautiful bow!!  That is from the awesome new Ribbon Dies.  I put a snowflake from the Snowflakes Dies in the center of the bow and then a glitter gem in the center of that and attached it to the eyelash yarn I attached to the outside of the tin which allows it to hang.

And then when you open it:


More cuteness!  The snowmen are all from the Cool Dudes set and the trees and cardinal are from the Warm Hearts set.  I also cut some white glitter paper using the Wavy Pattern dies to create my layers of snow.  Lots of strong adhesive, liquid glass and popup tape later I had layered all of my pieces from back to front.


So... aren't those little teeny tiny snowmen so cute??  And there is only one on the set that faces looking towards your right... so how did I get the other one facing to your left do you ask...lol?  Well, I'm going to tell you anyway... I used the Mirror Blocks set to do some mirror image stamping or as some of you know it, stamp kissing.  I placed one of the blocks in my misty on the bottom layer without the pad and placed the little snow dude on the other side... inked it up and stamped it onto the mirror block stamp.  Then I took my paper and placed it onto the stamped image and now I had a snowman image facing the opposite way!  Very cool and it took some practice, but it really extends all of my stamp sets now that I know how to do it!  

A couple tips, make sure your stamp is inky... and with the misty you are able to add some extra ink, but don't press down too hard because you'll spread the ink out.  Work fairly quickly so your ink doesn't dry and when you press down on the paper make it a firm and quick motion.


And then down on the bottom part (or really the lid), more glitter and beads, more snowflakes and this awesome new die cut sentiment, Let's Chill!  And one more snowman for good measure...just love that little cutie!

I'm playing along with the Word Art Wednesday Anything Goes Challenge #310-311 with this one!  You should check it out!  Also, Paper Smooches December Challenge is all about Winter!  You should definitely check this one out and play along!

Thanks for sticking with me today!  And extra thanks for everyone that's been with me for all three days!  If you just got here today, it's not too late to go back and checkout all of the creations by all of the contributors over the last three days!  You have until Saturday, December 9th!  More info below on a couple ways you can play along and win!

How do you win?  

1.  Start by leaving a comment here that you would like to win (and you can say some other nice stuff if you want :) )

2.  Visit all the other contributors' blogs and leave comments.  

3.  Lori will gather all of the names from all of the blogs and put them in the "hat"  as many times as you leave comments.  Example:  Leave 14 comments = your name 14 times in the "hat".  Her husband is the official "draw-the-names-out" guy. 

Prize winners will be announced on Sunday, December 10th.   You have until Saturday December 9th to leave comments!

Look at all of the awesome sponsors that are offering up prizes for commenting!


AND!

There's a challenge going on over at Choux Choux also with a prize from another great sponsor, Mama Elephant!   The challenge runs from December 2nd through the 16th!   Be sure to head over there to find out all about it and play along!  I sure will be!

Now here are links to today's designers-check out what they've created and leave some love!

Lisa (You Are Here!)

Sunday, December 3, 2017

Visions of Sugarplums 2017 - Day 2


Welcome to Day 2 of the Visions of Sugarplums Blog Hop and Challenge hosted by Lori over at Choux Choux Paper Art!

I'm hopping along with some of my teamies from Paper Sweeties and here's what I have for you today!


I've been wanting to make one of these cute mini coffee cup holders for a while now... everytime I see Debbie create one I remember.. I have those cups... I must do this!  So I got the digital PDF file from the Paper Sweeties Shop (that you can get here) and finally put one together!

This set has two PDF files that can be printed.  One has the cutting, scoring and folding instructions to put together the adorable box and handle and the other has some cutting patterns for the bow and cup covers.  It was so quick and easy to put together and I love it!


I used some double sided papers from Authentique and My Minds Eye.  I printed the bow and cup cover patterns on regular copy paper and cut them out.  Then I took the paper I wanted and flipped it so that the "good side".. the side that would show was on the back and traced my pieces with pencil and then cut them all out.  If you have a pattern that has a right or wrong direction, just be careful how you place the pattern pieces on the paper.  And I used strong adhesive for all of it... redline tape for the box and handle... glue dots for the bow, Ranger Multi Medium Matte for the ribbon, and some Liquid Glass here and there ... the button and the gems and the pompoms on this little guys sweet winter hat:


I trimmed the outside of the box with some pretty crocheted ribbon.. almost looks like pom poms and then stamped, cut and colored a couple of the adorable snowmen from the Paper Sweeties Thanks Snow Much stamp and die sets.  I decided to place one on the "front" and "back" of my holder so both sides would be just as pretty and the one on the back covered up the seam from my ribbon.


Aren't these cups just the cutest!  That paper is from Authentique and was on the back of the pretty plaid I used for my box... just love it!


And that double bow... just LOVE it!

And here's an extra treat for you! ALL Paper Sweeties HOLIDAY PRODUCTS are 30% off using coupon: sugarplum! Sale ends 12/3 at 11:59 pm EST, cannot be combined with other offers or discounts and cannot be used on items already on sale.

So there's me for today!  I'm going to put some cute little embellishments and ribbons in my cups to give as a gift to a crafty friend... I think she's gonna LOVE it!  What will you do with yours?

Thanks for stopping today!  Now .. you have a couple ways to get chances to win prizes over the next few days!

How do you win?  

1.  Start by leaving a comment here that you would like to win (and you can say some other nice stuff if you want :) )

2.  Visit all the other contributors' blogs and leave comments.  

3.  Lori will gather all of the names from all of the blogs and put them in the "hat"  as many times as you leave comments.  Example:  Leave 14 comments = your name 14 times in the "hat".  Her husband is the official "draw-the-names-out" guy. 

Prize winners will be announced on Sunday, December 10th.   You have until Saturday December 9th to leave comments!

Look at all of the awesome sponsors that are offering up prizes for commenting!


AND!

There's a challenge going on over at Choux Choux also with a prize from another great sponsor, Mama Elephant!   The challenge runs from December 2nd through the 16th!   Be sure to head over there to find out all about it and play along!  I sure will be!


Now here are links to today's designers-check out what they've created and leave some love!


Come back tomorrow for more awesome projects and inspiration!


Saturday, December 2, 2017

Visions of Sugarplums 2017 - Day 1


So excited to be joining in on the Visions of Sugarplums Event hosted by Lori at Choux Choux Paper Art again this year!  Three days of awesome Christmas creations and chances to play along, comment and win prizes!  I'll give more details at the end of this post!

Here's what I have for you today!


I've been planning on making one of these for quite some time and was inspired again when I went to a craft fair.  I already had everything in my stash.  I tend to buy shadow boxes any time they are on sale when I'm out shopping because you just never know when you're gonna need one!  This one is around 6x6.

I am using some papers from CTMH... an old woodgrain from one of the previous paper packs and the PML card for the sentiment from the Silver & Gold paper pack.  It was SO hard to photograph this baby.. with the black it's a little dark, plus the reflection from the glass and all of the glitter!  But I was able to finally figure out angles and lighting.


I started by attaching my base woodgrain to the inside back mounting.  Whenever I create a shadowbox I use the strongest adhesive I can find because I want it to stand the test of time!  Especially if you're giving it as a gift.  I used that extra strong red tape here.  Then I cut out and matted my PML sentiment and used a little bit of pink to make it stand out.


Then I adhered some seaglass glitter paper to Elizabeth Craft Double Sided adhesive paper and diecut some snowflakes .. the largest is from CTMH... the next largest is from a Tim Holtz set and the little ones are from Lawn Fawn (You can never have too many snowflakes.. no two are alike!  Seriously!)  Mounting the glitter paper on the double sided adhesive made it so easy to stick a couple inside and outside of the piece.


Then I turned my open frame upside down and added some of these awesome brightly colored and glittered bells in various sizes.  I threw a few silver ones in there too for contrast.  Then I attached the back and shook it around a bit 'til they sat the way I wanted for my photo... lol!  I suppose you could glue a few strategically in place, however I wanted mine to be free like a shaker card!

Easy peasy!  You may not have all of this in your stash like I did, but it's nothing a quick trip to your local craft store can't fix!


Thanks for stopping today!  Now .. you have a couple ways to get chances to win prizes over the next few days!

How do you win?  

1.  Start by leaving a comment here that you would like to win (and you can say some other nice stuff if you want :) )

2.  Visit all the other contributors' blogs and leave comments.  

3.  Lori will gather all of the names from all of the blogs and put them in the "hat"  as many times as you leave comments.  Example:  Leave 14 comments = your name 14 times in the "hat".  Her husband is the official "draw-the-names-out" guy. 

Prize winners will be announced on Sunday, December 10th.   You have until Saturday December 9th to leave comments!

Look at all of the awesome sponsors that are offering up prizes for commenting!


AND!

There's a challenge going on over at Choux Choux also with a prize from another great sponsor, Mama Elephant!   The challenge runs from December 2nd through the 16th!   Be sure to head over there to find out all about it and play along!  I sure will be!

Now here are links to today's designers-check out what they've created and leave some love!


Come back tomorrow for some more awesome!


Tuesday, December 6, 2016

Visions of Sugar Plums 2016 Day 3!


Welcome to Day 3 of Visions of Sugarplums hosted by Lori Hairston at Choux Choux Paper Art!

There are bunches of wonderful sponsors for this event and lots of prizes for commenting on the designers' blog posts:

And here's what you could win!

The Cutting Café :   Orange You Cute Kit
Paper Sweeties:  $25 gift certificate
Lawn Fawn:  $25 gift certificate
Pretty Pink Posh:  $25 gift certificate
The Funkie Junkie Boutique:  $25 worth of new Tim Holtz Christmas Idea-ology Products
Birch Press Design:  $20 gift certificate
TheTwinery:  Sample Pack

Also, there is a challenge!  Link up your creation with a Christmas and/or Winter theme and you could win a $25 gift certificate to shop with Freckled Fawn!  You can link up here!  Link up by Saturday December 17th!


Today I'm sharing with you a couple items I made using some awesome products from The Cutting Cafe, one of the sponsors for this hop!  Here's what I've made for you today!


If you've been with me for a while you may remember these little jars that my friend Mitra and I painted when I got to spend the day with her over the summer!  The jars were a clear blue color and she showed me how to use mirror paint to give it a cool mercury glass kind of finish... the paint goes on the inside... it's pretty cool!  Anyway, I thought one of them would be perfect to hold a little holiday decor/centerpiece!  When I thought about what to put in it, I decided not just some traditional Christmassy foliage but something different and I thought of these shaker ornaments from The Cutting Cafe.


I always wish for Peace for the holidays... if I could have anything that's what it would be so I just love these ornament shaped shakers because they contain the perfect sentiment.  And my order of My Minds Eye Sugar Plum paper from The Cutting Cafe Shop came just in time... oh my... I'm gonna need another one of these pads... beautiful beautiful colors and gorgeous patterns... love it!


AND my custom stamp came just in time too to offer up a cute holiday sentiment as well... Happy Owl-idays... lol... cute, right?  I picked a few digital images from The Cutting Cafe and gave Regina the images and sizes I wanted... a quick proof.. and it was on its way to me soon after... I am so excited about it and I'll put a pic of it at the end of this post.


The snowflakes are also from the shaker cutting files... see that little snowflake on the ornament?  I just resized it a few times and cut a few out of some seaglass and white glitter papers.  And that foliage... more clearance holiday foliage from Michael's end of season sale last year.

I also decided to use this week's Atlantic Hearts Sketch to create a card with the Sugar Plum papers, some extra snowflakes and my adorable custom stamp set:


Tee hee!  I think I might make some more of these... and yup!  That plaid is in the Sugar Plum pad.  #madforplaid  I'm pretty sure that twine came wrapped around one of my Cutting Cafe orders and the sequins are those fantastic clear sequins from Pretty Pink Posh.

Now...be sure to visit everyone and leave them some love... because it will make them happy and because you'll have more chances to win!  And be sure to comment over at Lori's Choux Choux Paper Art Blog for sure because that's where it all begins and how she will know you are participating!

Lisa Bzibziak (You Are Here!)

I have enjoyed participating with all of these talented ladies so very much!  Thanks to Lori for hosting the Visions of Sugar Plums and thanks to all of you who have stopped by and let me know what you think!  (And thank you to those who didn't let me know what you thought if you didn't like what I had to show you...lol... haha. no really... :P).  Don't be a stranger!  I'll be back this month... not as often... lots of holiday stuff to do... but I'll be here!  And don't forget to play along and link up!  You have until December 17th to add your winter/holiday themed creations!

So here's my oh so adorable stamp set:


And here's the Atlantic Hearts Sketch... hope you join us!