Showing posts with label SVG Files. Show all posts

Tuesday, June 9, 2020

Will You Be My Gnomie? - The Cutting Cafe


Hey there!  I have a fun one for you today!  I picked up this adorable Gnome Shaped Card file over at The Cutting Cafe and I love it!!  It's been a while since I pulled out and plugged in my Cricut and I thought it was about time!


Isn't he adorable?!  And there are two different gnomes in the set so I'll be needing to make one with the other guy too.  I used some plaid for his hat because... well... plaid!  And there are a bunch of accessories that he could be holding but of course I picked the coffee cup!  I actually cut my pieces smaller than the file called for so that my largest piece would fit on a 12x12 sheet of paper.  I just pulled in all of my pieces and then selected all of them and shrunk the whole thing at once to the size i wanted.  I put him all together and then added the sign using some dies from Kat Scrappiness.


Hope you enjoyed it!  Oh I forgot to mention the sentiments that come with the set in JPG form so you can make them any size you want!  I chose this one but there are a few good for many different occasions or just because!  Very fun!

Thanks so much for stopping by and hope you'll come again soon!

Thursday, November 21, 2019

The Cutting Cafe - Calendar Inspiration!


Welcome to some Calendar inspiration from the Cutting Cafe!  Today we're playing with the Calendar Holder with Front Box and the 2020 Calendar and I had lots of fun with mine!


The calendar comes in a bunch of different formats and sizes and I love that it has a front box to hold a Post-It pad and an optional box/tray that slides in at the bottom of the holder.  The holder is a big heavy with the Post-It pad in it, so it worked out perfectly to put some binder clips and a few other supplies in the tray, including my extra calendar pages.

I decided I wanted to use this Caffeinated Boxer from TRHD for my holder and when I remembered I had the dog house die from Honey Bee I knew they'd work together perfectly with this holder!


What a fun addition to my desk this will make!  And it would make a great holiday gift for anyone on your list too!  You could personalize it for the recipient.  So as not to cover up my dog house, I am using a simple dog bone paperclip to display my monthly calendar.  You could add it to the front of the Post-It box though if you wanted.


Eep!  I think everyone in my office is going to want one!...lol!  I might make a couple for my favorites.

Thanks so much for stopping by!  Be sure to head on over to the Cutting Cafe Blog and comment there for your chance to win three files of your choice!  And then check out what everyone has created with these fun files!

Wednesday, November 6, 2019

Cutting Cafe Inspiration - Fall/Thanksgiving Greeting Pillow Boxes


Welcome to some Cutting Cafe Inspiration!  Today we're playing with the Fall/Thanksgiving Greeting Pillow Boxes!


I love these boxes!   What a great way to give a little treat!  Maybe put one next to each table setting at the Thanksgiving table?

I've filled my pillow boxes with Chocolate Covered Coffee Beans..mmm... not sure if these will make it to Thanksgiving though...lol!  With this one I added a little coffee cup tag that I made using the Coffee Cup Shaped Card file and one of the sentiments in the pillow box set.

I'm linking this one up over at the 2019 Fall/Winter Coffee Lovers Blog Hop!  You should definitely check that out... you have until the 8th to link up!  I'm also playing along over at Double Trouble Challenges You Have Us In Stitches (my little tag has stitches) and I've met the twist with Coffee!  and I'm playing along over at Simon Says Stamp's Monday Challenge which is Thanks/Thanksgiving!  I've got that here!


More Coffee Beans... mmm.. I'm Grateful for Coffee Beans...lol!  And you!!

Thanks so much for stopping!  Be sure to head on over to the Cutting Cafe Blog to see what everyone has created and comment there for your chance to win three files of your choice!  And come back again tomorrow for some more coffee!


Sunday, October 6, 2019

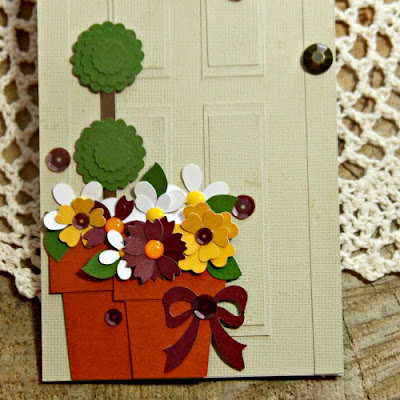
The Cutting Cafe Inspiration - Front Door Shaped Card


Welcome to some Cutting Cafe Inspiration!  Today we're sharing projects using the Front Door Shaped Card.


I used the Front Door with a Window (although most of my window is covered...lol!)  I cut the circle wreath and all of the flowers, and bow using the door file.   There are sentiments with the Front Door Shaped Card file, but I printed this sentiment from the Fall Window Boxes file. 


Not to mention the pot, topiary and leaves.  This is such a great file that I will use over and over even without the door!


Thank you so much for stopping by!  Be sure to head on over to the Cutting Cafe Blog to see what everyone else has in store for you... you're gonna see some awesome stuff!  Don't forget to comment there for your chance to win three files of your choice.

Come back soon! 


Friday, September 20, 2019

Cutting Cafe Inspiration - An Awesome Backpack?!


Welcome to some Cutting Cafe Inspiration!  We have some very cool projects for you today!  There's a new file in town and you are gonna love it!  This Backpack cutting file is quite awesome and so easy to use!

I picked out some beautiful Photoplay paper that I got at the stamp show last weekend for mine!


There are two separate compartments in the assembled backpack.  The main compartment could fit lots of cute little things... maybe some Chapstick and pencils and small notebook... or some embellishments and ribbon and twine... or a cute set of coordinating cards.... you get the idea!


And the front compartment can hold a few things too... including this cute little 3x3 card.  I used magnets to keep the flaps closed.


I used the same papers for my card and these Layered Flowers were perfect for the front.  I used a cute little sentiment from the Wheelbarrow Deliveries stamp set from The Cutting Cafe Shop.


Adorable and cool right??  Wait until you see what everyone has done with this file!  Head on over to the Cutting Cafe Blog and check them out!  While you're there, comment for your chance to win three files of your choice!

Thanks for stopping!  Come again soon!

Friday, August 23, 2019

The Cutting Cafe - Checkbook Inspiration!


Welcome to some Cutting Cafe Inspiration!  This time around we're sharing projects using the Checkbook Register file along with some fabric!  

I am not a sewer..   I mean... I've sewn... I just don't enjoy it.  To much following instructions I think and I suppose if I spent some time doing it I might like it more, but I don't need another addiction...lol!   So when Regina said, "Let's use fabric" I have to admit... I was a little stumped.  But then I thought... well... I don't HAVE to sew and I have some pretty fabric that I bought ... well... because it was pretty!  And I thought... I can use that in my projects... (see what I mean... I don't even sew and I justified buying pretty fabric!...lol!).  So I got out some old fabric from CTMH.  Used the Checkbook Register file to cut out my base and put it together and just cut some fabric out and adhered it to the base using binding tape.  Oh... and I knew I couldn't cut a straight line and that was ok since I love the distressed look... so I roughed up all of my edges by pulling out some threads.  I decided to leave the one pinked edge because I liked it!


Then for a fairly flat decoration on the front, I decided to use some Paper Smooches dies from my stash to cut a flower and leaf from felt.  I finished it off with a button and tied a scrap piece of the fabric through the button holes... and I thought that this sentiment was perfect for a checkbook register... Adulting IS hard!!


This file is SO cool because not only do you get the cut for the checkbook register cover which has two pockets on the inside flaps, but you also get the register pages you can print on whatever paper you want!  I don't write a ton of checks so I just printed one sheet and I can print another when I need one... next year maybe!...lol!  and I though this will also be a great place to hold receipts... those I have a lot of!...lolol!


I decided the inside called for another bloom.. this time I used a flatter button and no fabric bow so it would be less bulky... and then chose the inside sentiment also from PS because I thought again it was perfect for those stressful days.

And there you have it... be sure to checkout everyone's projects up on the Cutting Cafe blog because we DO have some sewers in the group and they've created some beautiful things!  Comment there for your chance to win three files of your choice!

I'm playing along over at Paper Smooches monthly challenge which is School and/or Words... I've got some awesome words here!


Thanks for stopping and hope you'll come again soon!

Wednesday, August 7, 2019

The Cutting Cafe - Back To School Inspiration!


Welcome to some Cutting Cafe Inspiration!  We've got some fun Back To School projects for you!  I've used the Bus Shaped Card and the adorable From Owl of Us stamp set to create a fun thank you for the person that delivers our treasures safely to school and then back home each day!  I don't have little ones in school any more, but I remember the worry once they left home.  Nothing was right until they got home again.  But it was a little easier when you knew the people who cared for them during the day were wonderful and cared about them too!


This file is fun and SO easy to cut and put together.  I pulled the SVG version into my Cricut Design space; chose colors; and the machine did the rest!  You remember Sassy Owl??  Still love her!  She looks like she doesn't put up with any nonsense!


I mean look what she's got to put up with every day ... and if I remember from my school days, this is pretty accurate.  AND she's gotta drive that huge bus!  Thank goodness for Sassy Owl!  I used some dies from my stash for the heart and sentiment.


Love this file!

Now!  Be sure to head on over to the Cutting Cafe blog to see what everyone has created for you today!  And comment there for your chance to win three files of your choice!  Maybe you'll pick this one!

Thanks for stopping!  Come again soon!

Sunday, July 21, 2019

The Cutting Cafe Inspiration-Christmas in July 2019!


Welcome to some Cutting Cafe Inspiration!  It's Christmas In July over at the Cutting Cafe!  I've been making Christmas cards all year long along with my friend Debra Davison and I'm a couple days early with this one but that's ok... I'll still be back on the 25th with more!  For today I decided I wanted to color up some of the poinsettias from the Sleigh Treat Box set.


I printed them in different sizes, colored them with my Copics and some colored pencils and then cut them out and layered them together with thin popup tape between the layers.


I also used the Merry Christmas background from the Christmas MIni Colored Printable Set... but I printed it in black and white.  I splattered everything with some gold, red and black glitter water colors... a little ribbon, a button, wooden snowflake and some stamens... and well, of course some sequins.


I had a lot of fun with this one... I haven't used ribbon in quite a while and this beautiful ribbon from DL Art was perfect!  It's a bumpy one though so extra postage for sure... although who am I kidding... I don't send many flat cards...lol!

SO!  Be sure to head on over to the Cutting Cafe Blog and see what everyone has created for you!  Comment there for your chance to win three files of your choice!

Thanks for stopping and come back again soon!


Tuesday, May 21, 2019

The Cutting Cafe Inspiration - Paper Lace!


Welcome to some Cutting Cafe Inspiration!  Today we're playing with the Paper Lace cutting file!  I've used the Square Sheet.  There are three sizes and I believe I used the Medium size and re-sized it to 6" wide before Ungrouping the cuts.

I cut the full grid from some gray cardstock and then used the single square to cut the remaining small squares to fill the spaces.  I cut them out of three different design papers from a coordinating pack 9 times each.


I attached the gray grid to a 6x6 sheet of cardstock.  Then I arranged my squares to my liking before adhering them.  I made a quilt!  And I had fun turning my lined designs different ways.


Next I added all of the goodies!  I used various dies, stickers, chipboard pieces and sequins to decorate my card.  I love this sentiment because I could use this card for almost any occasion!


It was fun to put this one together!  And quick!  There are a few different options in this file!  Be sure to head on over to the Cutting Cafe Blog to see how everyone has used it.  Comment there for your chance to win three files of your choice!

As I write this everything in the Cutting Cafe Shop (The Cutting Cafe's sister site), everything is 50% off with the code HALF OFF SALE for a limited time!  Check it out here!


Thanks for stopping!  Hope you'll stop back again soon!

Sunday, October 7, 2018

The Cutting Cafe Inspiration - Pillow Boxes


Welcome to some Cutting Cafe Inspiration!  This time around we're playing with Pillow Boxes of the Halloween sort!  We were also lucky to get to play with some Digital Papers from Tabitha Skagg's CuteNCraftyMommy Shop on Etsy!  Tabitha is one of our new teamies and a big welcome to her, K M Meena Herale, Kim Hodgson, Justine Dandrea, and returning to our crafty family, Donna Espiritu!  Lots of new places to visit!

Edited to ad this (Woo hoo)!


These Pillow Box files are just about the easiest!  The box itself cuts in all one piece and scores where you need to fold.   With the scores the Cricut took a while to get it cut and once I pulled it off the machine I had it together in no time.   Although instead of leaving the window clear, I decided to make shakers out of them!  And the ends are not adhered so they are easy to open, get out the goodies and save! (make sure you tell the kids that though so they don't just rip it open...lol!)


So usually when you put these together, you'd pull them off of your cutting machine, place a piece of acetate over the window on the inside of the box, and then fold it up and glue it together!  All I did differently was add some foam tape around the hat and spider, a few sequins on top of the window, and then attached a piece of design paper to that, choosing which side I wanted to have show through the window (well, of course I chose the plaid... this yummy paper is from Authentique and I got mine in the Cutting Cafe Shop here... thinking I might need to get another 6x6 pad!

Speaking of design paper... don't you just love the paper that I cut the boxes from?  This was made using the digital paper set from CuteNCrafty Mommy!  I just opened the paper I wanted, printed in an 8 1/2 x 11 format, and placed it on my Cricut Mat for cutting!  The sizes indicated just fit on the printed 8 1/2 x 11 sheet but you could adjust the size of the box and make it smaller... just make sure you size the box and the included outline at the same time if you're going to use the outline... which I did on my next one:


I felt like this one needed an outline so that his many many legs would stand out... love the way it looks.  This shaker doesn't shake as much because the wide window is a bit more curved than the hat so it makes it tighter... but it shakes!  And you may have noticed I used the inside cut from the spider outline as an embellishment on my witch hat pillow box!  This beautiful distressed orange paper is also from the digital set and was just what I needed!  I wanted something not too busy, but still with a little bit of interest.  And there is an October challenge over on the Cute N Crafty Challenges Group and I'm adding this one to that Challenge!

For most of my embellishments I just pulled out my box of crafty Halloween goodies and went to town!

I'm linking up to the current Double Trouble and Crafter's Cafe Challenges... they are partnering this time around and both are Black/White and one Additional Color!

So thanks for stopping!  Be Sure to head on over to the Cutting Cafe Blog... comment there for a chance to win three files of your choice and then see what everyone else has created for you today!  And be sure to leave some extra love for our new teamies!

Be sure to come back on Tuesday for something special!


Tuesday, August 7, 2018

Cutting Cafe Inspiration-You're My Type!


Welcome to some Cutting Cafe Inspiration!  This time around we're playing with the adorable Typewriter Shaped Card!  Love this file that comes with the shaped card cutting files as well as some cute sentiments in PDF and JPG form!  Give it any theme you want and make it your own!

I LOVE this typewriter because in my youth I spent many hours in front of a typewriter .. my first job transcribing for a lawyer... paid by the page and my fingers flew across these keys to get in as many as I could in an hour.  You don't come across these often and I'd love to pick up an old one to have (where?) in my craft room to type sentiments here and there.  Maybe even a whole letter!!!  (What even is that??)  Anyway, sweet memories.


IDK... I was beginning to think I might be ready for some Fall colors, however lately in my craft room it's been pretty bright and tropical...lol!  These Doodlebug papers were perfect along with some puffy stickers I came across from Crate Paper.  Just a simple note so I can send this anytime just to say Hello!  And I had those leftover leaves from another project and some pretty paper flowers from my stash.


Those sweet little hearts are in the cutting file and I just added a few more of the puffy stickers and hand wrote my hello letters on the keyboard (yes, I know they're not where they are supposed to be..lol!... artistic license...lol!)

I'm playing along with Word Art Wednesday Challenge 346-347 which is Anything Goes!

Hope you enjoyed your visit and be sure to visit the Cutting Cafe Blog and check out what everyone has created for you!  There are LOTS of beautiful projects!  And comment on the main blog post for your chance to win three files of your choice!

Come back again soon!

Saturday, November 19, 2016

The Cutting Cafe Inspiration-Shaker Tags


Welcome to this week's inspiration from The Cutting Cafe!  It's an Anything Goes week and I've decided to create some shaker tag/ornaments!  I'm also playing along with Tracey McNeely's 25 Days of Christmas Tags.  I was inspired by the colors of Daniela Dobson's tag from Day 11 and the shaker and the gold, white and shaker element from Julie Warner's tag from Day 12.

So!  On to what I've created for you today:


I LOVE the shaker files from The Cutting Cafe!  You may remember I used them a while ago to make a snowflake canvas and card and also an acorn canvas.  For the tag/ornaments I made today I used the Christmas Shaker Card set.   I imported the SVG version of the files and changed the size according to the instructions that came with them.  Then I ungrouped them and kept only what I needed (the files come with pieces for both a card and an ornament).  Then I regrouped the images I kept and made them smaller as a group so that all of the pieces fit together properly and they were small enough to tie to a package or gift bag...


This, of course, is the snowglobe shaker.  I just love blue, white and gold together... and so does Sassy Owl... she thinks it makes her look fabulous....


I'd have to agree.... and I love the Clear Cardstock from The Cutting Cafe Shop... it's perfect for shakers and a lot of other stuff too!


I also love the movement in a shaker ... and the cute little shakey sound they make.


For the mitten, I knew I'd want to use my sweater embossing folder on it... and I filled it with all kinds of cute little buttons, some CDD Christmas sequins, and some little seed beads.. and those adorable little acrylic images I picked up at Hobby Lobby last year.


And it was fun to wrap the eyelash yarn around the wrist to create my fuzzy cuff on my mitten.

Thanks for stopping by today!  Hope you come back soon!  And be sure to check out the post at the Cutting Cafe Blog on the 21st to check out all of the Design Team makes!  I can't wait to see which files they all decided to use this time around!

I know I've been here a lot this week and next week will be a little slower because one of my boys is coming to visit so I won't have a lot of crafty time.... but hopefully I'll see you Monday for Atlantic Hearts!  And don't worry... Owl Be Back!