Showing posts with label Prisma Colored Pencils. Show all posts

Tuesday, May 11, 2021

Eaten By Sharks!


I've got this one on the Rubbernecker Blog and I'm sharing my process for creating that heat embossed background.  We're sharing lots of background stamp inspiration over there this month!


I've had this one rolling around in my head for a while... I love this cutie pie shark image and the sentiment is perfect for it!

The stamp stamps the entire image including the colored in parts... so I chose to stamp it in a blue and then gray over the top for that blue-grey shark color and then added some dimension using colored pencils.


I had stamped and embossed two panels using that cool Wavy Lines background stamp trying to decide which color to use, but I decided to use both!  I cut waves from the lighter color and then added some of the same embossing powder to the waves!


You'll find more details over at the Rubbernecker Blog if you'd like them!

Thanks so much for stopping and I hope you'll come again soon!


 I've included links below to all of the Rubbernecker products I've used for this one!  Should you decide to purchase using these links, I will receive a small compensation at no additional cost to you.  And thank you!

Friday, June 26, 2020

Celebrate - Miss Ink Stamps!


Welcome back!!  So if you come here often you know I've been playing with a bleach technique this month and I keep finding new ways to use it!  This one wraps up my month of bleach...lol... but I am in no way done with using it.  You'll see it pop up here and there for sure because I really am enjoying the look!  My friend Mare introduced me to this technique and she learned about it in a Gina K Facebook Live that you can check out here if you'd like!


So this technique isn't just for florals!  I've used the included images from the Pinata Party stamp and dies and the Streamers stamps and dies.  You can use any stamp sets for a different look.  I think I love painting with bleach so much because I love to play with Mixed Media... I love a vintage look (and you can definitely use this technique for a more clean looking card, but that's not what we're doing here today for sure...lol!).  I should say that this time around I did not stamp in Memento ink first before covering it with clear embossing powder.  I simply stamped in Versamark and used clear embossing powder for my images.  I love that the lines aren't as defined... perfect for this look I love so much!


And this word die from the Streamers stamp and die set!  I LOVE it... even with the included background die attached it takes up very little real estate on a card... perfect when you spent all that time making your card pretty and you don't want to cover any of it up!

This time I made my colors a little brighter using my Prismacolor pencils... because it's a party!  I colored the red, purple and blue pencil dark and then went over it with Putty Beige which is perfect for muting and blending the brighter colors just enough to keep the vintage feel.


I used an old Lil Inkers die as a topper to give me a nice blank space to add my extra images that I stamped and die cut.  I popped everything up with various thickness of foam tape and finished it off with some of my favorite sequins from Trinity Stamps!


And that's me for today!  I hope you enjoyed it and I sure hope you have fun playing with this technique!  Do be careful with the bleach.  You don't want to be inhaling lots of fumes while you are coloring.  I put a very small amount in a dish and move it away from me as soon as I'm finished... usually I'll leave it on the bathroom sink and then rinse it out when I'm positive I don't need to touch anything up.

Hoping your are all safe and happy!  Things here with COVID in Arizona are ramping up so I am spending lots of time still at home... which I don't mind at all!  I don't seem to have any extra time though somehow so I guess I may have been a bit of a homebody anyway...lol!

Have a wonderful weekend!  Come again soon!

Friday, June 19, 2020

Thinking of You - Miss Ink Stamps!


I'm back again and sharing a card that coordinates with the card I shared yesterday!  (You can find my post on the Miss Ink Stamps blog here)  If you prefer videos, here is a link to a Gina K Facebook Live where my friend Mare saw the technique!

This one kind of happened by mistake.  I was creating my card for yesterday and I messed up the top corner because my mind wandered...lol... so the bottom was perfectly good still and I set it aside and started over knowing I'd use it. 


So, I just stamped another couple flowers, embossed and painted them all with bleach and then colored with my Prismacolor pencils (details are in the post from yesterday) and then cut them out to use them on this card!  I used coordinating papers in the Coredination paper pack I had and then popped the images up onto the card.  That sentiment is from the Magnolia Sympathy set.


I just love the vintage look these cards have!  I hope you're not getting bored with bleach because I'll have (at least) one more for you next Friday.. I have an idea brewing in my head and I'm really hoping it works out because I'm excited about it!

Hope you'll come back soon!  Thanks for stopping!!


Thursday, June 18, 2020

Hey Beautiful - Miss Ink Stamps!


I'm up on the blog over at Miss Ink Stamps with some more Bleachy goodness and I've tried a few new things!  I have a photo tutorial and share how I put this one together.  If you'd like details and links, please do hop on over there to check it out!

Thanks so much for stopping and hope you'll come again soon!

Friday, June 5, 2020

I'm Here For You - Miss Ink Stamps


Welcome back!  Today I'm sharing a card I made inspired by a crafty friend that I crop with virtually almost every Sunday.  We have a group of ladies that used to get together physically once a month and about halfway through the Pandemic so far we decided to start cropping virtually (thanks Mom!).  So last week, my friend Mare was playing with an old technique of painting with bleach!  I had never heard of it, but I don't watch a lot of videos... I just don't have the time.  She had been watching a Gina K Facebook Live on this technique... which I will admit I didn't watch... but I decided to play with the technique with the little bit I know.


Oh I had so much fun!  Basically I stamped the images from the Smokin' Caterpillars stamp set with Memento Espresso Truffle Ink in my Misti and then stamped over it with Versamark and embossed with clear embossing powder.  You may notice some extra sparkle... I think my clear powder ended up with some glitter in it...lol.. which I'm good with.. and not surprised.  I think the embossing is important so that the bleach doesn't make the outline fade and maybe the embossing kind of contains the bleach?... although that might make a fun no line type of thing so I might play with that a little.  (I'm guessing if you watch the video these things will be addressed...lol).  I decided to try it on kraft paper for a really neutral color pallet.
 

After my images were embossed, I took a brush and some straight chlorine bleach and painted the images... I had to be careful with this one as there is a lot going on and I didn't want to bleach any of the open spaces... and I did.. but it worked out okay because I just decided there was something behind there and treated it as such.  At first it seems like not much is happening, but as time goes on the bleach really takes hold.  You don't need a lot.  It was very cool.  After, I splattered on some bleach for good measure and then used a Diamond Fade stencil and some Brushed Corduroy Distress Oxide Ink to add a little extra... I masked the image on the right and let the diamonds go over on the image on the left... just 'cause... it was intentional and not an accident.


I got a really cool result that looked great as it was, but you know I can't leave anything alone.  I tried.  I was a little afraid and was going to just leave it, but it got the better of me and I pulled out some neutral Prismacolor pencils and did some light coloring.  I did use greens and browns, but then also went over those with a putty to diffuse the color a bit.  I am so happy I did this and I love the dimension it adds!

So finally a sentiment from Everyday Sentiments and some sequins from Trinity and I was done!  I'm gonna be playing with variations of this technique all month and I'll be up on the Miss Ink Stamps blog towards the end of June with a few tips based on what I've learned and experienced.

Thank you SO much for stopping and I hope you'll come again soon!!  In the meantime, please stay safe and share as much virtual love as you can.. I think everybody needs it right now!

Friday, March 27, 2020

In The Dark - Miss Ink Stamps Alice In Wonderland Release


Did you know that Miss Ink Stamps is in the middle of a huge and awesome Alice In Wonderland release?  This is such a complete collection of Alice images and I think you're gonna love it!


Today we're sharing projects using the In The Dark stamp set as well as Wonderland Wisdom, Dodo, and Unbirthday!  I've used the In The Dark set today along with a few other things!  Can you see the subtle touches here?  Behind my quote I stamped in black on the black paper the Mad Hatter image from the Tea Party stamp set.  I do wish he showed up a little more, but I love the look.  It's a little surprise!  I also used black Distress Oxide with the Wonky Checker stencil on black cardstock for the background.


The chair (LOVE that chair) and sentiment are from the In The Dark set and I used the cups from the Tea Party set and sweet Alice from the Alice set!


I just love this set!  That sentiment is one of my faves ... perfect to let a friend know that you are there for them... always.

Now, be sure to head on over to @Missinkstamps on Instagram and enter for your chance to win some fun stuff from the new release!

Thanks so much for stopping and please do come again soon!

Friday, March 6, 2020

Oh Crop! - Miss Ink Stamps


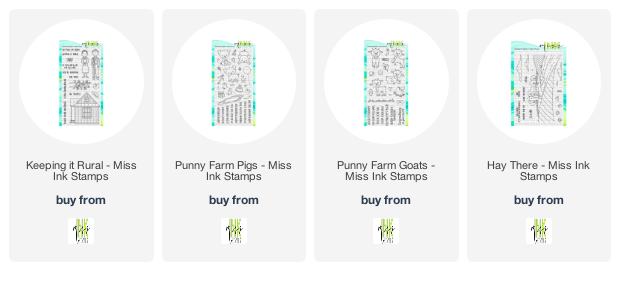
Welcome back!  If you had asked me a few days ago what this card was going to look like I'd have shrugged and said... idk...lol!  But when I decided to play again with the idea of a spotlighted framed scene and a black and white background scene I knew what I was going to do!  I wasn't quite ready to be done with the Keeping It Rural, down on the farm theme so I had stamped, cut and colored the images, not really knowing what my layout would end up looking like!


When assembling my card, I cut the white base 5x5 and stamped the Hay There background stamp off the edge ... I had played a little with the frame I found in my extras pile and knew I wanted the barn to show in the background so rather than stamping across the whoe card I stamped off of the right edge and planned on filling in with some corn on the left to fill in that space.


You've been seeing these images a bit on Instagram over the last few days possibly... I'm playing along with the 30 Day Color Challenge that's going on... we're on Day 6 and this will be my share for today.  I had colored up the images with my Copics and today I finished up adding some additional shading and detail using my Prismacolor Pencils... I also needed a couple extra images so colored those for today as well!

I also decided that this time my black and white background would have a little dimension, so outside of the frame, I added a few black and white cornstalks and popped them up.  You may know that my most used supply aside from my Copics, Misti and Memento Ink is foam tape.  I buy it in all thicknesses and widths (yeah... those are two different things...lol!)  I LOVE being able to play with dimension and the foam tape helps SO much with that.


Probably the hardest thing about putting this card together was being brave enough to cut part of my shack off when I decided part of it would be outside of the frame...lol!  I had already taken great care in coloring up the little porch and I hesitated before slicing it off and then slicing off the porch of an uncolored one!  I may have whimpered a bit as I did it... but I am SO glad I did!  I stamped a cornstalk directly onto the background... popped another black and white cut out one up and added the porch over that.


And finally, this sentiment!  It's in the Hay There set and I just adore the cute punny sentiments in all of the sets I used today!


I just finished it off with a mix of sequins and I was done... this one makes me happy!

So thanks so much for stopping by!  If you've thought about joining the Color Challenge, you can hop in at any time and you can find all of the details here!  Bunches of ways to participate and share... you don't have to have a blog!

AND did you know March is Miss Ink's birthday!  We're going to be having some fun this month so stay tuned!


Saturday, April 28, 2018

My First Attempt At An Eclipse Card with Honey Bee


Happy Saturday!  So happy you could stop by today!  I've been working on this one for a couple days (not whole days.. just my mornings before work).  I've got two firsts today... first Eclipse style card and first time coloring on kraft and I've gotta tell you, I love both!

I recently got this pretty Zen Floral stamp set during the birthday celebration over at Honey Bee.  I LOVE it!  The border at the top is all one stamp, but I used some of the separate flowers to create the cluster at the bottom.  I will tell you, I do not care for masking so I made a few mistakes because I rushed through it, but in the end I was happy with how it turned out.


I started by cutting out the hugs part of my sentiment from the Kraft Paper.  Because I had to build my cluster, I wanted to be sure I had the flowers where I wanted them and that they'd overlap my die cut.  Then I used some removable adhesive and put all of the pieces back together so that I could stamp over the hugs diecut and have it be seemless.  I stamped all of my images in Versamark and heat embossed in white.  Once that was done I colored it all in with my Prisma colored pencils.  Then, on these eclipse cards the sentiment is meant to be subtle, but since mine was part of the complete sentiment, to make it stand out just a bit, I decided to remove it before I splattered and dotted with some acrylic paint and then some Nuvo Drops.  I cut 5 or 6 of the hugs word out so that I could stack them easily to pop up rather than trying to fit popup tape and it really makes for a nice, chipboard feeling piece.  Then I attached the hugs back to the card in the space it belonged and again, to make it stand out a bit I applied some liquid glass again to bring a little attention to the word.  I used a small layer, let it dry and then applied another.  (I love my liquid glass, but there are some color formulations that will change color a bit when it's applied... see the rose on the end of the word-I'm not worried about it, but wanted to let you know)


Then I finished my sentiment with a couple stamps from a couple different sets in my stash... white embossing on black.. you know I love it.  Popped it up and added a few sequins.

This is one beautiful stamp set and I'll be using it a lot to add some pretty floral detail to many cards.  I have another one to play with too and I'll share that soon.  For this card, I'm entering it into the Honey Bee Buzzworthy Challenge for April to create a birthday card!  You do need to have Honey Bee products bee the feature on your card, but you can use other products (for instance, I didn't have any birthday sentiments, so I built mine from some other sets) and you could win a $15 gift certificate to the shop!  I guess I know what I need next!


Monday, April 9, 2018

Happy 2nd Birthday to Little Acres Creations!


Happy Birthday Wishes to the crew at Little Acres Creations!  It's their 2nd birthday and we're celebrating from today through the 20th of April with a couple hops, a challenge, and a shipping discount.. not to mention lots of prizes!  You can check out all of the details for the celebration on the Little Acres Blog here and get started today, because today is a YouTube Hop along with your first chances to win some awesome prizes!  You should definitely check it out!

In celebration I've "whipped up" a little something for you (lol... there was no whipping up involved... I've been working on this one for a little while...lol)


So apparently I was not done with the whole Distress Oxide Lift technique that I learned over on the Simon Says Stamp blog in a video by Gina K!  I decided I'd try one with the sunflowers from the Little Acres Summer Blessings set.   My favorite sunflowers that I've ever grown were some beautiful ones in burgundy colors... not your traditional, but when am I ever traditional.  I mean.. I love those too!  But I also loved making these ones with a little of that burgundy color in them.


I loved having the chance to use this awesome Friendship Defined stamp set!  And when I got this one, I didn't even realize there was a coffee reference in one of the sentiments and a little coffee cup on the set..lol!  I guess it was meant to be!  I didn't use the coffee cup stamp in the set because I needed something just a little bit bigger so I used the die from Cas-ual Fridays to cut that cute little cup in printed papers that didn't fight too much with my very full background.  And those bees are from the Summer Blessings set also.  I stamped them on yellow cardstock and cut them out.  I added some white gel pen to the wings and then covered the whole thing in liquid glass to give them some dimension.


So, I did the Distress Oxide Lift here, colored in the flowers with some Prisma pencils and Gamsol, and then splattered some water... sopped that up with a paper towel... and then used a brush to splatter some Heidi Swap Color Shine in gold and sopped that up with a paper towel.  Then I took some Docrafts metallic gold ink and stamped the Happiness Definition and some of the bees so they'd be barely visible.

So that's it for me today!  Head on over to the LAC blog to see what's going on now through the 20th and the ways you'll have chances to win prizes.. trust me.. you want to check this out!  See you again later this week!


Monday, April 2, 2018

Three Amigos Blog Hop Challenge # 13 - April Showers

WOW!  April!  And tax season is almost over... the cacti are getting ready to bloom... and we're in the 80's and 90's here in southwest Arizona!  LOVE!!

Welcome to the April Three Amigos Blog Hop Challenge!  This month we're all about the April Showers!

To me, April Showers means Spring which means flowers! Here's what I've made for you today:


I saw a card that Gina Krupsky made over on the Gina K Designs Facebook Group and it was gorgeous!  There was a video she made that was up on the Simon Says Stamp Blog and I actually took the time to watch it and knew right away I needed to give it a try.  Rather than trying to clumsily explain the process, I'll give you a link to her video here!  I decided to stamp and heat emboss a few different stamp sets before I went to a crop this weekend and brought my Distress Inks, Prisma Colored Pencils, and a few other items I thought I'd need.  One of the bases I stamped was this one using the beautiful Blossoming Buds stamp set from Paper Smooches.  LOVE these fun flowers!


I heat embossed my sentiment from the Birthday Bash stamp set onto a piece of die cut vellum and this adorable birdy from the My Peeps stamp set.  This is the only piece i cut out and popped up and then added a few music notes from the same set.


The bird was a last minute decision, so I used my Zig Clean Color markers to color her in using colors similar to the Distress Oxides and Prisma pencils I used on the background.  I also added a few music notes from the My Peeps set because she's singing... she's so happy 'cause it's Spring (like me)!


I made a few mistakes (which I will not point out to you :) ) and I did a couple things a little different... I did add a little bit of pink acrylic paint to some of my flower petals.  originally my intent was to fit a color challenge which I ended up not entering...lol!  But I love the brightness it adds to the whole thing.   I also splattered some water droplets and then some Gold Color Shine onto the background... cause I could!  And I will definitely use this technique again because I love the way it looks!

Now, be sure to head on over to Donna and Susan's Blogs to see what they've created for you today!  And stop over at the Three Amigos Blog Hop Challenge Blog to play along!


Wednesday, October 11, 2017

Outlawz Progressive Challenge With Createful Hearts


So busy in my craftroom for the next week!  I have company coming and my youngest is coming to stay with us for a while as his seasonal job is just about over!  So many things I want to get done before I'm banned from my room for a couple weeks!

I created this for the October Progressive Challenge over at the Outlawz and for this week's Twisted Thursday Challenge with a Twist of Charmed!  I'm also playing along with the Createful Hearts Challenge of Anything Goes since the sponsor for this month's Progressive Challenge is Createful Hearts and this General Store digi is one of her creations!  (Outlawz is a Ning site and you have to join to play along, but it is so worth it and you should give it a try!  The first time I linked up I needed a little help, but now it's easy peasy and such a wonderful group of people over there!  AND (I think this is a record) I'm also playing along with the Victorine Originals Mood Board Challenge #12 (pic at the end of the post-lovely lovely mood board)!

For my Layers, I used the Craftin Desert Divas Crazy Stitched Frame die... one of my favorites and I finally got a chance to use my Tim Holtz Tree Line Thinlets die.  The front landscape dies are from CDD (the hilly middle layer) and Lawn Fawn (the grassy layer).  I have a few grass dies, and I chose this one today because it was the shortest blades and worked best here.  To cut the landscape layers, I used the frame die to cut the green first and then cut my layers from that so that my stitching would go all around the entire piece.


And this digi.. pretty right??  Love the pup sleeping on the porch... so sweet!  I used my brand spankin' new Prisma Colored Pencils that my friend Jean Chaney made me buy so this whole thing was an experiment and the first time I used them... I'm pretty happy with the way it turned out and plan on taking some classes to really get to know them!


I thought this simple saying was the perfect sentiment... tiny ... from a Tim Holtz word stickers packet.. and I chose the sunflower charm because it seemed to go with the whole outdoorsy, pumpkin time of year feel.  Tried to keep the embellishments simple since this digi really tells the story on its own.

That's it!  Thanks for stopping by and don't forget to check out my first Design Team post over at the Coffee Lovers Blog!  I'm playing along with a challenge there too!

Come back soon!  Paper Sweeties Release starts on the 13th with the Plan Your Life Series.. I'm planning a little Halloween fun!