Showing posts with label Embossing Folder. Show all posts

Friday, September 25, 2020

Crafty Elves' Countdown to the Holidays - September 2020 Edition!


Hello!!  This is one of two posts for today!  If you like to win stuff, then after you are done with the Crafty Elves, see my second post for today for a chance to win some stuff!

Welcome back to the Crafty Elves!  Every 25th of the month my fellow elves and I share the Christmas cards we made during the month!  It's a very very hectic time for me right now.  The 15th was a tax deadline and October 15th is another so I went the quick and easy route! 

 Here's how I was inspired:


A Jillian Vance Design has a new release this week and part of that is this awesome Bold Snowflake Die!  I love the size of it!  It's big enough to be the star of your card and that's just what I made it for these!  I used some pretty Gina K Designs papers and used a rectangle die and taped the snowflake centered inside of it and cut them both at the same time.  I did those twice from two different papers.  That left me with two panels for shakers and two snowflakes!


I cut two sizes of rectangles for these ones and used a snowflake embossing folder on the smaller panel.  then I cut the snowflake twice more from white cardstock and stacked my three snowflakes together for support.   I added all of my layers and popped the snowflake up over it.  Then I stamped my sentiment from the Let It Snow onto a Sentiment Strip and then added that and instead of trimming the strip I wrapped it around to the back of the card.


I used the same basic design for all of the cards... and the white layer behind the shaker is also embossed with snowflakes!  I stamped my sentiments using Color Fuse Inks from Rubbernecker Stamps.


And that is me for today!

Whew!  9 months and we're still going strong!  Before you know it it will be time to address the envelopes and mail them out again!

Now be sure to check out my fellow elves' projects... I'm pretty sure you're gonna saw "Wow" more than once!


Now leave me some love here and you could win some happy mail from me!  Last month's winner is:


Denise, send me your snail mail at bzscrapper66 at gmail dot com!

Thanks so much for stopping and don't forget to check out my second post for today for more chances to win stuff!  (Goes live at 6 am Pacific time)


Wednesday, August 12, 2020

Terrific Pretty Posies - CAS-ual Fridays Stamps!


Hello all and welcome back! I have a quick and simple card for you today!  I love the neutral background with a pop of color in those pretty floral images from Pretty Posies!


I cut two panels from white and kraft, embossed the kraft piece and then trimmed them down to fit on one card and placed a strip over the seam to hide it.  Then I just stamped, die cut and colored those pretty posies.  I used my Misti to stamp one of the sentiments from Pretty Posies onto the white piece and then popped up my flower pieces.  And then I added some of those pretty chipboard hearts from the Coffee Chips Chipboard... perfect with the kraft paper just the way they are!  Easy peasy.. done!


I just love these pretty posies and love that this set makes it so easy to make a quick and pretty card.

Should you decide you absolutely need something from the shop, I have this for you:


Thanks so much for stopping and hope you come again soon!


Saturday, November 9, 2019

Merry & Bright Gnome - Rubbernecker Stamps


Excited to be sharing with you another fun and adorable new stamp from Rubbernecker... meet Thomas Winter Gnome!  There are four new gnomes over at Rubbernecker stamps and I think you're gonna love them!


They are a great size for coloring and each has his own personality!  I added lots of layers with this one (and lots of popup tape) all just to frame that cutie pie!


And you know I love this fun sentiment!


So be sure to hop on over there and check out all of the new stamps in the shop!

Thanks for stopping by!  I hope you enjoyed it and come back soon for more fun!  I'll be sharing another new one soon!


I've included links below to all of the Rubbernecker products I've used today.  If you purchase using these links I will receive a small compensation at no additional cost to you and thank you!

Sunday, August 25, 2019

Crafty Elves' Countdown to Christmas - August 2019 Edition


Welcome to the August edition of Crafty Elves' Countdown to Christmas!  My friend Debra Davison and I decided we were going to create a Christmas card a week for the year so that come December all of our cards would be made and it has been awesome!  I've so been enjoying the chance to use some of the products I purchased during the season last year and love our monthly posts!  

For me, this month's post is all about elves! So without further ado:


I picked up this Elf'd set from Ellen Hutson after one of the first Coffee Lover's Hops I participated in.  It was a while ago... and this is the first I've used it.  It's not even available any more and I'm just NOW using it.  The good news is I just got the coordinating dies on clearance!  I don't know why I hadn't used it... I love it... that's why I bought it...lol!  So I'm very excited to be using it now.


I used the die for this guy and laid it on some Copic friendly cardstock and traced the outer edges with a very light cool Gray Copic... C0 I think.  Then I used C00, C0, and C1 and dotted around the outline using the darker color on the crevices and lighter as I moved outward.  Then I used some Alene's True Snow and dabbed it around with a paint brush.  Next I used some glittery clear stickles and dabbed it around.  And Voila!  Snow Angel!  I popped up that cute little elf right in the middle.

The snowflakes and sentiment banner are from Paper Smooches.
The sentiment is from Picket Fence Studios.
I used this embossing folder from Taylored Expressions.


Of course I had to have a cup or two for you!  I used the Holiday Cheer papers from Sunny Studio Stamps.  This one was fun!  And did you see how perfect that sentiment die is for one of these cards?


There is Elf right there in it!!  I added some mirror cardstock over the glitter on the "elf" area so it would stand out just a little bit more.

The Treat Yo-self Die is from Ellen Hutson (also not available any more...lol!)
The heart and mug are from MFT.


For this one I used the Sunny Studio Stamps paper and the awesome Letterboard Essentials Dies from Ellen Hutson and that Christmas Light Border is from Craftin Desert Divas.

And guess what I got since your last Crafty Elves visit:


I got my hands on one of these adorable Crafty Little Elf stamps from Unity Stamp Co.... you know... the namesake of our little monthly post!  


Well... the splatters are obvious...lol... but some of those splatters are with some pearl white watercolor... hard to see, but it's in there!

I've also used:

Christmas Over/Again by Brutus Monroe for Unity Stamp Co.
Sending Love from Birch Press Design.
Nested Rectangles and Nested Deckle Rectangles from Rubbernecker Stamps.
Wow Gold and Wow Sparkling Snow Embossing Powders.

And finally... yeah... he's not an elf, but I love this Winter gnome from Picket Fence Studios A Gnome Winter Stamp Set:


Isn't he just so adorable??

For this one I also used the following items:

Cable Knit Embossing Folder and Snowflake embossing folder from Taylored Expressions.
Funky Flakes and Coffee Cup Fri Dies from CAS-ual Fridays.

Now it's time to announce the winner of some Happy Mail from last month's Crafty Elves post:


Lagene!  Please e-mail me at bzscrapper66 at gmail dot com with your mailing address!

We're doing it again... next month I'll choose someone from the comments on this post to win some Happy mail from me.

Thanks so much for stopping and come again soon!  Be sure to head on over to Debra's place and see what she's created for your viewing pleasure!


Thursday, March 28, 2019

CAS-ual Fridays Stamps New Release-Noteworthy Fri-Dies!


Welcome to Day 5 of Inspiration for the CAS-ual Fridays New Release!  Today we're sharing inspiration with the new Noteworthy Fri-Dies!  Here's how I was inspired:


This is a set of three border dies that create that cool notebook edge on your paper and I love them!  There are three different shapes for the holes AND you can also use it to cut the actual border shape out to add to your projects.  I used it here to create a torn notebook edge.


I started by inking up the inside of a sheet music embossing folder with black ink.  I just lightly rubbed the pad across the raised portion of the folder.  Then I sandwiched my paper in between and ran it through.  While it created the embossing it also "stamped" my paper for me.  Then I used some Old Paper distress ink around the edges of the paper and used the new Modern Petals stencil and Vintage Photo distress ink in the corners for a little more interest. I used the noteworthy die to cut the edge of the sheet music and then splattered some Heidi Swapp Gold Colour Shine over the top.


While my background dried, I heat embossed this beautiful sentiment from the Big Treble stamp set onto a banner die cut and cut the Treble Clef Fri-Die from some Foil Cardstock.


I put it all together and added a little flower and some pretty gold sequins and done!

I'm playing along with Simon Says Stamps Wednesday Challenge which is Anything Goes this week!

Thank you for visiting me!  Hope I've inspired you and be sure to check out what everyone has created for you today!  And come back tomorrow for some more inspiration.  In the meantime, should you decide to shop, there's this for you:


Saturday, January 12, 2019

Alcohol Inks and Foil-Not Just For Backgrounds


I'm up on the CAS-ual Fridays Blog today and sharing a card I made using some alcohol inks and foils!  Sometimes I find it hard to work with alcohol ink backgrounds because they are SO bold... I make them.. and I love them.. and they are beautiful... but I have a hard time using them as backgrounds.  But I LOVE to make them and use them with dies even more!  And add a little bit of some foil from my scrap leftovers... even better!


I started this one with some Yupo paper and just plopped some alcohol inks all over it.  I then added some Blending Solution in a few spots as well...


Next I used my Alcohol Ink Felt Applicator and kind of smooshed and twisted the colors together to get a nice colorful base.


Then I knew I wanted to add some gold foil but to do that you need some tacky/sticky spots.  So I plopped a few more dots of pink around and let it pool.  Since I'm using this piece for die cuts... it doesn't have to be "beautiful".. just be sure if you are adding foil you have some pooled areas to stick to.


I let it dry just a bit to tacky... how long that takes will depend on how much ink you added, but it's a little bit of trial and error.  I took my scraps of foil (of course I keep them all...lol!) and you place them backside down (same side you use when heat heat foiling or foiling with adhesive) and pressed down firmly.. pulled it up and voila!  Shout out to my awesome friend Jean Chaney for teaching me all about this! I did the same with some greens:


Aren't they pretty??  And yes, I felt I needed a few different colors than what I had in my alcohol inks stash, so I added in a few drops of my Copic Re-inkers and that worked just fine!  Also, warning, I didn't wait for my pieces to dry completely and I did get some transfer of inks onto my dies when I cut them out and also on my Big Shot plate... but I don't mind and probably if you made these and waited a bit longer you won't have that problem. I do have a plate that I use for messy projects and I was smart enough to use that...lol!


I used the Garden Fri-Dies to cut some flowers and some leaves.  I love the contrast of these bright alcohol inked die cuts against the white paper!  And those little specks of gold.. even better!


With the gold flecks in the flowers I decided to cut my Best Day Ever sentiment from some Foil Cardstock that I had in my stash.  I cut it once from the foiled paper and twice from white cardstock and stacked them together for dimension.  And the Bubble Box Fri-Dies make such a pretty backdrop along with that Tim Holz Woodgrain embossing folder.


Love to make some of these "backgrounds" to have on hand for just such an occasion.  But it's also quick and easy to make for one project.


That's me for today!  

Don't forget you can still get some great deals on some beautiful retiring sets here!


Thanks for stopping and come back soon!


Monday, December 31, 2018

Casual Fridays - Happy New Year!


I'm up on the CAS-ual Fridays Blog today and wishing all of you the best in the coming year!  "May the Best of Your Todays Be The Worst of Your Tomorrows!"...my wish to you.. compliments of Jason Mraz!  

Today I'm celebrating with a little "Coffee"?  Maybe... or maybe not!..lol!  Sometimes my coffee cup doesn't necessarily contain coffee....


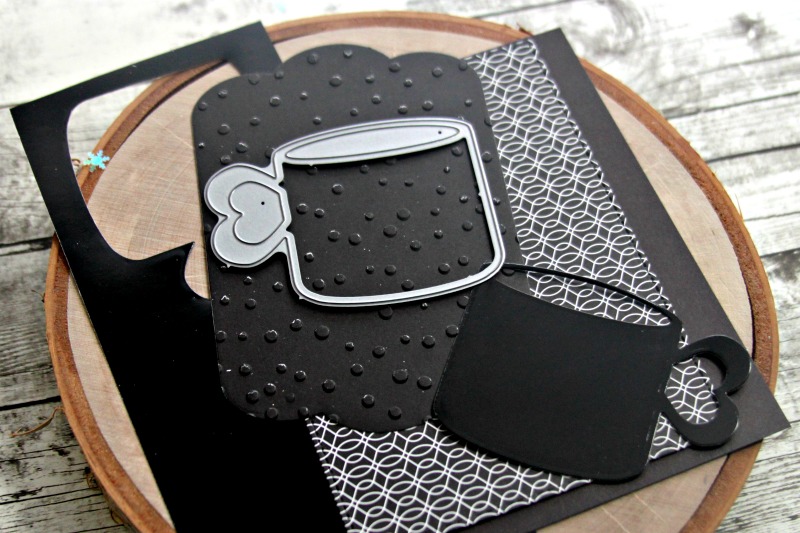
As I was looking through my coffee sentiments for my last card using this cup, I stumbled on "Possibly Vodka" from the Cup of Coffee Stamp Set and the idea for this card was born!  I started by cutting my layers.  I knew I wanted Black, White, Silver and Gold for a New Years card.  I cut my Bubble Box layer in black cardstock and then dry embossed it with a folder to play along with the final Friday Challenge that runs through tomorrow.

Then I decided to Jazz up my Coffee Cup Fri-Die with some foil.  So I cut the cup from some Thermoweb Black Toner Paper which is simply paper you can buy that is printed all black with Toner.  It's fun to die cut shapes from and then apply foil.


    The foil will cover the entire piece because the paper is covered in Toner (like from a laser printer).  Some people foil with adhesive, but my favorite way is to foil using my Minc machine or you can use a laminator.  I placed my cup die cut with the toner side facing the "back" of the foil I was using and then inside my transfer folder.  You can also use parchment paper as a transfer folder.  You then feed it through whatever heat machine you choose to use and when it comes out, you peel back the foil and the colors have transferred to the die cut!


The Brutus Monroe Thermoweb Dry Brush Transfer Foil I used was perfect with some silver, black, and gold!  I foiled the inside cup piece (where the coffee or other liquid would be) using some gold foil.

I chose the Taylored Expressions Snowfall Embossing Folder because I thought it also looked a little like bubbles.. and I didn't mind that the white core of my paper broke through in spots because I felt it made them look even more like bubbles!  Then I layered all of my pieces, popped up the cup, and cut a few of the Jumping Jacks die cuts from some purchased foiled cardstock in gold and silver and scattered them around along with some sequins!


So... yeah.  It might be coffee... or possibly vodka... maybe even champagne!  Either way, it's a celebration in a cup!  I hope you've enjoyed this non-traditional New Years Celebration and hope that whether you are out on the town with lots of friends or relatives or on your couch sipping some coffee with one or two of your favorite people (and/or furry babies...lol!) that you enjoy your evening ringing in the New Year!  Personally I'm in Arizona, but originally from the Buffalo area.  We're two hours behind so I'm thinking we may celebrate Buffalo New Years and call it a night!...lol!

AND if you're signed up for the CAS-ual Fridays newsletter you may know that there is a fantastic end of year sale going on right now!  Everything that is in stock in the shop is already marked at sale prices for at least 19% off!  There are some really great deals available there and no code is needed for these sale prices!  And to make it even better you can use one of the DT codes to save even more!  Mine is below or you can use the code of whatever DT member inspires you!


And you've still got until tomorrow to play along with the final Friday Challenge!  Let's give this long running challenge a proper send-off shall we?  And don't forget to make a stop at the DT's blogs to say thanks for all of the inspiration!

I'm also playing along with Anything Goes over at the Simon Says Stamp Wednesday Challenge!  You should check it out!