Showing posts with label Somebunny. Show all posts

Wednesday, June 8, 2022

CAS-ual Fridays Stamps - Hoppy Birthday!


I'm up on the blog over at CAS-ual Fridays Stamps with this one.


Hope you'll hop on over there and join me for links and details.

Thanks so much for stopping and hope you'll come again soon!


Saturday, January 22, 2022

CAS-ual Fridays Stamps - Bunny Wishes


I'm up on the blog over at CAS-ual Fridays Stamps with a box card and that adorable Somebunny stamp set!


Hope you'll hop on over there and join me for links and details!

Thanks so much for stopping!  Hope you'll come again soon!


Tuesday, May 4, 2021

CAS-ual Fridays Stamps - Some Bubbly


I'm up on the CAS-ual Fridays Stamps Blog today with this one.  Hop on over there for links and details!

Thanks so much for stopping and hope you'll come again soon!


Tuesday, February 16, 2021

CAS-ual Fridays Stamps - Hang In There!


I'm up on the blog over at CAS-ual Fridays Stamps playing with Alcohol Inks and the Alcohol-Lift Ink with those great EVO Synthetic Papers!  If you'd like details and links, hop on over there and join me!


Thanks so much for stopping and hope you'll come again soon!


Friday, September 25, 2020

CAS-ual Fridays Stamps and Catherine Pooler Designs Collaboration Hop!


Hello!  I've got some fun for you today!  CAS-ual Fridays Stamps is joining Catherine Pooler Designs for a Blog Hop!  We've all used some beautiful CP Inks along with some fantastic stamps and dies from the CFS shop!  And both are giving away a $30 gift code!  Hop and leave some love at each stop for your chance to win!

You should have arrived here from Jen Carter's Blog!  Here's how I was inspired: 


I decided to pull out the Full on Floral background stamp for today because it's so pretty and I thought it would be perfect in these beautiful colors from the Party Collection Carnivale Mini Ink Pads.  I used the Misti and applied the Limoncello ink first and inked up the bottom right corner of the stamp and stamped onto a panel of white cardstock.  When I do this I like to apply the ink with a sponge to avoid lines and get a better blend.  It will take me a couple applications which is why I use the Misti.  I cleaned off my stamp in between colors and followed with Coral Cabana and Be Mine.


Then I left the stamp on the Misti and covered it with some Wow Embossing Ink and stamped over the inked background.  I added some Wow Changers Sparkle and heated it up.  It added a really pretty sparkle to all of the beautiful color.


I stamped, cut and colored that sweet bunny from the Somebunny stamp set and then diecut the Sweet from the Sweet Friend die set three times from white cardstock.  I added more of the same colors of ink again using a sponge to one of the word diecuts and then heat embossed it with the Sheen from the Changers kit and then again using some clear powder.  I stacked my three word diecuts together and then popped the bunny and "sweet" onto my base.  I stamped a sentiment from the Be A Unicorn set and cut out the top and bottom parts to arrange around the Sweet to build my sentiment.


I added a few sequins and this one was done!

I've been using these inks lately ... I just love the beautiful and rich colors and the pads are nice and juicy!  Here's a couple more projects I made recently using CAS-Fridays products along with these inks:


If you come here often, you know how I love my coffee cards!  That background was made using the By The Beans stencil and CP inks topped with a little translucent texture paste and some "texture" Wow Changers.  If you'd like more details you can visit this post here!


And oh look!  More Coffee....lol... and you can find this one here if you'd like more details.

That's me for today!  Now head on over to see what Karen Baker has created for you today!  Remember!  Be sure to hop and visit each post and leave some love for your chance to win one of two $30 gift codes to one of the shops!  You'll find all of the details when you stop at the CAS-ual Fridays and Catherine Pooler blogs... links to those are at the top of this post!

 Thank you so much for stopping by today!  I hope you enjoyed your visit and you'll come back real soon!

Monday, July 13, 2020

What's Up Friend - CAS-ual Fridays Stamps


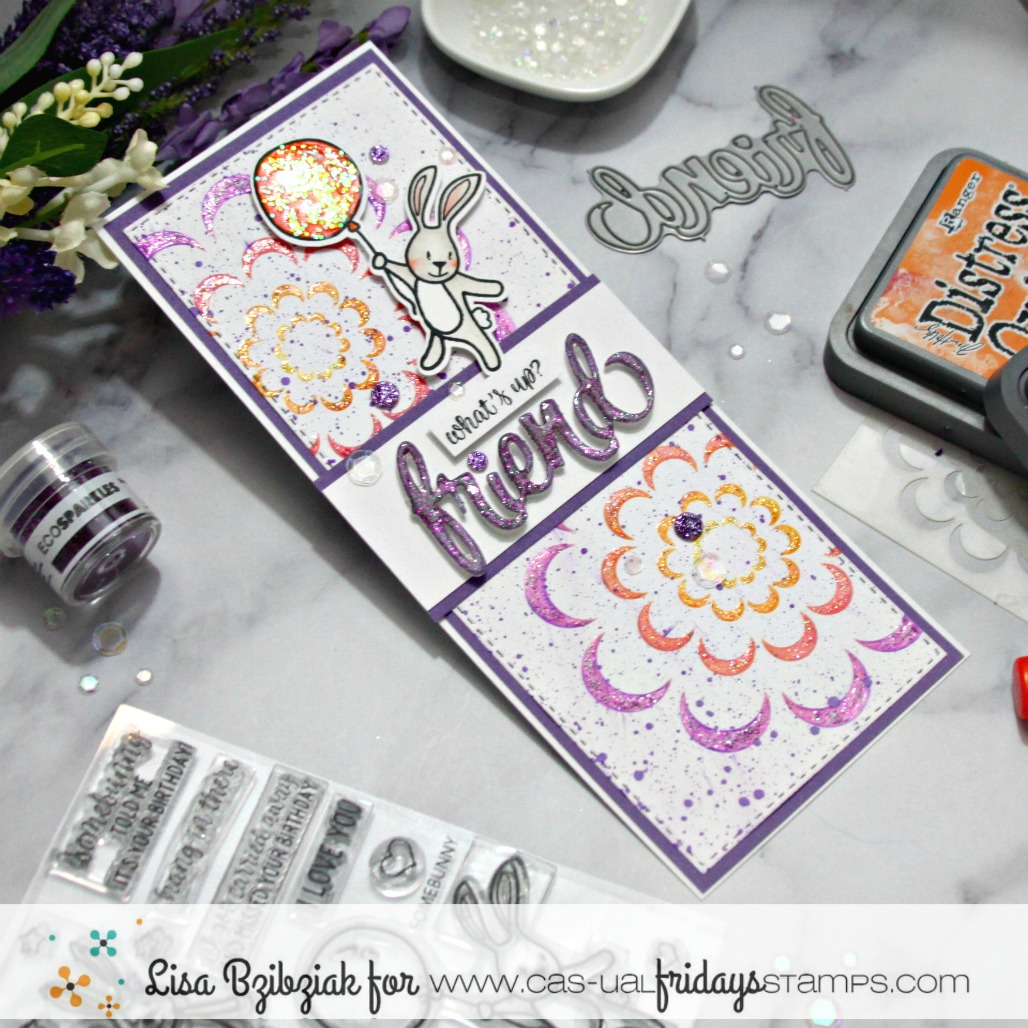
Welcome back!  Today I'm sharing another card using the Bold Flower stencil along with the Somebunny stamp set and a few other things!  I'm painting with Glitter again on this one because I'm playing with this technique this month and I love it!


I started by using Distress Oxides and the Bold Flowers stencil to add the two largest flowers to my slimline sized card.  I knew I wanted to use a few colors on the petals so I stuck with the largest flower on the stencil and added one off the left edge at the top and off of the right edge at the bottom.  Then I took a paint tray and added a little bit of anemone colored Eco Sparkles glitter from Wow and some Glossy Accents and mixed them together.  You don't need a lot and you can always add just a little water to the mix if you need to thin it out a bit while you paint.


After I got done "painting" the glitter onto the purple areas, I rinsed out my paint tray and grabbed pink, orange and yellow glitters from my stash and repeated the process with each.... rinsing out in between so that cleanup would be easy... and it was!  Before I set that aside to dry I sprayed some Distress Oxide Spray in purple over the panel and then set it aside.


I cut the Friend word die from the Sweet Friends word die set once from purple card stock and twice more from white and stacked and glued them together.  Then I decided it would be fun to paint the sentiment with glitter too, so I did!  I wanted even more dimension for this part of my sentiment so I decided to add additional Glossy Accents over the top of it and set it aside to dry.


I colored in my bunny and balloon and then decided the balloon could use a little sparkle too...lol!  So I broke out the chunky orange glitter and liquid glass and proceeded to paint that too... I can't get enough!


I absolutely love the shimmer of the glitter and glossy accents painted on!  It's much lighter than just adding glitter to your project.  The Glossy Accents is light enough that it doesn't buckle your paper, and there is no glitter to fall off of your project either at your house or your recipients!  It's all securely in place with the Glossy Accents... smooth and sparkly!

I used one of the short sentiment pieces from Somebunny along with the Friend word die to build my sentiment.


I just added some jewels and sequins and I was done!

So thanks for joining me today!  I hope you enjoyed it!  Should you see something that you must have today, I have this for you:


And you just might find some really great deals in the sale section too!

Come again soon for more CAS-ual Fridays Inspiration!


Monday, February 10, 2020

To The Moon And Back With CAS-ual Fridays!


Welcome back!  I'm up on the blog over at CAS-ual Fridays and sharing another cloudy background I created using some distress oxides and the Bubble Box die cut that I used on my card from my last post which you can see here if you'd like!  I'm using the adorable Somebunny stamp set again and this is the night time version....


I used some blues and purple distress oxides this time for my night time sky.  I realized after I finished my background that I forgot to leave some space for my moon glow so I decided to try the oxide lift technique.


I figured out about where my moon would be and used a paintbrush to apply water where I wanted to add a yellow glow and then "lifted" color off of the paper using a paper towel.  I repeated this process a couple times and then dried the area with a heat gun.  Then I added in some yellow.


I also added some tiny gold "stars" using a Uniball Gold Gel Pen.  I used the Stars Fri-Dies (still attached to each other) to create these glitter paper star frames.  I'm thinking I may not cut them apart because I love these frames!  I popped them up onto my background and then popped the rabbit hanging from the moon with a slightly thicker foam tape.


And finally a couple of the adorable sentiments from the Somebunny stamp set and a few sequins!


So there we are!  I can't tell you enough how I love these bunnies!

There is a sale going on over at CAS-ual Fridays Stamps!  It's a Valentines Special and there are 7 sets marked at $3 or less right now!  You can check out the specials here and the sale is While Supplies Last through February 14th!

Thanks so much for stopping and I hope you enjoyed your visit!  If you have seen something that you must have from the shop I have this for you:


Come again soon for more CAS-ual Fridays inspiration!  Or why not get it in your inbox!  Sign up in the sidebar to the right so you never miss a post and be sure to sign up for the Newsletter so you get all of the latest information about sales and new products!


Wednesday, January 29, 2020

As High As The Sky - CASual Fridays Stamps


Welcome back!  Today I'm sharing this sweet card that could be a Valentine or just to let someone know that you love them!  And I'll show you how I used the Bubble Box Fri-Dies to create this cloudy background!


I started by cutting a background layer from white cardstock.  Then I cut the largest Bubble Box die also from white... you could cut it out of any cardstock or even a light cardboard or chipboard depending on how often you intend to use it.  Although even just out of simple card stock this one is in my stash ready to use again!  I laid the bubble Box die over the background panel starting at the bottom at various angles, blended ink lightly over the top and then moved the die cut over and repeat... always tilting at different angles to give the feel of various shaped clouds.


I just kept my ink blending to the top of the diecut careful not to go over the straight edge too much!


This background took just a few minutes and I love it!  I added a little ink to the bottom of the panel as well... 'cause we're WAY high up in the sky...


... 'Cause that's how much I love you!!  Aren't those bunnies from the Somebunny Stamp set SO adorable!!  This one was floating hanging onto a balloon, but I cut the balloon and string off and covered the extra lines with white gel pen.  Then I cut his hand off (sorry bunny) so I could make it look like he had it wrapped around that largest heart from the Heart Board Fri-Dies.  And can we talk about the heartwarming sentiments on the Somebunny Set?!  Love them all, but I thought this one was perfect!


And seriously... those Heart Board Fri-Dies are one of my favorite go to die sets... I cut them once from the design paper I wanted to use and once out of some thin crafters foam for a little bit of dimension.  And the hearts from the Somebunny set were perfect to scatter around along with a few sequins.


And that's me for today!  Thanks so much for visiting and hope you enjoyed it!

Should you decide there is something that you must have, I have this for you:


And you can still get some great deals on retiring sets right here!

Come again soon and often for more inspiration!


Thursday, June 13, 2019

Somebunny Told Me - Huggable Critters With CAS-ual Fridays!


I'm up on the CAS-ual Fridays Blog today and sharing this card I made using the Huggable Critters Fri-dies and a punny sentiment from the Somebunny Stamp Set!  I wanted this to have a kind of sewn stuffed animal feel so I used some pretty coordinating patterns and along with the stitching on the Fri-dies, I love the way it turned out!


There are SO many options with this die set!  You can create all different kinds of expressions and faces... with four different ear shapes and a few eye, mouth and nose combos, two different paws and three different tails.  I trimmed down the bunny ear and attached the puppy ear to create the look of one of his ears being turned down.  And I love to use foam tape to create depth on these... I think it makes such a difference.  I also trimmed down just the inside two of the bunny ears to create a lighter inside ear color.  I added a flower by cutting two of the smallest Four Petals shapes and layering them and used Nuvo drops for the center.


And this sentiment from the Somebunny stamp set was perfect!  A sweet birthday card for a sweet little girl!  And I kinda want a stuffed bunny like this now!


Sweet, right??  I love how these critters can hold a gift card... a sign... some flowers... anything!

So thanks for stopping by today!  I hope you enjoyed it and I can't wait to see what you create with these critters!  If you don't have them yet and you feel the need to get them, I have this for you:


Stay tuned and come back often for more CAS-ual Fridays Inspiration AND for something special coming later this month!