Showing posts with label Cutting Café. Show all posts

Tuesday, June 9, 2020

Will You Be My Gnomie? - The Cutting Cafe


Hey there!  I have a fun one for you today!  I picked up this adorable Gnome Shaped Card file over at The Cutting Cafe and I love it!!  It's been a while since I pulled out and plugged in my Cricut and I thought it was about time!


Isn't he adorable?!  And there are two different gnomes in the set so I'll be needing to make one with the other guy too.  I used some plaid for his hat because... well... plaid!  And there are a bunch of accessories that he could be holding but of course I picked the coffee cup!  I actually cut my pieces smaller than the file called for so that my largest piece would fit on a 12x12 sheet of paper.  I just pulled in all of my pieces and then selected all of them and shrunk the whole thing at once to the size i wanted.  I put him all together and then added the sign using some dies from Kat Scrappiness.


Hope you enjoyed it!  Oh I forgot to mention the sentiments that come with the set in JPG form so you can make them any size you want!  I chose this one but there are a few good for many different occasions or just because!  Very fun!

Thanks so much for stopping by and hope you'll come again soon!

Wednesday, November 6, 2019

Cutting Cafe Inspiration - Fall/Thanksgiving Greeting Pillow Boxes


Welcome to some Cutting Cafe Inspiration!  Today we're playing with the Fall/Thanksgiving Greeting Pillow Boxes!


I love these boxes!   What a great way to give a little treat!  Maybe put one next to each table setting at the Thanksgiving table?

I've filled my pillow boxes with Chocolate Covered Coffee Beans..mmm... not sure if these will make it to Thanksgiving though...lol!  With this one I added a little coffee cup tag that I made using the Coffee Cup Shaped Card file and one of the sentiments in the pillow box set.

I'm linking this one up over at the 2019 Fall/Winter Coffee Lovers Blog Hop!  You should definitely check that out... you have until the 8th to link up!  I'm also playing along over at Double Trouble Challenges You Have Us In Stitches (my little tag has stitches) and I've met the twist with Coffee!  and I'm playing along over at Simon Says Stamp's Monday Challenge which is Thanks/Thanksgiving!  I've got that here!


More Coffee Beans... mmm.. I'm Grateful for Coffee Beans...lol!  And you!!

Thanks so much for stopping!  Be sure to head on over to the Cutting Cafe Blog to see what everyone has created and comment there for your chance to win three files of your choice!  And come back again tomorrow for some more coffee!


Monday, October 21, 2019

The Cutting Cafe Inspiration-Autumn/Halloween


It's kind of an Anything Goes share for us today over at the Cutting Cafe... we chose from tons of Autumn/Halloween themed files for today's post.  I chose the Fall/Thanksgiving Window Boxes to work with, but I used them in a different way... with a little help from my mom!


I pulled the file in with these boxes and kept only the layer that fits on the top of the box in Design Space.  Then I resized each of these layers to 5x5.


I knew I was going to create shaker cards with these, and I wanted to be able to layer another color over just the sentiment.  I could have just cut a second square and trimmed the word out with scissors, however, I enlisted the help of my mom to trim away the edges within Design Space!  She says I taught her about the Slice feature, but apparently I've forgotten because she had to teach me!


She cut these for me, but when we got together again, she showed me how to use the Slice feature and I'm looking forward to testing it out again in the near future!


Before I added the clear acetate to the window layer, I did trim off a quarter inch from each of the edges because I knew I wanted my card to be five by five, but still wanted some of the printed paper to peek out around the edges of the shaker window.  My card base is 5 x 5, the design paper layer is 4.75 x 4.75, and the window is 4.5 x 4.5 after trimming off the edges.


In this file there is also a cutie pie turkey along with some layers.  After I resized this window, I layered each of the pieces... wings, body head and beak over the top in Design Space and re-sized them so they'd fit correctly over the turkey shadow attached to the window.


There is also a Gobble Window that we sliced this sentiment out of and re-sized it small.  I didn't create a shaker card for today using the Gobble window, but you'll be seeing that soon!

I hope you enjoyed your stop today!  I know I really enjoyed creating these shaker cards from the Window Box file!  Be sure to check out the Cutting Cafe Blog to see what everyone has created for you today and comment there for your chance to win three files of your choice!

Come back soon... Wednesday I'll be sharing a card I made using the Gobble window!


Sunday, October 6, 2019

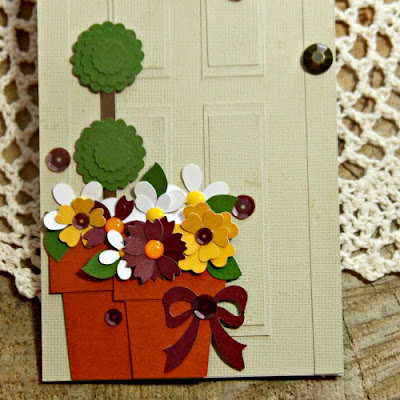
The Cutting Cafe Inspiration - Front Door Shaped Card


Welcome to some Cutting Cafe Inspiration!  Today we're sharing projects using the Front Door Shaped Card.


I used the Front Door with a Window (although most of my window is covered...lol!)  I cut the circle wreath and all of the flowers, and bow using the door file.   There are sentiments with the Front Door Shaped Card file, but I printed this sentiment from the Fall Window Boxes file. 


Not to mention the pot, topiary and leaves.  This is such a great file that I will use over and over even without the door!


Thank you so much for stopping by!  Be sure to head on over to the Cutting Cafe Blog to see what everyone else has in store for you... you're gonna see some awesome stuff!  Don't forget to comment there for your chance to win three files of your choice.

Come back soon! 


Friday, September 20, 2019

Cutting Cafe Inspiration - An Awesome Backpack?!


Welcome to some Cutting Cafe Inspiration!  We have some very cool projects for you today!  There's a new file in town and you are gonna love it!  This Backpack cutting file is quite awesome and so easy to use!

I picked out some beautiful Photoplay paper that I got at the stamp show last weekend for mine!


There are two separate compartments in the assembled backpack.  The main compartment could fit lots of cute little things... maybe some Chapstick and pencils and small notebook... or some embellishments and ribbon and twine... or a cute set of coordinating cards.... you get the idea!


And the front compartment can hold a few things too... including this cute little 3x3 card.  I used magnets to keep the flaps closed.


I used the same papers for my card and these Layered Flowers were perfect for the front.  I used a cute little sentiment from the Wheelbarrow Deliveries stamp set from The Cutting Cafe Shop.


Adorable and cool right??  Wait until you see what everyone has done with this file!  Head on over to the Cutting Cafe Blog and check them out!  While you're there, comment for your chance to win three files of your choice!

Thanks for stopping!  Come again soon!

Friday, September 6, 2019

Cutting Cafe Inspiration - Anything Goes!


Welcome to some Cutting Cafe Inspiration!  This time around it's Anything Goes so I had some fun playing around with one of my fave files, the T Shirt Shaped Card File.  I love this file because it's so fun to create any T Shirt you wish you had!  A great canvas for any design!  I decided it's finally time to get my Halloween on!


For this one I used some Halloween themed papers from my stash from Authentique and My Mind's Eye.  Of course one of them had to be plaid and I love that skeleton with a top hat that I cut from one of the papers!  And I had the perfect chipboard sticker for the sentiment!


And of course there is coffee!  Probably my very favorite file is the Coffee Cup Shaped Card 2.  I used the layering pieces and made them small enough to fit on my T Shirt card (the best part about SVG files vs dies... like digital stamps you can re-size them!) and another perfect sentiment from those chipboard stickers!


And that's me for today!  #IdbuythoseTshirts!

Thanks so much for stopping!  Be sure to hop on over to the Cutting Cafe Blog and comment there for your chance to win three files of your choice and then see what everyone else has created for you today!

Friday, August 23, 2019

The Cutting Cafe - Checkbook Inspiration!


Welcome to some Cutting Cafe Inspiration!  This time around we're sharing projects using the Checkbook Register file along with some fabric!  

I am not a sewer..   I mean... I've sewn... I just don't enjoy it.  To much following instructions I think and I suppose if I spent some time doing it I might like it more, but I don't need another addiction...lol!   So when Regina said, "Let's use fabric" I have to admit... I was a little stumped.  But then I thought... well... I don't HAVE to sew and I have some pretty fabric that I bought ... well... because it was pretty!  And I thought... I can use that in my projects... (see what I mean... I don't even sew and I justified buying pretty fabric!...lol!).  So I got out some old fabric from CTMH.  Used the Checkbook Register file to cut out my base and put it together and just cut some fabric out and adhered it to the base using binding tape.  Oh... and I knew I couldn't cut a straight line and that was ok since I love the distressed look... so I roughed up all of my edges by pulling out some threads.  I decided to leave the one pinked edge because I liked it!


Then for a fairly flat decoration on the front, I decided to use some Paper Smooches dies from my stash to cut a flower and leaf from felt.  I finished it off with a button and tied a scrap piece of the fabric through the button holes... and I thought that this sentiment was perfect for a checkbook register... Adulting IS hard!!


This file is SO cool because not only do you get the cut for the checkbook register cover which has two pockets on the inside flaps, but you also get the register pages you can print on whatever paper you want!  I don't write a ton of checks so I just printed one sheet and I can print another when I need one... next year maybe!...lol!  and I though this will also be a great place to hold receipts... those I have a lot of!...lolol!


I decided the inside called for another bloom.. this time I used a flatter button and no fabric bow so it would be less bulky... and then chose the inside sentiment also from PS because I thought again it was perfect for those stressful days.

And there you have it... be sure to checkout everyone's projects up on the Cutting Cafe blog because we DO have some sewers in the group and they've created some beautiful things!  Comment there for your chance to win three files of your choice!

I'm playing along over at Paper Smooches monthly challenge which is School and/or Words... I've got some awesome words here!


Thanks for stopping and hope you'll come again soon!

Wednesday, August 7, 2019

The Cutting Cafe - Back To School Inspiration!


Welcome to some Cutting Cafe Inspiration!  We've got some fun Back To School projects for you!  I've used the Bus Shaped Card and the adorable From Owl of Us stamp set to create a fun thank you for the person that delivers our treasures safely to school and then back home each day!  I don't have little ones in school any more, but I remember the worry once they left home.  Nothing was right until they got home again.  But it was a little easier when you knew the people who cared for them during the day were wonderful and cared about them too!


This file is fun and SO easy to cut and put together.  I pulled the SVG version into my Cricut Design space; chose colors; and the machine did the rest!  You remember Sassy Owl??  Still love her!  She looks like she doesn't put up with any nonsense!


I mean look what she's got to put up with every day ... and if I remember from my school days, this is pretty accurate.  AND she's gotta drive that huge bus!  Thank goodness for Sassy Owl!  I used some dies from my stash for the heart and sentiment.


Love this file!

Now!  Be sure to head on over to the Cutting Cafe blog to see what everyone has created for you today!  And comment there for your chance to win three files of your choice!  Maybe you'll pick this one!

Thanks for stopping!  Come again soon!

Thursday, July 25, 2019

Crafty Elves' Countdown to Christmas - July 2019 Edition!


Welcome to this month's Crafty Elves' Countdown to Christmas!  Debra Davison from Meticulosity and I are the Crafty Elves and we've made a pact to create a Christmas card a week so that when December comes, all of the hard work will be done and we can just mail them out!  We share our makes every 25th of the month and this one is special because we are also participating in an Instagram Hop with our Polka Dot Orchard Teamies to show off some awesome Christmas themed digital stamps!

Each month I draw a name from the visitors who commented the prior month and send out some Happy Mail!  Last month's winner will be announced at the end of this post.  And when you are done here be sure to head over to my Instagram Hop post that begins at 10am EST and follow the instructions there for a chance to win some more!

Here's how I was inspired:


This adorable Penguin from the Penguin Love digi set was just begging to have a Santa Hat on and this one from the Magic of Christmas set was perfect!  The awesome thing about digis is you can resize them so it was easy to make it in just the right size.  I pulled up the penguin and made him the size I wanted and then pulled in the hat and sized it so it would fit on his head.  I then separated them to print because I knew I'd be cutting them out.  I used the beautiful Really Rainbow Christmas papers from Lawn Fawn as well as the Mini Snowflakes.  The sentiment is from an adorable Reverse Confetti set, S'more Love and I layered my papers using some dies from Rubbernecker... these and these!


These images and sentiment are also in the Magic of Christmas set.  And since I printed the sentiment on my laser, I was able to foil it with my Minc.  I used the Lawn Fawn snowflakes and Rubbernecker background dies again.  I used this NEW Rubbernecker Stencil on the top layer and that adorable Santa Hat die from Taylored Expressions.


This one might be my fave... but then you know why that is...lol!  The belt and sentiment are in the Magic of Christmas digital set.  The mug die is from Memory Box and I used a stencil from Paper Smooches for the steam along with some texture paste and glitter.


And my fourth card for this month is this one that I shared a few days ago.  I used digital stamps from The Cutting Cafe and you can find more details on this one here if you'd like them!

Now for the winner from last month's commentors:


Shell!  Contact me at bzscrapper66 at gmail dot com with your snail mail so I can send you some Happy Mail!

Now be sure to head on over to Instagram (after 10am EST) and hop for a chance to win a digital stamp set of your choice!  Head to my Instagram here and look for this graphic!:


Come back soon!


Sunday, July 21, 2019

The Cutting Cafe Inspiration-Christmas in July 2019!


Welcome to some Cutting Cafe Inspiration!  It's Christmas In July over at the Cutting Cafe!  I've been making Christmas cards all year long along with my friend Debra Davison and I'm a couple days early with this one but that's ok... I'll still be back on the 25th with more!  For today I decided I wanted to color up some of the poinsettias from the Sleigh Treat Box set.


I printed them in different sizes, colored them with my Copics and some colored pencils and then cut them out and layered them together with thin popup tape between the layers.


I also used the Merry Christmas background from the Christmas MIni Colored Printable Set... but I printed it in black and white.  I splattered everything with some gold, red and black glitter water colors... a little ribbon, a button, wooden snowflake and some stamens... and well, of course some sequins.


I had a lot of fun with this one... I haven't used ribbon in quite a while and this beautiful ribbon from DL Art was perfect!  It's a bumpy one though so extra postage for sure... although who am I kidding... I don't send many flat cards...lol!

SO!  Be sure to head on over to the Cutting Cafe Blog and see what everyone has created for you!  Comment there for your chance to win three files of your choice!

Thanks for stopping and come back again soon!


Saturday, July 6, 2019

The Cutting Cafe Inspiration-"Ugly" Sweaters!


Welcome to some Cutting Cafe Inspiration!  This time around we're playing with the Ugly Sweater file.. it's not just for Christmas!  I've created four cards today using this awesome shaped card file along with some fun old papers, dies and stamps from my stash.


It was so fun to put these together and once I started getting ideas I just couldn't stop!


I'd buy that sweater!  You know... here in Arizona... Summer IS sweater weather... I don't leave the house without a sweater (for the air conditioning) and a bottle of water (because...well... the desert!)


For this one, I used some old stickers that coordinated with the paper and the sentiment is from the From Owl of Us Stamp Set from The Cutting Cafe Shop, which in itself is owldorable!.


I like owls... ya know?  I used dies to put together this one, but there is a cool Owl Shaped Card here in the shop that would work too!

Thanks for stopping and I hope you enjoyed it!  Be sure to head on over to the Cutting Cafe Blog and check out what everyone else has done with this cool file!  And while you're there, comment for your chance to win three files of your choice!

Come back here soon!