Friday, November 30, 2018

Coffee Lovers Blog Hop-Fall/Winter 2018-Day 1


I thought this day would never get here!  It is time once again for the Coffee Lovers Blog Hop!!   This time around we're creating projects using the theme of Coffee, Tea or Cocoa along with Fall/Winter!  You can link up at the main post here for a chance to win one of so many prizes!  (85 Sponsors!!!)  And link up more than once for more chances... just be sure to create something new with these themes and link it up!  I've used some awesome Paper Smooches and Lawn Fawn products for Day 1 and here's what I have for you today: 


One of my absolutely FAVE To Go Cup dies is the Cozy Coffee die from Paper Smooches... I mean.. I just love that the die cuts out the outline and all of the pieces.  I just cut mine a few times out of various papers and piece them together upside down and then add foam tape across the whole thing... or regular adhesive if you like things flat... but why would you want to do that??  I started with that adorable Lawn Fawn Really Rainbow Christmas Paper.


Then I just mixed and matched them and cut out my cup pieces along with that awesome hat for my cup from the Snowman 2 Die... it was the perfect size!  And the largest tag from the Gift Tags 2 Dies made the perfect backdrop.


And if you've been following me on Instagram you may have seen this fellow before... but probably not his friend!  These images from the Santa Paws stamp set... really all of the images from that set... so adorable!!  I'd say that I'm pretty sure these are Santa's two best friends... the hugest cup of coffee (with a hat to keep it warm) and his little buddy Rudolph.  What else would you need?


A few snowflakes from the Snowflakes Dies, the scarf from the Snowman Card Dies, and that awesome sentiment (don't you just love all of the Paper Smooches sentiment stamps and dies????) from the Christmas Word Dies.  All I needed were a few sequins!


Just the cutest right??  Now, head on over to the Coffee Loving Cardmakers Blog Post Here for all of the details!  You'll be able to check out all of our awesome sponsors, including Paper Smooches!  Be sure to thank them for all of their wonderful support of our beloved hop.. and Amy!!  Please don't forget our Fearless Leader Amy Tsuruta who works so hard to make this hop happen... Thank you Amy!!  And play along!  Nothing to lose!

I'm playing along with a couple challenges today too!  Check out the Simon Says Stamp Wednesday Challenge which is Anything Goes!  I'm also playing along with the Holiday Challenge over at Cupcake Inspirations... if you've never played along over there you should definitely take a look!  And be sure to check in on on Paper Smooches on December 1st for their next challenge... you know I will be heading over there!

Thanks for stopping and hope you'll come back tomorrow... I'll be having lots more for you this week.. maybe even a little Blog Candy!


Thursday, November 22, 2018

Casual Fridays-An Old Technique With A Twist


So glad you are here!  Today I'm up on the Cas-ual Fridays Blog and I'm showing you how I made this cool shaving cream background!  And after we'll talk about that tag!


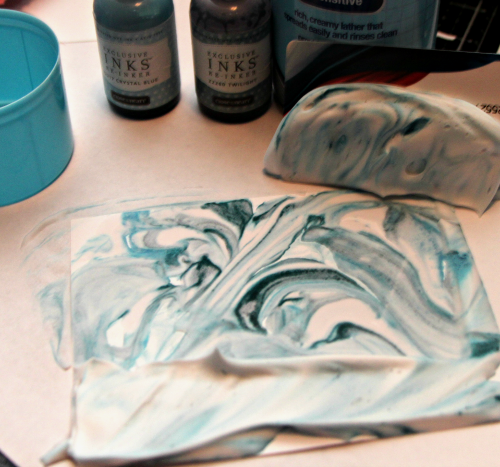
Some of you may already be familiar with this type of background and it may be new to some of you.  I just learned it last year and it's quick and easy and just a little bit messy!  You'll need some shaving cream (dollar store is just fine), some water based re-inkers (I just used my old CTMH ones), a paper plate (or a plastic one like I have here which would be re-usable), an old credit card, some paper (a bunch of white 5 1/2 x 4 1/4" sized pieces are just right), and also a plastic knife which isn't in the picture.  You'll want to have some paper underneath you too because as I said... little bit messy!


First you just spray a big blob of shaving cream onto your plate.  Then drop some of the reinker around into the blob... I had two different shades of blue so I made sure to make my drops in kind of a random pattern, interspersing the two shades.


Then you will use the knife to move the shaving cream around... "fold" in the inks.  You don't want to mix them together too much unless of course you want less contrast and swirl... but you'll see you can make multiples from this and as you go there is less and less contrast so you get a fun and varied set of backgrounds.


Next, lay your piece of paper on top of the shaving cream blob and make sure it gets covered with the mixture.. you can move it across the top, push it down into it more than once... lift it up and smoosh it back down if you've got more open spaces than you want.  When you lift it up and it's covered, you'll need to flip it over onto your protective surface:


You'll notice here I have some blank spaces, but everything turned out ok.. you just take the credit card and holding the card firmly against the paper scrape across the paper:


And as you scrape it across to remove the shaving cream, your piece of art is revealed!  Cool right?  


I made four backgrounds with this one plate of shaving cream and probably could have made a few more!  Notice the difference between the top and bottom ones... as you work with the shaving cream, the ink will blend together more and you'll have a little less white and a little more of whatever color you've used.  Then once they're dry you can use them as they are or I gave it a twist and I smooshed Versamark over the entire top.. sprinkled some Wow Sparkling Snow Glitter Embossing Powder over the top... just a little because the stuff will pretty much cover the swirlies (ask me how I know).. and then covered the rest with some Clear Embossing Powder and heated it.  And you don't have to use these as just backgrounds... I have a bunch that I use with diecuts... like the leaves I used on my Autumn Shaker here!


And that's how I got that pretty sparkly swirly blue background for my card!  And you may have visited me for the CAS-Fridays day over at 25 Days of Christmas Tags when I told you I made a 2nd tag inspired by Jane Taylor's beautiful tag because I wasn't able to use the snow mounds I'd created on my tag for that day... so here it is!  I used the Scalloped Tag Fri-Dies (to cover the scallops on the tag) and the Bubble Box Fri-Dies (to create my snow mounds).


I colored up these sweet fox from the Bushy Tail stamp set and did some no line coloring... but decided to make him a gray fox this time... such a cutie!  And this time he's holding a snowflake.


And left my sentiment short and sweet.  I used the Merry word from the Merry Christmas Fri-Dies and decorated with a few snowflakes from the Funky Flakes Fri-Dies!


Originally I was going to keep this just as a tag... but I loved it so much I decided to make a card out of it and it was a great way to use that shaving cream background!

And I'm playing along with the Sparkles/Christmas challenge over at the Wow Embossing Powder Fans Group.  You must join the group to play along but you'll love it... there is lots of inspiration over there!  I'm also playing along over at Color My Heart Color Dare where they have a Monochromatic Blue challenge going on and you should check that out too!

Hope you enjoyed your visit and thanks for sticking around until the end!  See you again soon!

Don't forget about the special that is going on right now too!


So here are the details regarding this stamp set!  It will be available for purchase for $6.50 or you can get it free with a qualifying order of $50 placed November 20-26th!  Your order must total at least $50 after discounts and shipping.  No code is needed-it will automatically be added to your order when it ships!  On the 27th, the set will be offered in the shop for $7.99!  You can find this set here!  And you can check out the tag I made using this set here if you'd like!  I have a giveaway for this stamp set going on at my blog here and all of my DT sisters are doing a giveaway too!  Find links in the main 25 Days of Tags post at CAS-ual Fridays here!

Woo hoo there is a sale going on here too!  With deep discounts on retiring items and all items in the Christmas/Hanukkah section are on sale through the 26th!

And if you feel like shopping here's this for you:


Wednesday, November 21, 2018

Caffeine Fueled Paper Play - Stamplorations


I'm up on the Coffee Loving Cardmakers Blog and playing along with the Cutplorations Challenge over at Stamplorations!  Here's a sneak peek!  Hope you'll hop over there to join me, find out the details, and info about some cool stuff going on over at Stamplorations blog!  (That awesome sale is just the tip of the iceberg!)


The Cutting Cafe Inspiration - Handmade Embellishment Box


Welcome to some Cutting Cafe Inspiration!  Today we're showing off gift ideas for the holiday and I chose to work with the Handmade Embellishment Box Set!  It's the perfect way to give a gift that you made and that the recipient can use to make something too!  I decided to create some handmade flowers to give to a crafty friend!


The box itself is super easy to put together!  With cuts and scores in all of the right places, I didn't even need a video!  That's saying something...lol!  I'm in no way or ever could be an engineer... not in this life!  I had lots of time leftover to make these pretty flowers... they COULD be poinsettias or they could just be pretty red flowers!  I pulled up the Layered Flowers cutting file and pulled them in to my Design Space.  I created three different sizes about 1/4" apart in size and just duplicated to my heart's content!  I kept duplicating until I filled a page.  Then I cut one sheet of red and one sheet of white flowers!


While I was playing with flowers, I "accidentally" cut a bunch of these flowers from the Popup Flower Card, but what a happy accident that turned out to be!  I used them as a decoration on the box and I used popup tape to hold them on ... they can easily (but not too easily) be removed and also used as an embellishment!


I love the red and the white flowers!!  After I cut them out, I sprayed some Heidi Swapp Color Shine in gold on them.  When they were dry, I folded the petals just a bit where they are scored in the center of the petal for some dimension.  Then I used liquid glass to layer them on top of one another and a gold pearl for the center!  I cut a piece of acetate to fit inside the box that I used to attach my flowers to with a glue dot so they could be removed for use easily!  You could add an acetate window to the box top if you'd like... I left mine open at least for now (much easier to take pics of!) but it would make a nice touch!


I also used some Christmas Mini Words that I'd printed a while ago and still had a few waiting to be added to a project.. perhaps one with pretty Christmas flowers.  I just cut them out with a die and distressed them a bit.

That's it for me today!  Be sure to hop on over to the Cutting Cafe Blog!  Comment there for a chance to win three files of your choice!  And then check out what everyone has created for you today!  You never know!  Maybe it's that perfect gift you've been looking for!


Tuesday, November 20, 2018

25 Days of Christmas Tags - CAS-ual Fridays!


So excited to be participating in Tracey McNeely's 25 Days of Christmas Tags along with my CAS-ual Fridays teamies!   CAS-ual Fridays is one of the many sponsors for this awesome event.  There are lots of ways to be eligible for some fantastic random drawn prizes which include commenting and playing along!  Check out Tracey's main post here to find out all of the ways you could have a chance to win!

AND be sure to read to the bottom of the post for a special sale and another chance to win!

Today I've used the Scallop Tag Fri-Dies along with this month's newly released Naughty-isms Stamp Set and Naughty Fri-Dies.

I created a Santa Suit for my tag by cutting two of the largest tags in the set.. one in red and one in white.  I used the red as my base and started with a thin strip of white glitter tape down the middle.  Next I cut the top and bottom off of the white tag and attached the pieces to the red tag and covered the ends of the glitter strip.  Then I cut a strip of black cardstock the width of the tag and added it for a belt and a simple square die cut from gold foiled paper for a belt buckle.  I added some acrylic dots as  buttons.


When I had the backdrop all done, I cut the Naughty or Nice sentiment once from black glitter paper and twice from black cardstock so I could stack them together.  Then I stamped the remaining part of the sentiment from the stamp set onto black cardstock with Versamark and heat embossed it in white.  I fussy cut it out so it would only take up a little space and moved it around on the tag until I settled on where it would go.  I popped it up and then I came across those sweet little Santa hat embellishments in my stash which fit perfectly on the loopty loop for the Nice part of the die cut!  Fun right??  

AND!  Michele has a special stamp set for you!   It's called Most Wonderful.. and it is! Take a look at this beauty!


So pretty right??  And I created a quick tag using this special set because I couldn't help myself!  So I'm playing along with 25 Days of Christmas Tags too! 


I was inspired for this one by Jane Taylor's beautiful tag from Day 8 here!  I knew this beautiful tag design would be perfect with this set!  That gorgeous blue evening sky background and the pretty snow mounds at the bottom!  I didn't have room for the snow mounds that Jane made, but I had already found a cool way to create them... so I made a second tag... but you'll have to wait until Thursday to see that one...lol!


So here are the details regarding this stamp set! 


It will be available for purchase for $6.50 or you can get it free with a qualifying order of $50 placed November 20-26th!  Your order must total at least $50 after discounts and shipping.  No code is needed-it will automatically be added to your order when it ships!  On the 27th, the set will be offered in the shop for $7.99!  You can find this set here!  To top it all off... all Christmas and Hanukkah sets are on sale now and you can find some great deals on retiring products too!

Should you decide to shop, here is this for you!

ALSO!

Michele has been so generous to let us have a giveaway here and all of your stops along the way!  The CAS-ual Fridays Design Team are all giving away one of these special sets so be sure to stop at all of my teamies places to to find out how they are giving you a chance to win!  Here, all you have to do is be a follower and leave me some love here and be sure I can get in touch with you in case you are the winner!  You have until Sunday night to comment to win and I'll announce the winner Tuesday!  It is Most Wonderful isn't it?

EDITED TO ADD: The winner is Verna Angerhofer!!  Thanks so much to all who left me some love!  I do so appreciate it!!

AND!

Be sure to stop over at the CAS-ual Fridays Blog post and leave some love there for a chance to win a $20 gift code!  And comment on all of the 25 Days of Christmas Tags Design Team posts and even play long for chances to win sponsor prizes from this fun challenge and celebration!  So many chances to win!!  Good luck!

So thanks for stopping by!  Hope to see you again soon!


Saturday, November 17, 2018

Cozy and Warm Christmas


IDK... I said I'm not done with Autumn yet, but I am enjoying making some Christmas cards!  I'm playing along with a few challenges with this one.  Over at The Cat's Pajamas, the challenge is Winter Holiday.  At Simon Says Stamp, the challenge is All That Glitters is Gold.  Double Trouble is having a Christmas/Holiday Challenge and they are collaborating with Try Stampin' on Tuesday's Tic Tac Toe Challenge!  AND this month I'm playing along as often as I can with the 30 Day Coloring Challenge over at The Daily Marker.  Don't get me wrong... I color almost every day... but sometimes I forget to share...lol!  And this one actually took me 3 days...lol! And I made this card for all five challenges!

I started with that beautiful plaid from last year's PhotoPlay Mad4Plaid Christmas paper.  One of my fave holiday packs!  I made my base 4 1/2 x 4 1/2.  The next layer is the plaid at 4 1/4 x 4 1/4 (It really is slightly smaller because the paper I used had already had a cut out of it...lol) and then I used a CDD Inside Scalloped Square as a frame.  Originally I was going to fill in the center with white, but I decided to display my plaid proudly!  I used an old CTMH bow die for my presents and some standard rectangular dies for the presents.


I started my coloring with this too sweet little pup!!  I LOVE this image from The Cats Pajamas!!  It's from the Whee stamp set... Such an adorable set!  I actually colored him up when I met Kathy at the Road Trip event at Our Creative Escape in Goodyear, AZ.  He's been sitting and waiting patiently for his turn on a card and I knew I wanted to use him on a Christmas Card but wasn't sure how I'd do that!


And then I had a Shopping Day with my mom at the last stamp show in Mesa and we were wandering around the Our Daily Bread Designs booth and I saw this beautiful Jingle Bells stamp set and just knew it would be perfect for all kinds of Christmas cards!  And when I decided it was time to get my little sleepy pupper on a card, my eyes landed on these beautiful bells and knew exactly what I would do!  I stamped and started coloring the branches and bow one morning and then it sat until I went to a crop today where I finished it up by coloring the bells.  I wanted to add some glitter to them initially, but it covered all of the gorgeous detail up so I wiped it off quickly and settled on just some liquid glass.  Love how they turned out!


And I maybe didn't know exactly what i wanted to do because I got it all done and realized I needed a sentiment... and then my eyes fell upon the Sunny Studios Alpaca Holiday Stamps that I ordered recently over at Simon Says Stamp and that sentiment looked me square in the face and said... Me!   I heat embossed it in white on black cardstock and cut them down into banners (thank you Mom for the Pigment Ink... since I forgot mine... and thank you Jean for the heat gun... since I forgot mine...lol!  A whole box of embossing powders... and no Versamark or Heat Gun.. yup... I'm a genius!) Lastly, added a few gold sparkly embellishments and I was done!


So there it is!  Winter Holiday for TCP and Double Trouble (and did you see Tracy??  I used the twist with my hanging bells!); Gold Glittery goodness for Simon Says Stamp; plaid, red and stamping for Try Stampin' on Tuesday; and three days of coloring for Kathy Racoosin!

Thanks so much for coming by... I'd be lying if I said this one wouldn't be hard to send away... I just LOVE that pup so much!!!  But it will be sent off (probably late) to someone I think might enjoy and love it as much as I do.

See you soon!!


Friday, November 16, 2018

Let Me Sing You The Song Of My People!


So happy to see you today!  Today I'm sharing a card I made because I've been wanting this Waffle Flower Flora Cat Play stamp set for a loooong time, but kept denying myself because... I'm a dog person... not a cat person (although I love all creatures great and small).. and I don't need it... but it's so sweet!  And then I was at the stamp show in Mesa and there it was.. and what better reason to buy it than it found me!  And all of the dies were on sale so I bought this cool Moon & Stars Panel Die... I mean... the girls were very persuasive... they said "All dies are on sale."  And I said... I'll take it!  I mean... relentless, right?


I mean this sweet kitty cat!  With her sweet little mouse friend!  I don't know why I made myself wait so long!  I chose the music embossing folder for the backdrop because I felt this kitty looks like she might be humming something that makes her happy... and those stars dropping from the top of the frame... I chose some gold glitter paper because... well... I love it!

I cut this panel three times and layered them for a little dimension.  The bar of hanging stars is separate and I just tucked it in under the top edge.


And I won't tell you how long I wanted this Celebrate die from MFT!  Everytime I'd go to order it was sold out... because it is awesome!  It's a fantastic size and the font is beautiful!  I cut it once in gold glitter paper and a couple times from cardstock, layered them, and then attached it so it was laying on top of the bottom rectangle... speaking of gold, I'm playing along over at Simon Says Stamp's Wednesday Challenge which is All That Glitters is Gold!  I'm also playing along with the Glitter Challenge over at Try Stampin' on Tuesday!


That's me for today!  Hope you enjoyed your stop and you'll come back soon!