Friday, March 30, 2018

Coffee Loving Collaboration Hop With A2Z!

The Coffee Loving Cardmakers Design Team is so excited to be collaborating with the A2Z Scrapbooking Design Team!  Be sure to visit all of the blogs in the hop for chances to win a couple free digital sets!  Wait until you see all of the awesomeness we have in store for you!  And A2Z is launching a new line of digital stamps and there is a rafflecopter drawing to win the entire new set!  Be sure to stop at the A2Z Blog to enter this drawing!

 I'll be sharing some projects today using a couple Hero Arts Digital stamp sets and one of the brand new A2Z Digi sets.. both are available in the A2Z Etsy Shop now!  Here's what I've created for your viewing pleasure:


It was a lot of fun to play with the Hero Arts Kitchen Silhouettes Digital Kit!  There are images, backgrounds, brushes and a few extras included in this kit.  For this card, I created most of my scene in Word before I printed.  I chose a couple of the colored images (the coffee pot and the cookie jar) and layered them one in front of the other.  You could make the jar a little smaller and it's a sugar jar!  But I decided that it was a cookie jar.


Then I took one of the sentiments from the A2Z Hug In A Mug digi set and layered it over the coffee jar.  I left enough room around my images so that I could die cut the scene after I printed it and have it be my base.  I chose the cup image in gray and layered the spoon over that; printed and cut them out and popped them up over the pot for just a little bit of dimension.  A couple sequins and a little baker's twine and this baby was done!  So easy!


You didn't think you were gonna get out of here without a little bit of foil did you?  I mean... these are digis and I printed them on my laser... of course I was going to do some foiling!  I decided to print this cool background onto some woodgrain design paper instead of just plain cardstock.  Then I ran it through my Misti with some sparkly red foil and I LOVE the way it looks!


I printed a few of these sentiments from the Hug In A Mug set in a few different sizes leaving room around them for die cutting and chose this one for this card.

I don't know if you know this, but when you use foil on something, you are left with a sheet of foil with negative space on it.  And you can buy toner paper that you can then use that leftover sheet with the negative spaces and run it through on some of the toner paper and the foil that's left sticks to the paper ... sooooo... I did this:


After I foiled the piece of toner paper, I die cut the top layer banner on this one from it.  I created a shaped card using the larger banner by folding a piece of black cardstock in half and placing the banner die so that the top cut was just above the fold (so it wasn't touching paper and didn't cut it).  Then I attached the foiled piece to that.  It's a fun and easy way to make a shaped card!


And another really cute sentiment from the Hug In A Mug set!


For my final card for today, I printed a background from the Hero Arts Artistic Circles Digital Kit on white cardstock on my laser and guess what I did...lol!  Um... foiled it?  This time I foiled it in gold and then used some Spun Sugar and Picked Raspberry distress inks to add some color.  When I was done blending the inks, I splattered some water to add a little bit of texture.


I added one of the single stamps from the Artistic Circles set to the mug from the Hug In A Mug set before I printed it out.  I colored it in with my copics and cut it out, popped it up and used another awesome sentiment from the Hug In A Mug set... flowers and sparkly Doodlebug Sprinkles and done!

I'm entering this one into the Outlawz Twisted Thursday Anything Goes Challenge with a twist of Anything Goes!  Can't get any better than that!

Hope you enjoyed your visit here!  Be sure to visit everyone and leave us some love for chances to win a couple free sets!  You have until April 5th to comment and the winner will be announced on April 7th.  Check out all of the details on the A2Z blog!  Here is the complete list for this hop:

Lisa Bzibziak  (You Are Here!) 
Dana Gong   

Thanks for stopping to see me! Come back soon!


Tuesday, March 27, 2018

Papertrey Ink Make It Monday #316: Stenciled Edges


Back with some more Papertrey Ink from my new haul!  When I went to see who the random winners were for the Monthly Challenge (not me-frowny face...lol) I saw that there is a challenge each Monday and I had some time and some leftover cuts that weren't used on my last project so thought I'd see if I could put a quick one together for the Make It Monday #316 Stenciled Edges challenge.  To be honest, I only used one of the leftover items...lol!  I remembered I had also gotten this cool Edgers #2 die set (that pretty pink vellum piece was cut using the smaller of the two that are included in this set) and wanted to use it.


The challenge for this Monday was to use stenciling on the edges of your piece.  I used a Tim Holtz Lace stencil and inked it with some Spun Sugar Distress Ink.  I wanted it to be a bit brighter and thought I'd try sprinkling a little Colorburst over it and then spray a little bit of water.  Some of the edges ran together a bit, but I don't mind... I love the deeper color it gave and the variation.

So the white inside stitched piece was my leftover and I cut a new large outside frame using the Fun Frames dies. so now I have some more leftover pieces to use...lol!!  Always happens!


I mirrored the stenciling on the base paper layer as well and did originally try some colorbursts on that one, but the color ran too much and it ended up looking like a blob, so I decided to cover that part up with some pretty flowers and that ribbon that had fallen off of something I had gotten long ago and since it was something that would be used up I didn't put it back on that item, but saved it to use in the future and it was perfect for this.  I love the lighter stenciling that still shows on the background piece.

I added a splattering of tiny Nuvo drops in white, pink and dark pink along with a few glitter drops and some sequins to finish it off.

That's it for me today!  Hope you enjoyed it and if you want to play along with this one you have about 5 days left from today!  You have to use one Papertrey Ink product and you must have stenciled edges on your piece.  Thanks for stopping!  Come back soon!

Sunday, March 25, 2018

Papertrey Ink March Blog Hop Challenge


So excited to be participating for my first time ever in the Papertrey Ink Blog Hop!  I placed my very first order last month during the Anniversary celebration and boy was I not disappointed!  Loving all the beautiful products that came to live at my house!  So here is the inspiration photo for this month's hop:


Um... Gorgeous much?  And here is how I was inspired:


As always, I was inspired by the colors.   The pink, the yellow, the white and that beautiful "nest" that holds the bouquet of flowers.  I love the blue hue created by the soft light coming in the window so I added a little bit of blue but not as much as I originally planned...just a little in the butterflies on my Crate design paper.  And I also felt the cup with the steam mimics the flowers come out of the base.

I knew I needed one of these beautiful Cover Plate Dies and I chose this Twist pattern and I LOVE it!  I cut it in white and placed it over a piece of the design paper that had a soft pink watercolored look to it.


And of course I had to get a couple of the coffee related items... this What The Doodle Tea Time set (mine has coffee in it) has been on my list since I saw a card on Amy's blog I've been filling up carts that include these stamps and dies and abandoning them.  So I finally did it!  There was a sale and I ordered enough to get free shipping and how could I not?

The tricky part for me with this set was die-cutting the steam.  It is so intricate, but what I ended up doing was die cutting the steam first.  Then I took both the negative space and the diecut over to my Misti.  Then I placed some temporary adhesive on the negative space and die cut and stuck them both down together with my diecut piece inside the negative space.  Having the negative space surrounding the die cut helped me to place my stamp set over the die cut just right.  I stamped it with versamark, added the powder, and then took the whole piece of paper out of the misti and over to my heating tool and heated it up while it was all still on the paper.  I needed to do the die cut first because if I stamped first, when I'd run it through my Big Shot, the embossing powder would crack and come off in some spots so this worked best for me.  But there is a similar way to stamp first and then die cut by using a negative space cut out to line your die up on the paper.   If I can ever find the video on it, I'll link it up here.  It was so worth the extra couple minutes to line it up because I LOVE the way the die cut steam looks and this will help with a few other dies I have that I've had a similar struggle with.


Another awesome die I knew I needed is the Fun Frames!  These are such a pretty shape and there are two in the set.  I love that the frame and inside are cut separately so you can mix and match your papers or leave them both the same.  Here I cut two and used the pretty Butterfly paper on the inside with just a plain white outer frame.  Love all the stitching on these too.  So pretty!  I cut a few of the butterflies out of the paper so I could pop them up and use them as embellishments.  Of course I needed some flowers in pink and white and added a few leaves die cut from kraft paper that were sitting on my desk and they were perfect to mimic the beautiful nest in the photo.


The What The Doodle Tea Time stamp set has a couple sentiments on it as well.  I cannot believe how inexpensive this set is!  Since there was black in the design paper, I decided to cut my CDD banner in black and heat embossed this sentiment on the set in white.  A few more flowers and a couple sequins and done!

I'm also playing along with this week's Outlawz Twisted Thursday Challenge... the twist is Seasons.

I was so happy I signed up for the PTI newsletter so I got a sneak peek of the inspiration photo for today's hop.  Life is so busy especially now during tax season that I may not have been able to play along had I not.  I am loving my new stuff and still have a few items left to crack open so you'll be seeing those soon!  Oh... and I've already started a new Wishlist...lol! #AMYMADEMEBUYIT ... cause she did!


Saturday, March 24, 2018

About as CAS as I Get!


So, when I saw on the Winnie & Walter Blog they were sponsors for the AAA Cards CAS Game #111 I knew I wanted to (try) to play along for a chance to win a gift certificate and when Amy (you know... #AMYMADEMEBUYIT Amy) challenged me to try out the CASology Week 292 Challenge which has a Foil Cue Card (and Stamplorations is the Sponsor!) I decided to mash them together because, well, this really IS the biggest challenge for me... CAS.. and what was the chance I'd be able to do it twice???  (Not very good... she whispers).  Don't get me wrong!  I LOVE and can truly appreciate a beautiful CAS card... but when I'm creating, I have a switch in my crafty brain that doesn't usually turn off in time to create something CAS myself.  And I'm ok with that, because I also love lots of layers and embellishments and stuff.  When I stop at your place and tell you I LOVE what you did... I do because while I may have a creating preference, my viewing pleasure has no boundaries.. 


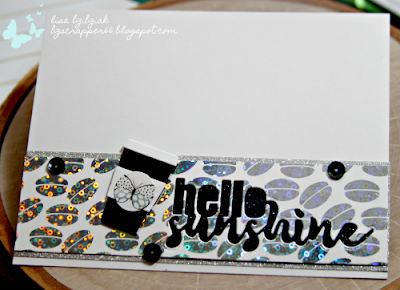
SO the AAA challenge is to use only one third of the card... I had foiled this awesome Coffee Bean Background from The Cutting Cafe a while ago and was just saving it for a future project... and I thought this would be perfect.  I challenged myself by using the silver instead of gold which is my usual go to.  The file comes with black coffee beans, brown coffee beans and just the outline (so you can color them whatever color you want).  Knowing I was going to foil these, I printed them on my laser in black and used some Gina K Silver Sequins foil.  LOVE that stuff because of all of the sparkle and the colors it picks up!  Then I cut the Hello Sunshine out of my strip of foiled print using a Stamplorations die.. one of my favorites!  I backed it with black glitter paper to make it stand out from all of the sparkle going on.


The coffee cup die is from CC Designs and it was the perfect size.   I cut the butterfly from some Crate paper and I added a couple sequins in black also to finish it off.  See how the foil is picking up all of those beautiful colors??  LOVE it!

Thanks for stopping and you'll be seeing those foiled coffee beans again soon... come back!  And be sure to check out these two challenges:


Friday, March 23, 2018

Get Your Happy On - Going Green with Cas-ual Fridays!


I LOVE it when I have a little time to do whatever I want in my craft room!  I decided to see what the challenge was over at Cas-ual Fridays and it was all about the green.  Then I checked out Simon Says Stamp Wednesday Challenge and it was a Floral Frenzy and this week the twist over at Outlawz is Seasons!  So this is what I came up with!  A pretty green flowery springy creation.

I started by using an old CC Designs panel die (no longer available) for the circle background.  I attached it to another piece of white cardstock and did some ink blending with distress inks and then squirted a little bit of Ken Oliver colorburst on it and sprayed with water.  Let dry.  (I HATE drying time)... but while that was drying I cut out my other pieces!


I pulled out the Friendly Flowers Fri-Dies again  and cut a whole bunch of sets all in white (I just left these flower dies attached and when I cut them I cut a whole bunch at once-if I have leftovers, I just store them for use on a later project... very little goes to waste!  I love all of the different combinations I can use to put my layered flowers together.  Then I took out my Casual Trees Fri-Dies to use as the leaves... cut little tiny leaves from some paper I'd watercolored quite some time ago for another project.  I LOVE these branches .. I cut them apart and placed them in a few spots.  Love how they look... kind of clover like.  


And since I'm in need of some birthday cards, I used this sentiment from the Whole Shebang sentiment set.

So there it is!  Three challenges in the books!  You should check them all out for sure!


Weirdos Are My People!


You may or may not have guessed this about me... but I can tend to be a bit of Weirdo... and yes.. I capitalized it because I love the word and I love the people who claim it... or even those who don't even realize they are included in the above category.  To some extent I think we're all Weirdos... some of us just don't know it.

So, if you are a self proclaimed Weirdo stand tall!   If you think you might be, but you're not sure.. you probably are.  And if you think you're definitely not... hopefully someday the lightbulb will turn on and you'll be ok with it.  Why don't you start with "Unique" and see how that feels.

  Weirdos are my people.  Normal is Boring!  (I don't even know what normal is any more).


Which leads me to one of my all time favorite stamp sets that I hadn't inked up until now.  It's from Brutus Monroe and it's called Be Unique.  I just love the adorable unique critters in their hipster doofus outfits.. easy and fun to color up!

The papers are from CTMH and the polaroid die is from A Jillian Vance Design.


And that sentiment!  It paired wonderfully with the Hey die from L'il Inker Designs Hey Foxy Die set.

This one was fun!  Loved using all the bright colors and fun patterns along with the black... makes my Unique heart happy!

Thanks for stopping!  Lots going on here lately so come back soon!

Wednesday, March 21, 2018

Caffeine Fueled Paper Play with Paper Smooches


I'm up on the Coffee Loving Cardmakers Blog today and playing along with this month's Paper Smooches Sketch Challenge!  Hope you'll hop on over there for the details!  Here's a sneak peek of one of my two projects!


Cutting Cafe Inspiration - Custom Word Shaped Cards


Welcome to some Cutting Cafe Inspiration!  This time around we're playing with some custom Word Shaped Cards... and well, of course you know what word I requested!  For my first one I used these pretty Authentique papers....along with some pretty flowers and sequins.


We chose our word and then two sentiments to go along with it... I chose to incorporate the word from the card into the sentiments... 


Here I cut out a COFFEE pot and a COFFEE cup from the paper to use as embellishments... (they are NOT teacups...lol!)


For my second I used this cool paper from a Multi Craft Coffee Time packet that I got at my LSS.  And I had these adorable stickers from Doodlebug to embellish... this sentiment is "If you bring me COFFEE" ... 


I did print the other part of the sentiment but then these Doodlebug stickers had this one on it, so I opted to use it instead... cute, right??

So thanks for stopping!  If you could have any word made into a shaped card, what would it be???  Check out what everyone else created over at the Cutting Cafe Blog and comment there for a chance to win!


Sunday, March 18, 2018

Happy Birthday From Howl Of Us!


So lucky to be able to attend a crop yesterday with some of my best crafty girlfriends and took the opportunity to ink up some images I hadn't yet, but have been dying to!  Also, I just don't have enough plain old birthday cards!  So the first one I pulled out was this adorable image from Little Acres Creations From The Pack Stamp Set.

I started with these design papers from CTMH (I'm not sure which paper packs they are from) but I knew I wanted that subtle cloudy background.


It was fun to color in these cuties belting out a soulful tune to the recipient!  I cut them out and popped them up on the background.  I also added a couple of the music notes included in the set.


The From All Of Us part of the sentiment is a stamp from the set also, but I used an  Impression Obsession die for the Happy Birthday and love the way it turned out cut from glitter paper.  I decided on the baker's twine to cover up a smudge in the top left corner...lol... how many of my crafty decisions are made.  I'm often trying to cover up some goof or another.  Then I felt like just a few of my favorite CDD sequins were all that was needed to finish it off.  A little simple for me, but I love it!

Thanks for stopping and hope you enjoyed it!  Stop again soon!


Friday, March 16, 2018

Some Inspiration From My Teamie and Stamplorations


Quick post today!  I wanted to play along with my Teamie from the Coffee Loving Cardmaker's Inspiration Challenge that's up on the Coffee Loving Cardmaker's Blog!  Here is the inspiration photo:


I decided not to make it a St. Patrick's Day theme, however, I did pick up on the greens and white and Springlike feeling of the photo.  Of course, I needed to add some other colors as well.  I was lucky because yesterday in my mailbox was my order from Stamplorations!  And what was inside was perfect for today's project.  These new Cover Plate dies are quite awesome!  It made for a really quick card with not too much else to do.
  

And this beautiful cup and rose are from Stamplorations also, and I used one of my favorite sentiment sets from Stamplorations by Becca Cruger, Strong Women.  I added the small gold butterfly that I cut using a Memory Box die.  A few gems and this one is done.

Hope you'll be inspired and link up to Lauren's Inspiration Challenge!

I'm also playing along with the Stamplorations March Challenge to create something that feels Spring or Faith (or both!) and the Outlawz Twisted Thursday Tic Tac Toe Challenge!   and this time I'm playing along the right edge, Wet or Dry Embossing, Shade of Green and Polka Dots!  You should check it out!


Paper Sweeties March 2018 Blast From The Past-Day 3


Welcome to Day 3 of Paper Sweeties Blast From The Past March 2018 Edition!  Today I'm using some images from the Hippity Hoppity Easter stamp and die sets!

This time I used some Oval Scallop Frames for my backdrop.  I had these in a baggy full of extras from another time when I used the other pieces parts from this diecut.  I love that the centers cut out of these dies so you can use them together or separate and you can make the inside and outside different or the same!


I love this birdie from Hippity Hoppity Easter!  I've made her a Cardinal, a Robin and now a little Easter chick!  She can be anything you want her to be!  And love the sweet stripey flowers and pretty stems in the set.  


And this pretty sentiment from the Kindness Matters stamp set was heat embossed in green directly onto the vellum background.

Thanks for stopping again and hope you've enjoyed our blasts from the pasts!  Be sure to hop around and check out all of today's makes!