Tuesday, May 31, 2016

Paper Sweeties Inspiration Challenge - June 2016


Welcome to the June 2016 Paper Sweets Inspiration Challenge!  Here is the inspiration photo:

 
So pretty!!  Love these colors!!  They were my inspiration... as is usually the case...lol!  And here is what I've created for you today:
 
 
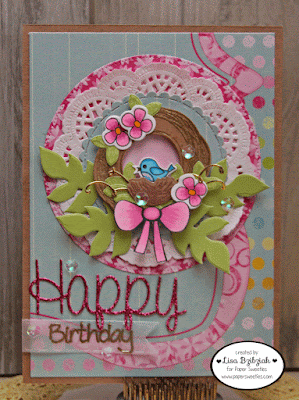
I decided to pull out the wreath from April's Release set Hello Spring.  I knew it would be perfect with this color scheme.  I'm also linking up to the Classic Design Team Challenge for June... it's Anything Goes and you just need to be on any Design Team!  Lots of fun... you should check it out!

 
I stamped the wreath onto kraft paper with a brown ink and then stamped again in Versamark but offset it just a bit because I wanted the brown to show also and embossed in gold.  I love the way it came out.  I cut it out using the Hello Spring Sweet Cuts.  The large leaf sprays are from the Bee Happy Sweet Cuts (I just love to use these leaves as additions to so many cards).  The sweet little flowers and small leaves are also from Hello Spring and do you see the little curli-Q's from last month's Sweet Borders?  Still loving those of course!  And you're looking at a little bit of a sneak peek here .. the little birdie and nest?... perfect with the wreath, right?

 
  I used one of my favorite sentiment sets, the Happy Sweet Cuts and stamp set and that pretty stitched banner that I cut out of vellum is from last month's Sweet Borders as well.  I guess I managed to squeeze a lot of my favorites, old and new on this one!  And of course a few Paper Sweeties cupped flower shaped sequins to finish it off.
 
Thanks so much for stopping by today and please don't forget to hop on over to see what the rest of the Design Team has in store for you today: 

Beth Luetschwager --WELCOME TO THE TEAM!  
Debbie Marcinkiewicz – Paper Sweeties
Jinny Newlin - *June Guest Designer* 
June Guest Designer: Tracey Kelly


A Purple Tribute With A Far Away Friend

 
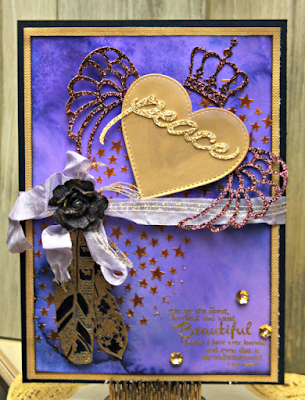
Yes... this is purple... the only black on this photo is the card base... however, I could not get my picture to be true to the color and my Photoshop has decided to blow up on me so I couldn't correct it.  50 Photos later.... we're back to a royal blue at best.  Well... at least it's Royal....   I'm linking up to the Stamplorations Mixed Media Challenge as well as the Monthly Challenge Theme Anything Goes and the Never Ending Anything Goes Challenge.
 
 
When Prince passed away a little over a month ago, my friend Mitra, who actually lives back in New York not too far from where I used to live, and who I didn't "meet" until this last year when I ventured to ask her how she had made something and she so wonderfully (and as I found out not at all out of character) made up a little tutorial for me AND mailed me her little "sample" along with some other goodies... where was I?  Oh yeah... so we talked about both creating something purple in tribute to him.  When Purple Rain came out, I was a teenager and I saw it in the theaters 5 times.  I LOVED Prince ... he was all over the walls of my bedroom... he was a beautiful man inside and out... and the news of his death made me sad.  These days I only listen to his music now and again when I come across it on the radio, but when that happens I turn it up really loud and sing along (as long as no one else is around) and just enjoy.
 
 
Sigh... that flower is purple and the feathers are gold and purple... not black.. I'm going to try to get some new pics in the daylight in the morning to see if they come true.  Love these feathers from Stamplorations.. they are from the Trendy Feathers 2 set!  They were perfect because the one has some music notes on it and the other is kind of floral and reminds me of something Prince might wear... memories of a brocade jacket or pants (or both).  So happy I decided on these feathers... I think I'll be using them a lot.

 
And here's another awesome stamp set I got over at Stamplorations... it's another Becca Cruger creation called Strong Women and it's full of awesomely inspiring sentiments and I thought this one was appropriate... I didn't want it to be a sad piece.. he was a good man who passed in a sad way, but he filled the world with so much beauty and happiness while he was here... that's the feeling I wanted.
 
 
So I haven't even talked about the Ken Oliver Colorburst Powders, Liquid Metals, Gold Texture Paste....lol... I guess that's not what this is about, but maybe if I can get some better pics I'll come back around to this at a later date.
 
Thanks for stopping by and hope you enjoyed my tribute and please do check out Mitra's Rock Star Creation.  I've seen it and IT IS wonderful as all of her makes are....
 

Monday, May 30, 2016

Atlantic Hearts Sketch Challenge #162

 
Welcome to this week's Atlantic Hearts Sketch Challenge!  I have to say... this one almost got away from me.  I had so many plans for this weekend and my computer decided to start giving me problems so I spent a good part of today that I intended to use for creating uninstalling and reinstalling and manually uninstalling Photoshop and being quite unsuccessful and finally giving up and finishing what I NEEDED to get done today and using Pic Monkey to edit my photos.. which has been a challenge in itself...not figuring out how to use it, but again...computer issues.
 
So here it is!  I was able to create this in half an hour... yes.. me.. half an hour!!  Thanks to this awesome CTMH Calypso paper and complements... no stamping.. oh wait... Ink Blot behind the drink... but that's it!   I like it and I'm kind of proud of myself.  I CAN do it when I need to... but... the next card... not so much...but that's for later!
 
 
All of these images including the sentiment are from the Complements.  I used a pre-cut frame from my stash that was cut with Mom's Pretty Pink Posh die.  Those pretty sequins are from the Florence sequin pack... I didn't want to spend 15 more minutes trying to figure out where my Calypso ones were so I liked these rose gold ones... I used them.
 
So please do check out the great artwork over at Atlantic Hearts and make this week the week you play along with us!
 
http://atlanticheartschallenge.blogspot.com/


Sunday, May 29, 2016

Craftin Desert Divas Linky Party Create A Scene Week 2!

 
Welcome to this week's Crafting Desert Divas Linky Party! The theme for this Linky Party at Craftin Desert Divas is “Create A Scene”!  Please play along and create something that fits this week's theme and link up at the Craftin' Desert Diva’s Blog.

Every other Monday is the beginning of a new semi-weekly Linky Party over at the CDD blog. We hope you will share your projects with us! And there are prizes! Every Linky Party will have a winner and a Top 3!  The more times you link up…the more chances you have to win!
 
Here is my project for this week's party (links to the CDD products I've used are at the bottom of the post):

 
This week I used one of the adorable new digis available in the CDD shop, Bee Little Bear.  There is a whole series of these cuties available now in the shop and they are all adorable!  You should check them out for sure!


 Isn't she a cutie??  I colored her with my Copics and texturized her with some Blending Solution and an old terry cloth washcloth.  I added a bit more color with some dots and some chalk for blush.  I also added just a slight bit of green with some watercolor... very careful not to interfere with the alcohol markers.  I wanted to use my waterbrush filled with alcohol and my Copics, but I couldn't find my waterbrush filled with alcohol...lol!  So we'll talk about that again in the future.

 
 I used the Build A Scene 2 stamp set for the pond, the background flowers, and the fish... which I colored ever so lightly because after all he's underwater!  The cute yellow bird is from Home Sweet Home clear stamp set which is one of my favorite go to's for nature, flowers, etc... I don't know what I'd do without it!  Oh!  And my background hills... I used the Outdoor Landscapes dies as a template and just traced along the lines with my black Multiliner pen.

 
 And then for the sentiment I used the Wishful Thoughts Die Set to cut out the word Big in glitter paper and the Wishful Thoughts Stamp set to emboss the word Hugs onto my banner from the Flag Banner Dies (this die has fishtails on both ends, but I needed to cut it down so I added the cut off end as another banner).  The clouds are from The Sky's The Limit dies and the background is none other than Fancy Frames.  I used the same technique on this one as my last for the sky, except this time I didn't texturize it... I like it both ways...I think this card had so much going on it called for a "quieter" background.
 
So thanks for stopping by and don't forget to check out what the other Design Team members have created for this week's Linky Party and play along!  There are prizes to be won!
 
Here are the links t the CDD Products I Used:
 
Build A Scene 2 Clear Stamp Set http://craftindesertdivas.com/build-a-scene-2/
Home Sweet Home Clear Stamp Set http://craftindesertdivas.com/home-sweet-home/
Wishful Thoughts Clear Stamp Set http://craftindesertdivas.com/wishful-thoughts/

Saturday, May 28, 2016

Step Cards and Elisha Jean and Friends

 
Back again with another card using the new Elisha Jean and Friends stamp set from The Cutting Café Shop!  This time I used one of the awesome Step Card Templates and Birthday Fun Printable Stamp Set.  Be sure to stop over at The Cutting Café Shop for the special Memorial Weekend sale going on... 25% OFF!!!!  Be there and don't be square!
 
 
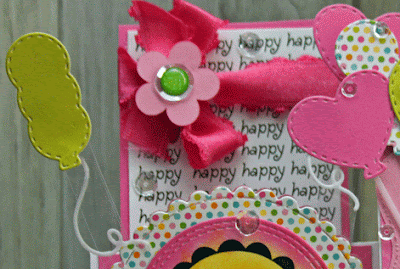
That adorable "happy" print is from the Birthday set (and there's a little leftover flower from my cake the other day).  I also used the oh so wonderful Clear Cardstock to suspend a couple of fly away balloons... LOVE that stuff!

 
This cutie is Mikala Ann from the Elisha Jeans and Friends stamp set.  And the adorable papers I used are from the Doodlebug Spring Garden paper pad.

 
This cute pup is from the digital stamp set Animal and Bug Love.

 
And the Happy Birthday Circle and the birthday hats are both from the Birthday printable stamp set... there are lots of other images with this set and I printed them all so you'll be seeing them again soon.
 
Thanks for stopping and don't forget to come back soon!


Tuesday, May 24, 2016

Adorable New Digis From CDD and Masking

 
Quick post today!  There are bunches of new adorable digis over at the Craftin Desert Divas Shop!  This Bunny Heart Balloon Digi is one of them. I also got a chance to use some new techniques with my alcohol markers that I learned at Bootcamp.  All of the products I've used and links are at the bottom of this post.
 
I'm playing along with Ellibelle's Critters & Creatures Linky Party.. it's always Anything Goes with a Critter or Creature!  Some cute stuff over there... check it out!
 
For the background I just used the markers and swiped on varying shades of blue and added some streaks of the darker into the next lighter shade.  Then I took some blending solution and applied it to a piece of burlap and held it on the colored area for three seconds in each section until it was covered.  The alcohol left the pattern of the burlap in the ink because it pushed away the color in the areas it touched.  It didn't turn out quite like I'd hoped so I then added another layer of the lightest over the whole thing and finally decided it was "good enough".  I'll try something different next time, but the texture looks kind of cool I think.. not your traditional sky look, but that's ok ... I don't remember the last time I saw a bunny flying around in a heart balloon anyway!... LOL!

 
You may be wondering how I painted that sky without getting the little hearts and birdie on the paper blue.  When I printed this one I knew I'd want to cut out the main image, but I didn't want to cut out all of the little images so I applied some masking fluid to those and once that was dry I colored the background.  Then I lifted up the masking fluid which turns into a gummy kind of texture easy to pick up with one of those little gummy adhesive remover squares and I found that once you start it it's best to peel the rest with your fingers so you don't rip the paper under it.  Then I colored in the little images how I wanted them.  I added a little extra blue to the clouds for some added interest...then I colored and cut out the bunny and heart separately so I could use skinny popup tape on the heart and a little higher for the bunny.
 
And notice the furry texture on the bunny?  That was with the blending solution (you can also use 70% alcohol which is much cheaper) and a terry cloth washcloth.  THIS I loved!

 
I also used the awesome new Flag Banner Dies ... the sentiment is from another Butterfly Birthday digi and I was able to print it separately and then I used the dies to cut it out.  They are so cool because two of them are scored so that you can bend and fold it and it's very dimensional... they literally pop out at you!!  LOVE!
 
Thanks for stopping by and come again soon! 
 

Monday, May 23, 2016

Atlantic Hearts Sketch Challenge #161

 
Welcome to this week's Atlantic Hearts Sketch Challenge!  I'm also playing along with the Color My Heart Color Dare Challenge this week with all of the glorious blues!  I stuck pretty well to our sketch this week (I think).  I wasn't sure about it at first, but when it all came together I was pretty happy with it.
 
I love the way the background die from the Craftin' Desert Divas Fancy Frames had the stitching in it so it was easy to mimic the stitching on the sketch!  That really was an accident.. I just love these dies and threw it on there before I knew what was happening.  I was originally thinking I'd have to draw in my stitches because while I LOVE the look of real stitching, I don't have a sewing maching and I rarely have time to do it by hand. Then for the scallops I used the CDD Pocket Pieces Hello dies.  It was a little too short for the length on the longer side, but I just used two and hid the seam with my ribbon and flowers.
 
 
I do love the new CTMH sentiment set, Beyond Awesome so I'll apologize ahead of time for how often I'm going to be using it... so Sorry...Not Sorry... :)!  I stamped it right on the background with the Sapphire ink and then stamped the Awesome banner separately in Pacifica and cut it out and popped it up.  Then I colored in "You" with some alcohol ink and then used some alcohol and burlap to distress it... very cool technique I learned for texturizing at Copic Bootcamp and you'll be seeing this more soon along with a little more elaboration.
 
The cute little butterflies are from the CTMH Hello Sunshine set that is in the new Seasonal Expressions Idea Book... there is some A-dorable stuff in there!


I used a leftover ribbon piece that has been sitting around my desk and just happened to be the right size and color!  I get lucky like that sometimes.  I also used one of the bulk white crocheted flowers I got from Etsy and then I distressed a white paper flower in Crystal Blue and Pacifica and piled some sequins in the center.
 
So thanks for stopping and come again soon!  And don't forget to checkout these challenges and play along!

http://atlanticheartschallenge.blogspot.com/
 

Saturday, May 21, 2016

Elisha Jean and Embossing on Clear Cardstock

 
So, the last time I used the Clear Cardstock from The Cutting Café Shop, I made a promise to my bloggy friend, Becca (aka The Damsel of Distressed), that I would test out the whole heat embossing on it idea and I'm finally making good on that promise.  On a side note you should check out the awesomeness on her blog!
 
 I decided to make another card with the Elisha Jean and Friends stamp set from The Cutting Café Shop.  I'm playing along with the All About the Girl Challenge over at the Fantasy Stampers Challenge Blog.  This week's a fun girlie challenge and since it's a Stampers Challenge you do need to use a stamped image on your project and not just a digital image... you should check it out!

 
I made a little band to slip over the card to keep it closed since I used some bumpy items on the inside. 
 
 
I heat embossed the Hugs and Kisses on the Clear Cardstock.  My only "problem" on my first try was the cardstock was static-y so a lot of extra powder stuck to it.  I just brushed off the bits easy to brush off without ruining the image and I let the rest stay... I never mind a little bit of "extra" anything on my projects.  I was careful not to hold the heat too close and I moved it around a bit and it worked like a charm!  The cardstock didn't "warp" any more than my regular cardstock ever does so I placed my acrylic blocks on it strategically while I ate my dinner and when I came back it was all ready to finish.
 
 
This is the front of the card without the band on it... isn't Elisha Jean just the cutest in her pretty little ladybug dress I stamped and cut out using a sheet of Doodlebug paper from the Spring Garden pack I got from the Cutting Café Shop?  The pretty pink die cut on the inside of the card that the sentiment rests on is the backside of that paper.  And that cute dimensional flower at the top left corner is also available in the shop and is a Spring Flower Doodlepop from Doodlebug.
 
 
This is the inside of the card.  I used some of my pretty leftover flowers from the Cake Boxes I posted yesterday and stamped and embossed the rest of the sentiment right on the paper.  This time instead of making the whole card out of the clear cardstock I cut my pink cardstock 5 1/2 x 5 1/4 and then scored the 5 1/4 length at 1".  I folded it and creased it well and then attached a 5 1/2 x 4 1/4 sheet of clear cardstock to the inside of it.  I like this version because it was easier to score the regular cardstock and it lays much nicer.  I used a strip of the Doodlebug paper to cover the adhesive on the inside where I attached the clear cardstock piece.
 
 
Isn't she just the cutest?  This time I used a little chalk on her cheeks for a little blush instead of the markers and I like the way it worked out much better.  I also learned last week from another Cutting Café Design Team member that she uses regular blush!  I didn't have any so I tried the chalk (that idea came from Regina).  And hey!  Becca!  Yes!  You CAN emboss on this stuff.
 
If you'd like to see a video about the clear cardstock you can go here.
 
Anywho!  Thanks for stopping by and don't forget to come again on Monday for Atlantic Hearts!  Happy Creating!

Friday, May 20, 2016

Cake Love With the Cutting Cafe'!

http://thecuttingcafe.typepad.com/the_cutting_cafe/2016/03/3-tier-cake-box-template-and-cutting-file.html
 
So if you know me... you know I love cake... cake and pizza... my two food vices ... and this week's project over at the Cutting Café is all about cake!!  Cake, Cake, Beautiful Cake!  Here is mine:
 

So... I'll be honest.. I've been working away at this week's project ... going along... almost finished... just pics and a post... and then realized Wednesday night that I was working on the wrong project!!!  So I had to switch gears and I was a little worried about making this 3 Tier Cake Box because I thought how am I ever going to get it done in time??

I'm also playing along with the Cupcake Inspiration Challenge this week... LOVE the colors in this challenge and they were perfect for my project!  AND I'm playing along with the Classic Design Team Open Challenge... it's Anything Goes and you just have to be a DT member anywhere in the world.  Lots of fun!
 
 
Let me tell you... this was such an easy project!  First of all... the cake is smaller than you think from looking at some pics but see the jars in the background... it's really quite petite so not so big an area to decorate.  Secondly... just import the files and cut!  And they are so easy to get together.  Regina has some great videos on the Cutting Café website and once your fingers figure out how to get one of these round box pieces together it just gets easier and easier!  When I started these it was only my second project with the round boxes (see my treat cup card here if you'd like) and it was easy peasy.  My friend, Mitra, likes to use little mini staples in a couple strategic locations when she starts to keep it all in place and make it even easier on herself so if I can find my mini stapler I might give that a try but either way... easy!  And you should see her gorgeous project here!  (Plus I have a supporting role in the post so... you know...but of course her knockout cake is the star of the show). 

There are three layers that you can cut (I made mine two layers) and a box to put it in not to mention decorations like the scallops and some of the flowers and more!  I also used the Layered Flower Set that I used recently on one of my Elisha Jean and Friends cards here.  I had created a file with a bunch of them in different sizes and saved it for quick cutting later.

 
My cake has a Paris theme because it's serving as a birthday "card" for a certain someone.  And I failed to take pics of it open but each of these layers has a top and bottom so you can open it up and put little stuff inside.  My gal wants cash so her cake will be filled with the green stuff... um... $1 bills of course... I'm no fat cat!  I cut the cute little Eiffel Tower and Paris lady on my Cricut.
 
 
I just love these flowers and I used some of my dies to cut the leaves and extras around it.  I distressed the flowers by inking the edges and then I added a little dry-brushed gold paint and curled them up a bit.  These ones have little stitches in the middle that make it really easy to kind of fold and pinch a bit to give them dimension.  Do you love my sequin frosting??
 
 
And Yvonne Yam would be proud of me because A. I used this pretty gold tassel (she loves tassels) and B. That pretty gold plate this cake is sitting on was a used clear plastic plate from last weekend's Copic Bootcamp (we'll talk more about this later) that I washed (of course) and then painted with the gold acrylic paint I used on the flowers.  She's the queen of upcycling and you should really checkout her blog here
 
So please do go to the Cutting Café Blog tomorrow (or right now if it's Saturday, May 21st or later) and check out all of the Design Team projects ... they are AWESOMELY beautiful!
 
Thanks so much for stopping and don't be a stranger... it's going to be a BZ weekend here!  Also don't forget to stop over at Cupcake Inspirations and Classic Design Team Open Challenge and check them out!

 
http://cupcakeinspirations.blogspot.com/2016/05/challenge-360.html


Monday, May 16, 2016

Atlantic Hearts Sketch Challenge #160

 
Welcome to this week's Atlantic Hearts Sketch Challenge!!  This is going to be a quick post!  Lots of things here that you've seen over the last few weeks all mashed up together... and yeah... a few new things!  I used this month's special paper pack from CTMH,  Happy Times because it is yummy!!  Love the pinks and oranges together.. and the woodgrain.... and the GOLD!  (well, of course I had to use them together... shush!)  I used those little Lori Whitlock doily dies again that I got recently, the beautiful heart doily from Paper Sweeties and I got some new leaf dies from Heartfelt creations with my gift certificate from the Coffee Lover's Blog Hop!  Which I might add the summer one is coming up soon....

 
Yes... my embossed vellum is wrinkly... but I don't care!!  Love it anyway.  I used the new awesomely awesome Beyond Awesome stamp set from Close to My Heart for the sentiment and I was in a hurry so I added some paper flowers and threw a little glitter glue from Bobunny around and around!

 
Some plain old white seam binding along with a delicious fabric heart from Fun Stampers Journey and did you catch those cute little Doubleclick Skittles?  And well.. of course I added some of the new squigglies from Paper Sweeties... why wouldn't I (she says with a furrowed brow, crooked lips and a shrug of the shoulders!).
 
I am also playing along with Artistic Inspirations Anything Goes Challenge (Twist is to use a diecut... I used one or two!  Check it out!
 
Thanks for stopping and be sure to stop over at Atlantic Hearts and please do play along!

http://atlanticheartschallenge.blogspot.com/

Sunday, May 15, 2016

Paper Sweeties May 2016 Release Rewind!

 
Welcome back for the Paper Sweeties Release Rewind where we like to show you how easily the new products play with the previously released goodies!  As you know I LOVE to play along with the Coffee Lovers Blog Hop so of course when the new coffee sets came out a couple months ago, I NEEDed to have them all.    It was so much fun to pair my *new* favorite dies from the Sweet Borders Sweet Cuts with the Coffee, Yes Please and But First, Coffee sets!
 
I'm also playing along with the Classic Design Team Challenge!  It's Anything Goes and if you are on a Design Team for any challenge around the world you can play along!

 
And I also managed to squeeze in the heart doily from the With Love Sweet Cuts not to mention some of my favorite flowers from the Party Time stamp set.  Don't you love the steam cut from vellum with the Coffee, Yes Please Sweet Cuts?

 
Well.... it's true.
 
A little crinkly Paper Sweeties seam binding ribbon and a few sequins and done!
 
Thanks for visiting me and please be sure to visit all of the Design Team members because they have some awesome projects to share with you:
 
Debbie Marcinkiewicz – Paper Sweeties
Jinny Newlin - *May Guest Designer* 

Don't be a stranger!!  And be sure to check out all of the new products!

Planner Series-Checklist


http://papersweeties.com/shop/all-products/sweet-cuts-sweet-borders/