

So... recently I participated in the Funkie Junkie 12 Tags of Christmas. Over a period of 12 weeks, Linda over at the Funkie Junkie revealed one tag a week, and we were to create something inspired by her tags. It could be a tag, a card, or anything else. My friend Mitra had been playing along for a few years and I don't think she ever made a tag...lol! You can check out her wrap up post here (I highly suggest you do!). She encouraged me to play along this year, and after she picked up an old golf ball display cabinet and transformed it into the beauty above, how could I refuse? Plus the thought of filling up all of those cubbies was exciting. (The jars in front were for her projects... like I said... check it out!) Now, you may notice, there are more than 12 cubbies here, so once the challenge was over, I still had some work to do! And you may or may not have believed I'd ever finish it... it's ok... I wasn't sure myself.. but over the New Years weekend I was "organizing" my room and in order to finish, I had to put away my boxes of all of the stuff I'd collected to finish this up and I knew if I did that, I wouldn't finish so I did it and yes, I did get the boxes put away :). Here's the finished project:

I hope you like it. I'm quite happy with it. I love each and every cubby and below I have some closeups. I did include individual photos of a few of the cubbies that weren't in the challenge, but not all... didn't want you to be here all day... I mean I do want you to be here all day... but you know... free will and all...lol!

The cubbies I finished up here are that pretty little coffee tray in the upper right hand corner and the little birdie nestled in amongst the holly leaves and pinecones.

The new cubbies here are again the coffee set, that cute little foxy fox, and a collection of vintage looking buttons, flowers, and a spool.

I still love that Peace, Love, Joy wooden piece that was one of my "tags". I placed a piece of acetate behind it and filled the cubby with silver bells.

These four cubbies were all post challenge. I realized as I was editing my photos I left a few gray hairs behind...lol! So sorry, but I left them as is here (I'll make sure they aren't still there before I put it away).

Here, I added that owl and the deer in the forest.

This Santa frame was another one of my favorite "tags"... and that cute squirrel is a new addition since the challenge ended.

There's that cutie pie squirrel, another cluster of vintage looking items with flowers.. and my argyle tree (that was a tag)... another favorite.

So here's my coffee cubby... you knew I'd have to put some in here right? I placed a crocheted doily on the bottom of the cubby and then glued the coffee set to the tray so it wouldn't keep falling down... adhered that in the cubby and then added the flowers. I think the only thing I may add in the future is something in the back there.. I thought a nice Victorian framed pic would be nice, but that one will have to roll around in my head for a bit. For now, it's finished. (Side note: you may think that is a tea set, however, in my house, it would have coffee in it..lol! So it's a coffee set!) If you come here often, you know I'm in a wonderful group called Coffee Loving Papercrafters on facebook. Our fearless leader Amy Tsuruta inspires me constantly with her awesome coffee cards and you should check out her blog her blog here! And while you're at it, check out the Coffee Loving Cardmakers Blog here! If you love coffee and crafting you'll adore both places.. if you just love beautiful cards and to be inspired, then still visit Amy's blog because there's lots more there too!

This one was fun to put together. I added another one of those cute little clay creations made by a co-workers daughter. She (the daughter) was going to throw them away!! But, my friend Jamie rescued them and they came to live with me. And the crocheted doilies... the large one in back was sent to me from my friend Tracey all the way from Australia! You should check out her blog here for sure.. it's one of my faves to visit! And the little one in the center was made by either me or my mom.. this was my way of spreading around that pink. I didn't want to do the same arrangement as the snowflake one, so I decided these items were perfect!

There's one of those pesky gray hairs!..lol! This wooden snowman was purchased on clearance last year. I made the conscious decision to leave him plain because I liked the simple look of it... and then glammed it up with some gold sparkly snowballs (aka pom poms). And next door... I got that sparkly house on clearance last year and rather than make a real house (I didn't have small enough items to put around it), I made it into a bird house and added those cardinals I found at a rummage sale. I let the liquid glass drip drop down the roof.. it's ice! To be honest, the first one was a mistake, but I loved the way it looked so I added more.

At the same rummage sale I got a baggy of these vintage looking buttons and charms and decided a couple cubbies with them "randomly strewn" were in order... (random = lots of time figuring out how to position them just right).

That bird is from Yvonne Yam (You'll want to check her blog out!)... I was happy to be able to put it here... and those holly leaves/berries are from Mitra... LOVE crafty happy mail and was so happy I knew exactly where both of these items were.
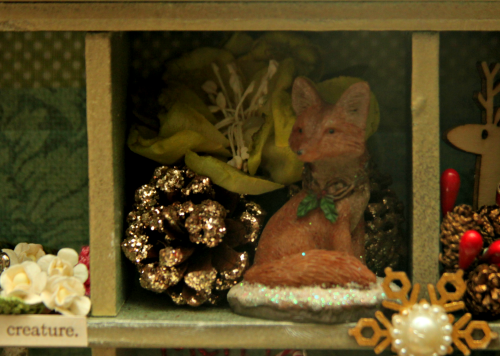
And this cutie pie fox, the owl, and the squirrel were in a pack I got on clearance last year as well along with those pretty gold glitter covered pinecones. And that pretty Petaloo flower I purchased at my LSS last week. It was perfect here and in the owl cubby.
I'll end here! I hope you enjoyed looking as much as I enjoyed making. I'll play along with the challenge again next year and I'm already rolling around ideas in my head! You should give it a go to! Sign up to get emails from the blog here so you know when it starts next year (You CAN make tags... you don't have to make a 3D piece) and you should also check out the shop here... many of the items I used in this piece were from there and/or are available there along with SO much more! And you'll want to sign up for email there too so you get notified of sales... there's always something going on over there!
Thanks for stopping and come back soon... lots going on here this month!

8 comments:
LISA! What a FABULOUS keepsake. All that time and love you poured into this gorgeous project certainly shows. AMAZING work.
OMG, I can spend hours gazing at your masterpiece. It's such a gorgeous project and something to cherish for many years to come. Maybe one day I'll attempt something as intricate as this. I'd have to start in January in order to get it finished by Christmas, lol. Love, love, love it!!!
Wow, Lisa! Just amazing to look at. I can't believe you were able to fill all those little boxes. I really would like to see this up close one day!
wow, Lisa, this is a great and fabulous job. So pretty and very complete the 12 cubbies
Absolutely amazing! A treasure!! Every little cubby, is chick full of goodness! It's a keepsake to be passed down!!! <3 I am in awe <3
I have loved watching you put this whole thing together Lisa. I made the tags but your box pulls it altogether so nicely. thanks as always for sharing.
This is beautiful! You have definitely created an heirloom to pass down to future generations. I MAY have to try something similar.
WOW! Lisa - It's stunningly BEAUTIFUL! I LOVE all the tiny details - it's a piece of art really! :)
Theresa
Post a Comment